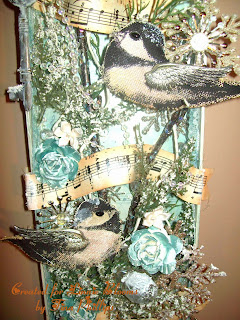
"WinterLand"
Wintertime in Indiana is like any other season in Indiana, You never know what you'll wake up to.. As a child, I remember I would wake up for school.. see snow and then listen to the local radio stations for news of school closings :D .. SNOW DAY!! Back to my cozy bed!! Later, I would stare out the windows, and muster up the nerve to go explore this "WinterLand" After 30 minutes of adding layers of clothes, scarfs, gloves, hats, boots.. I was ready.. Stepping out on the porch, a blast of frigid air instantly freezes my nose hairs.. BRRRR! Should I go back in?
Then I see it! The BEAUTY! This beautiful snow, so pure and white!! The trees are iced over creating a sparkling white and blue oasis.. I stand in AWE.. Thinking, just yesterday, there wasn't a flake on the ground.. The only sound to be heard, is the slight crackling of the ice on the trees, and a few sparrows singing.. After exploring the 7 acre farm.. I venture back into the house.. Strip off layer after layer of clothes, grab a cup of hot chocolate, and get cozy on the couch with my mama <3 .. These childhood memories inspired me to make this beautiful winter scene..
 The Base of my project is a chipboard box lid.. It was long and narrow, perfect for a scene such as this.. I painted it white, and added vintage music paper for a background.. Then I mixed up an icy blue color using my Folkart Metallic Paints (it's opaque and shiny).. I glued snowflake ornaments, iridescent beads and some lace onto my base.. After that I added pieces of different sprays (some snow covered, some glitter covered, some with crystals) to make my "tree branches" .. I placed painted roses (with the same icy blue paint mixture) a few white flowers, and then a broken small snowflake ornament I had.. I used the same vintage music paper and cut into 3 stripes to make banners, then wove them into the background.. I finished my background with a key on the right side.. <3 Perfect!
For the sparrows, I used the Linnie Blooms Bird Shapes.. and small Tim Holtz metal wings.. I painted both with Folkart Metallic paint in Champaign.. Then I added distress inks in Tea Dye and Wild Honey on the tail and underbelly of the birds.. Next I used a black sharpie to add details to the birds, then darkened them up with black paint and a liner brush... I also added black paint to the tips of their wings... Let them dry, then hot glued the wings to the bird canvas shapes..
Then I hot glued (i use hot glue for everything :D) the birds perched upon my branches..
 PERFECT!!! I had this project invisioned in my mind for a few weeks.. It turned out just like i imagined.. I was sooo happy to be able to create this for Linnie Blooms.. Every time I look at it, Im reminded of those beautiful cold mornings in my "Winterland" on the farm :) Thanks for reading my little story.. Hope you enjoyed!!
For a more detailed explanation on my project process, and more photos, you can view my facebook album.. <-- click here
You can find these adorable canvas birds as well as many other mixed media products here:
Linnie Blooms - by Linda Barutha
Facebook: http://www.facebook.com/LinnieBlooms
Pinterest: http://www.pinterest.com/lllcreate
Twitter: LLLCreate
Direct link to the online shop: http://linda-barutha.squarespace.com/shop/


Sharpie. . . ooh, I wondered how you got the detailed black onto the birds!! And excellent use of wings! Love.
ReplyDeleteSharpie. . . ooh, I wondered how you got the detailed black onto the birds!! And excellent use of wings! Love.
ReplyDelete