Showing posts with label Canvas Butterfly. Show all posts

Friday, March 6, 2015

SUNFLOWER GIFT BAG TAG

Hello Everyone!  I'm Beth Watson and I am so excited to be here on the Linnie Blooms blog sharing my first Design Team project. 

I met Linda this past January at the Craft and Hobby Association trade show where she was showcasing her line of pre-cut canvas shapes, stamps, masks and stencils and WOW was I blown away!  Such a great idea for mixed media and all of the work is done for you - GENIUS!  And what a great name for her company - Linnie Blooms!

I LOVE sunflowers, so I was immediately drawn to the sunflower mask and stencil.  When working in mixed media the concept of masks AND stencils is so very important, but a lot of companies don't get that!

Now, on to my project!


Start with the 5" by 5" Canvas Blank, the Bloom Stencil & Mask and some turquoise spray mist.  Place the mask down, spray then set aside to dry.
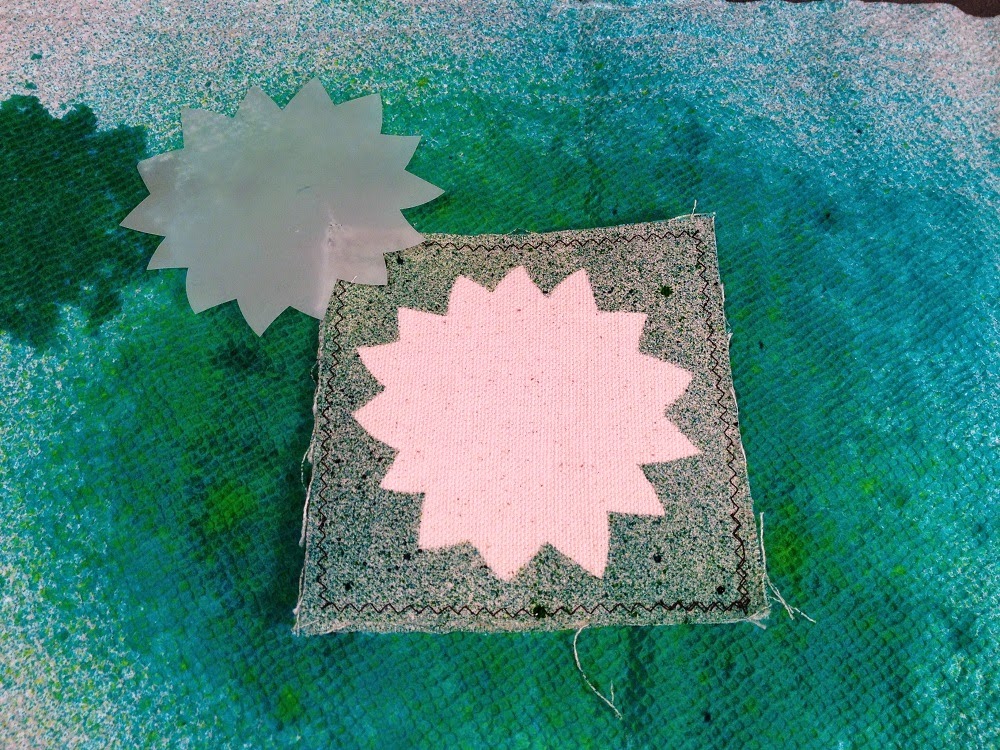

 Next, use the stencil and spray with yellow mist, set aside to dry.
TIP:  Use an old copy paper box lid lined with paper towels to spray with mists.  The box lid contains the spray and the paper towels absorb the extra mist which can be used for other mixed media projects, so nothing goes to waste!


Cut leaves from the Canvas Butterflies, then spray with lime green and grass green spray mists.  Make a few lighter and a few darker for contrast, then set aside to dry.

TIP:  The smaller canvas pieces will tend to curl when wet with mists, so once dry, iron them to straighten out.

Once dry and ironed, accent leaves by outlining with Tombow Dual Brush Pen in black (N15). 


Attach assorted black buttons to center of sunflower with Tombow MONO Aqua Multi Glue, let dry.  Accent flower petals and zig zag around edge with Tombow Dual Brush Pen in black (N15).


Decorate bag with Stitched Greetings Clear Stamp Set and black archival ink in a random pattern.  Accent with leaves created by coloring in the Bloom Stencil & Mask with Tombow Dual Brush Pens bright green (173), then outline in black (N15).


Mix leaves with loops of Shabby Trim in green and attach to sides of Canvas Blank with Tombow MONO Aqua Multi Glue, let dry.  Attach gift tag to top of bag with Mini Clothes Pins. 


Fill with a wonderful gift and give, give give!

Hop on over to the Linnie Blooms website to check out all of these great products AND like Linnie Blooms on Facebook for more inspiration!

Thanks for stopping by!  -Beth


Monday, August 18, 2014

August Designer Challenge~Quotes

Hi Friends! Abby here with ScrappinAbby and it's my turn to join in on this month's challenge "Create a project using a quote". Technically we're supposed to use our favorite quote but I really don't have a favorite...I have a lot that I really turn to depending on the mood or situation I'm going through. So the one I'm sharing today is more of a positive/gratitude quote. 

I created an art display piece that I already have displayed in my craft room...
I also have a short video that shows you the project up close along with the products I used...


 I altered a wood block using a combination of various craft paints...I wanted to match the green in the fabric I was using for the project...
While I was waiting for the block to dry, I started working on the butterfly canvas die. I am LOVING the new mixed stitch stamps Linda Barutha has designed so I wanted to incorporate them in my project...

 For the rest of the project I just used some sprays and crackle paint on the wood block and fabric to give it that shabby chic feel that I love so much and then I added the other elements...


 This was such a fun and easy project to create using the fabulous canvas pieces and stamps from Linnie Blooms. This would be a great gift for any occasion. 

Be sure to stop by the Linnie Blooms STORE and pick up some of the fun products so you can use them on your crafting projects. 

Thanks for stopping by the Linnie Blooms blog and for checking out another ScrappinAbby project. 

Happy Crafting!!

Wednesday, August 13, 2014

Thinking Of You

Hi Friends! Abby here with ScrappinAbby and I have a super fun & quick tag to share with you today using a couple of the Linnie Blooms Canvas Die pieces .


I used the butterfly canvas die piece to coordinate with the stamp and the smaller black butterflies. I played with some of my Gelatos and added a flower stamen to mimic the antenna and some black flat back pearls for the center of the butterfly. 

I had a partial piece of the flower canvas die left from another project so I tucked it behind my stamped tag. I really like how it turned out. 

This is a great quick and easy project that you can create to brighten someones day. You could leave it on their desk at work, pop it in the mail or attach it to a small gift or bottle of wine. 

Be sure to stop by the Linnie Blooms store and pick up some of these fun and fabulous canvas dies pieces for your crafting projects. 

Thanks for stopping by the Linnie Blooms blog today and for checking out another ScrappinAbby project.

Happy Crafting!!

Wednesday, June 11, 2014

Canvas pin

Hello Everyone, Kim here today with another fun and simple project using the canvas butterfly. I made it into a pin. You can wear it on a jacket, scarf, or attach it to a pillow, or even a curtain.


Let me tell you a little bit about how, I made this. First, I took the canvas butterfly and gessoed the front and then the back. This makes it stiff. Once it was dry, I used spray inks, stencil and some glitter glue. The center piece is a collaged mini-domino piece. Attached that to the canvas butterfly with some E6000. Made some antennas out of wire and used E6000 to attach them to the back of the canvas butterfly. Then I took some felt (I only had blue) and used my butterflies stencil/mask and trace a butterfly on the felt.  Cut it out. Since,  I can't sew to I used fabric glue attach the felt to the backside of the canvas butterfly. Leaving open one wing so you can add poly stuffing to it. Once you have it all filled with the poly stuffing then put the fabric glue on open area to close it. Then with E6000 I add a pin closure. Let dry and you have a super duper cute pin.

Hope you have enjoyed my project today! 
Hugs,
Kim H

Friday, June 6, 2014

Challenge - Popsicle Journal and pen

Hello everyone and Happy Friday-

Today, I am here to show you my take on the Design Team challenge. Here is the challenge:  Show us how to use LB Stencils/Masks and Canvas to portray what kind of outdoor fun you will have this month.  When, I had to boys so we tend to spend a lot of time outdoors. One of our favorite things to do is hike and sketch.  So much of my inspiration comes from nature. So the butterfly stencil/mask and butterfly (flutter)  canvas pieces were a natural choice.My first project is a journal to take along hiking.  I keep in the theme of outdoor fun and make a popsicle journal. I did laminate the covers to make it a little more sturdy. 


Then, I thought it would be fun to make a pencil that matched PLUS I still needed to use the canvas piece. I gessoed the canvas butterfly twice. I wanted it nice and hard. Next, I colored the butterfly up all pretty. Then, I used a scrabble tile (that I collaged on)  in the middle of the butterfly then used E6000 to attach it to the butterfly. I hand sewed a circle of elastic and used E6000 again to attach the butterfly to the elastic. I did this so that I could easily move the butterfly from pencil to pen. 


So, there you have it my take on the Design team challenge for the month of June! Hope you enjoyed it :)

Hugs,
Kim H


Monday, May 19, 2014

Just Bloom

Hey there…Happy Monday!
I'm here to share with you a card I created
with this month's challenge in mind.

We've been put to the test to use some
of the fabulous Linnie Blooms products for the theme
April Showers Bring May … Blooms
I used the Flutter Card Kit
and the supplies below to create this
"Bloom" theme card.
It's blank inside so it's perfect for any occasion.

Thank you for peeking in on us today.
I hope you've been inspired.


Don't forget you can find Linnie Blooms on Facebook 
and the Linnie Blooms online catalog is available for you HERE.
Have a beautiful day!
~Donna K / Created by Donna K


Tuesday, May 6, 2014

Linnie Blooms is celebrating Spring


Hi Bev Code here today. I am super excited as this is my first DT design reveal at Linnie Blooms.. what amazing fun products to work with. Be sure to visit often to see what I and other DT are creating and sharing with you.
Today I am boasting a fun page to celebrate Spring using the fabulous canvas butterflies and the stencil/masking butterflies... also some fun creative alterations to the product turned out to be so much fun.


First trace the Linnie Blooms Stencil/Masks Butterflies and cut them.


Next accordian fold them and tie off with twine.


In this close up I traced another butterfly from the same stencil only this one I
cut and then embossed it and added some ink. Trimmed it with the smaller made butterfly.


Here is the side view ..it give amazing depth and texture to the page.


This close up uses the canvas cut butterfly. I used ink on an embossing folder to add colour to the butterfly.. then I stitched the centre seam on the sewing machine.


In the side view you can see the sewn section and the inking touch.


On this section the base butterfly was treated with ink on a embossing folder as the above one.
The larger accordian butterfly is added to this base canvas butterfly.


Here is the side view.. love the many layers, texture and  depth.

Supply List:
Paper: Heidi Grace Daydream
Vellum: misc
Canvas Accents: Linnie Bloom refills of Jars - Flutter
Stencil/Masks: Linnie Bloom butterflies
Sketch: Scrapbook Generations Allison Davis
Punch: Martha Stewart
Ink: Tim Holtz Ranger
Title Sticker: Paper House canvas sticker
Mask: Prima with gesso
Embossing Folder: Cuttlebug Provo Craft
Other: twine, brads, punchinella

Be sure to check out:

Thanks for visiting today.. sure hope to see you again... enjoy your day.

Friday, May 2, 2014

Be Yourself / Linnie Blooms Card Kit

Hello and Happy Friday!
Today I'm here to share a sweet card with you that I
created with some of my brand new goodies from 
Linnie Blooms. 
I am totally in love with this wonderful Flutter Card Kit.  
For those of you like me who LOVE creating cards, it's perfect.
Using some heidi swapp color shine I sprayed the butterfly canvas die cut.
After the spray dried I just used a colored pencil to shade 
the edges a bit and folded it into a pretty flower. 
I like the combination of color and worn edges with this design.
Thank you for allowing me to share my card today.
Have a fabulous weekend!

Oh….Don't forget…


Saturday, April 5, 2014

Season for Tags

Happy Spring!! It's Kisha here today with my last post as a Linnie Blooms DT member. I've enjoyed months of sharing what I've created here with you all, and I hope I've created something that actually inspired you to create using Linnie Blooms canvas.

Today, I have a few tags I created with the spring season in mind.


Now, watch out till the end...funny how we start off with items to create with and end up using something else.  The tags you see here are bases that I cut using heavy weight card stock then begin to distress as desired.


Next, I added plenty of spray mist to my tag for added color.  Be sure to dry the color thoroughly before adding any other embellishments.


Here you see I added color to my butterfly then added some tinted molding paste using a stencil.


And here's my final product. I love how this tag turned out and it would make for a great end of year teachers gift.


 Here's where the canvas shape change happened. I ended up wanting to use a bird cage on my tag so that's how I ended up using my last canvas bird instead of the heart.  I love how I distressed this bird using my gelato's and music stamp.


And here is my final spring designed tag...shabby chic with a pop of coral.