Marie here today showing you a mini album made with Linnie Blooms 5x5 Canvas Blanks.
These proudct fits perfectly for the front and back of a album. I have cut different patterned papers into the same shapes as the canvas and then punched holes trough the whole lot.
I won´t show you more of the inside than this, cause it´s a present for a friend and rather personal, but you get the idea.
Hope this will inspire you to create a couple of sweet mini ablums this summer!
Have a really nice day.
Marie
Showing posts with label Canvas Blank. Show all posts
Monday, June 16, 2014
Tuesday, April 1, 2014
a sweet little canvas bag... by leeann pearce
Hello Linnie Blooms fans. Today I wanted to share another sweet but simply project I made using one of the 9x11 inch canavs blanks.
I made this little canvas bag for my youngest daughter as she has a love for bags of any kind. She loves to just stuff what ever she can in them.
One of her favorite animals is elephants because she remembers them from our Thailand trip.
anyway so this is it...
- I simply cut a piece of fabric measuring the same size as the canvas.
- I also made a elephant template and cut this out using scraps of fabrics.
- I used a canvas heart and cut in two and used them as leaves for the red fabric flower.
- Once the shapes were cut out i pinned everything in place and used a zig zag machine stitch.
- I went around twice.
NOTE: At this stage it was time to machine stitch the large piece of fabric I had cut out.
- I used some scraps of ribbon to create the carry handles and machine stitch them in place.
So you can see how easy it really was.
There are so many great ways to used this canvas blank.
I certainly loved making this little bag for jorja!
Thanks for popping by Leeann Pearce
Tuesday, March 18, 2014
Retro Mini Album
The definition of Retro:
adjective
adjective: retro
- 1.imitative of a style, fashion, or design from the recent past."retro 60s fashions"
noun
noun: retro
- 1.clothes or music whose style or design is imitative of those of the recent past."a look that mixes Italian casual wear and American retro"
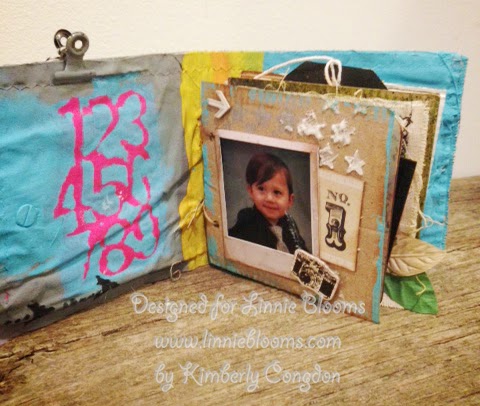
Most of us already knew the definition of Retro, but that is not the Retro I am talking about for my post. I am actually talking about a Mini Album for my 2 year old nephew named Retro.
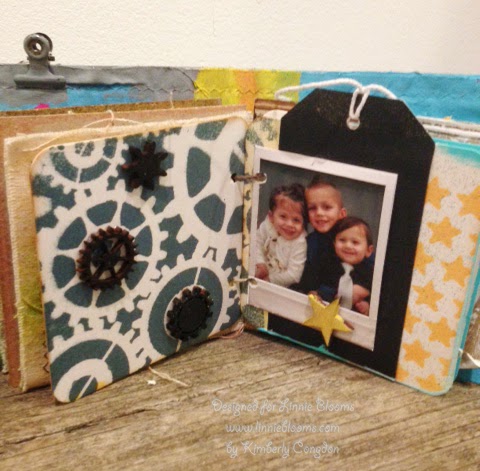
I am using a long blank, 2 small blanks, a star, and a bunch of misc. cardboard pieces, coasters, and pictures to assemble my mini album. I wanted to make it a little grungy and messy... kind of like my nephew. He struts himself around showing off his long messy curls and grungy 2 year old attitude.
Here is a photo of the Linnie Blooms products I used.
Here are a few photos of the cover, inside pages, and what the side view of this chunky book looks like.
I totally love this mini album.. I still have tons of pages inside to play with. All you need is a long blank and a few of the smaller blanks.. easy to do. I actually have a Linnie Blooms tag and a few of the new feathers to still add to this. I love that we can paint, distress, use stencils, and really mess up the canvas with any products. No matter what we use we always create something new and unique. Have you made a mini album yet? Just think of all the possibilities.
Thank you for stopping by!
Linnie Blooms Design Team Member
Tuesday, January 21, 2014
You look like me
Hi everone! Today is the fist day I post as a new designer for Linnie Blooms. I feel so happy and excited about this new adventure and love working with the canvas products.
I´m showing you a page made by using the 12x12 Canvas Blanks as my background.
Since my project involved a couple of different mediums I choose to prep the canvas with gesso on the area where I planned to add the mediums.
If you look close you can visualize that I also used the Canvas leaves on my project. The grid effect was aschived by stamping with a clear stamp from Cocoa Daisy.
Well I hope I could inspire you today! Please visit my blog for more inspiration.
I´m showing you a page made by using the 12x12 Canvas Blanks as my background.
Since my project involved a couple of different mediums I choose to prep the canvas with gesso on the area where I planned to add the mediums.
If you look close you can visualize that I also used the Canvas leaves on my project. The grid effect was aschived by stamping with a clear stamp from Cocoa Daisy.
Well I hope I could inspire you today! Please visit my blog for more inspiration.
♥
Marie Johansson
Saturday, January 11, 2014
Mini Brag Book
Hello and Happy New Year! I'm here today to share with you a mini brag book I created using Linnie Blooms Canvas Blanks. This is a great mini album to display at your office desk that shows off pictures of your kids, or a display of various photos of a recent trip.
Let's get started:
For my canvas blank cover, I used molding paste and added antique linen ink to create this pattern using a stencil. I also inserted two eyelets for binding the book together once completed.
I used various scraps of pattern paper left over from previous projects. I layered and inked the stack before adding stitching around the edges. Continue to add layers of your choosing before adhering them to the canvas blank. Then add more texture atop your layers using a medium and your favorite stencil.
And VIOLA! The beginning of your mini brag book is created.
Continue to add layers of pattern paper, texture and pictures throughout your mini book. Your book can be as large or small as you like. This little mini probably won't be so mini once it's complete, as I like chunky pages full of mediums, inks and embellishments. I will have a full detailed post on this mini brag book on my blog soon.
Have a super creative weekend!
Kisha
Let's get started:
For my canvas blank cover, I used molding paste and added antique linen ink to create this pattern using a stencil. I also inserted two eyelets for binding the book together once completed.
I used various scraps of pattern paper left over from previous projects. I layered and inked the stack before adding stitching around the edges. Continue to add layers of your choosing before adhering them to the canvas blank. Then add more texture atop your layers using a medium and your favorite stencil.
And VIOLA! The beginning of your mini brag book is created.
Continue to add layers of pattern paper, texture and pictures throughout your mini book. Your book can be as large or small as you like. This little mini probably won't be so mini once it's complete, as I like chunky pages full of mediums, inks and embellishments. I will have a full detailed post on this mini brag book on my blog soon.
Have a super creative weekend!
Kisha
Saturday, January 4, 2014
Birthday Bookmark
Today is my birthday, so I decided to create something that was just to make me happy ... a bookmark.
Yes, sometimes I still read a traditional book and need a bookmark to hold my spot.
I started with a blank from Linnie Blooms. This is actually two pieces of canvas sewed together with paper in between.
Then, I decided to try something different. I honestly did not think it would work, so I was ecstatic when it did.
I used an embossing folder and my Big Shot to create this unique texture on the canvas blank. Cool, eh?!
Then, I used the Copic Airbrush System to create a purple gradient.
Next, I used a Wendy Vecchi stencil and Dreamweaver's Glossy Black Embossing Paste to create the flower.
The small words are Tim Holtz rub ons. I also added a stamped word, some ribbon and floss.
And I learned you can used all of these techniques to decorate a canvas project.
Thanks for visiting!
Candy Spiegel
Labels:
bookmark,
Candy Spiegel,
Canvas Blank,
Dreamweaver's,
embossing folder,
embossing stencil,
Studio 490,
Tim Holtz,
Wendy Vecchi
Tuesday, December 31, 2013
"2014" Canvas Blank
Hey There!!! It’s Rochelle today and I have just a little something to wish you all a Happy New Year!
This is a 5"x12” canvas blank I altered with Gelatos. I also used Linnie Blooms Canvas Stars and tried something different. I used Rangers embossing powder to embossed the stars and I really like how the texture came out!
Here’s a close up on the stars:
And that is it for 2013! I hope you all have a very safe and happy New Year!
~ Rochelle
Sunday, December 29, 2013
Cherish Today
Hi Everyone- Julie, from A Little Bit of Bling, here today.
Today is my last post as a designer for Linnie Blooms. (sad face)
I've had a great time on this team! Linda- thank you so much for having me!!
Mixed media has always been something that I saw (and loved) but thought, "I'll never be able to do something like that".
Working with the Linnie Blooms shapes and canvas blanks definitely brought me out of my crafting comfort zone- and I am so thankful for it!
I have learned a ton of new techniques- and made some new friends while I was at it!
Here is my project using the Linnie Canvas Blank, canvas circles, and canvas hearts.
![]() |
One of the new techniques I learned is working with alcohol inks.
I made the flower out of aluminum foil and colored it and the canvas blank and shapes with my new alcohol inks.
I finished my project off with some 3 Girl JAM ribbon. (There may even be a little sneak peek of something new coming to 3GJ soon!)
Make sure to check out the other posts on the Linnie Blooms blog and the shop. Linda has some exciting things happening on the horizon!
Thanks for stopping by!
Monday, December 9, 2013
A Sparkly Christmas Garland
Hi, I'm Candy Spiegel and I am so excited to be a guest designer for Linnie Blooms Designs this month!
I created a Christmas banner and started with primative stars. They began as a blank slate, like this ...
I wanted to try some airbrushing techniques with the Copic Airbrushing System. Since that technique uses air to apply color, your pieces will fly all over the place. To hold them in place I used Removable Glue Dots to hold them to a scrap sheet of paper while I applied the color.
I used Y18 for the stars.
Next came theCanvas Evergreens. I used Washi Tape to mask off the trunks while I sprayed the tops of the trees.
I used YG63 and YG67 for the trees. I colored the entire top with the lighter color. Then, I went back and did stripes in the darker color to mimic the branches and depth in the tree.
Then I covered the trees and used E44 to color the trunks.
For the stockings, I taped off the top portion and then used R46 to color the base. Red is not a nice color. It does not play well with others and it goes everywhere. I learned I should have taped off the entire top of the stocking, not just a few strips!Then I taped on a stencil by The Crafter's Workshop. I colored it with R89.
Once it was dry, I covered the top portion with Art Glitter Designer Dries Clear Adhesive and then added Fun Flock. For the stars, I covered the entire top with a thin layer of glue and added glitter over the top.
Once the flock dried, I sewed some gold twine to the stockings and then added a little bow. I also used the Tiny Attacher to make little staple "x's" on the tops. I used Stickles to add garland to the trees and then Robin's Nest Dew Drops for Ornaments. Here are my completed pieces ...
I wanted one more piece for the middle, so I cut out a chipboard reindeer and covered it in paper. Then I added some greenery and a few Stickles for berries.To hook the pieces together, I used jump rings. On the middle jump ring, I added a few tiny jingle bells.
The jump ring can easily pull out of the fabric on the trees. To prevent that from happening, I applied a bit of Art Glitter Designer Dries Clear Adhesive to the back of the tree with my finger to prevent any fraying and make it strong enough to hold the jump rings on the delicate branches.
Then, I used another jump ring at the end to add some ribbon to hang the banner with.
And here is the finished banner ... I hope you like it and I hope it inspires you to create a banner of your own!
Labels:
Art Glitter,
Candy Spiegel,
Canvas Blank,
Copic,
Copic airbrushing,
garland,
Linnie Blooms,
star,
stocking,
tree
Monday, September 23, 2013
Bootiful Banner Decor
Hi there....Laura here with my second guest designer post here at
Linnie Blooms. This time I've used the Linnie Blooms canvas blanks.
These have so many options.....here is my Halloween decor project:
I used three together to make this spooktacular "BOO" banner!
I used Dylusions Spray Ink to color the blanks, then went back
and stamped them in black ink with a script stamp. I frayed the
edges a bit, and then brushed them with black paint using an
Adirondack paint dauber. Eyelets and twine connect the pieces
of the banner. Glittered chipboard letters and a little bling finish it
off with a spooky sentiment.
Here's a closer look:
Thanks for stopping by today, and you can find these fun canvas
pieces (and SO much more) in the Linnie Blooms store HERE, so
you can make your own spooky home decor!
Linnie Blooms. This time I've used the Linnie Blooms canvas blanks.
These have so many options.....here is my Halloween decor project:
I used three together to make this spooktacular "BOO" banner!
I used Dylusions Spray Ink to color the blanks, then went back
and stamped them in black ink with a script stamp. I frayed the
edges a bit, and then brushed them with black paint using an
Adirondack paint dauber. Eyelets and twine connect the pieces
of the banner. Glittered chipboard letters and a little bling finish it
off with a spooky sentiment.
Here's a closer look:
Thanks for stopping by today, and you can find these fun canvas
pieces (and SO much more) in the Linnie Blooms store HERE, so
you can make your own spooky home decor!
Wednesday, September 18, 2013
Sweet Bird
Julie from A Little Bit of Bling here-- I'm so excited to be sharing this project that I created for Linnie Blooms!
This is one of my favorite things that I've ever created.
It all started with a canvas blank.
I was holding it, and feeling the texture (there's a surprise sewn in between two pieces of canvas)- I decided to emboss it with my Cuttlebug and an awesome Anna Griffin folder that I have.
I wasn't sure if it would work-
but it did!!
Once I had the embossed image, I used Creative Inspirations Paint on it. This paint works fantastic on canvas! I did some outlining with Copic Markers- which also works great on canvas.
The end result:
I finished it off with a clip and some 3 Girl JAM ribbon from the New and Improved Seasons Bundle.
Make sure to check out the Linnie Blooms store for more inspiration and fabulous products!
Subscribe to:
Posts (Atom)