Monday, August 31, 2015

Meadow Silhouette Wall Hanging


Welcome...
Today Karen is sharing her mini wall hanging using a Linnie Blooms long blank canvas (5"x11") She created a meadow silhouette in a rainbow of bright and cheery colors perfect for summer home decor. Here's how she did it...


Preparations:
Prepare the canvas by securing it to the cutting matte or work surface using masking tape. I wanted to protect the very edge so that it served as a frame and remained plain un-inked canvas. To create the meadow silhouette, select stamps of flowers & leaves that have a solid image rather than ones that have a line image outline.  To prevent disappointment, you may want to practice stamping the meadow silhouette design on paper first in order to work out the placement of your stamps. Prior planning prevents poor performance!

(TIP: If you only have detailed flower stamps, it is still possible to use them. Stamp the image and then fill in the outline by painting it solid black. This is more time consuming but you can achieve the look of a silhouette.)

A Closer Look:
Directions:
1. Mist the canvas with water before you begin. Use a sponge applicator to blend distress inks or mists on the canvas. I chose to keep green at the bottom edge and blue at the top in order to emphasize the grass and sky. Allow the canvas background to dry thoroughly before stamping on it or dry it with a heat gun.

2. Next, apply an even coat of black acrylic paint to the stamp surface and begin to build the scene from the bottom up. If you find that the image has not stamped completely solid black, go back with a small detailing paint brush to fill in any whitish areas. I found that varying the intensity of the black silhouettes gave more dimension to the finished piece.

3. Finally, carefully remove the masking tape (the paint may not have dried on the tape surface) Embellish the wall hanging with butterflies and attach an inspirational word to the lower portion. Lastly, attach ribbon loops 2cm from the corner of the canvas. Insert a stick or dowel through the loops and tie on a cord for hanging.
                                   Visit the Linnie Blooms Shop HERE

Supplies: 5"x11' long blank canvas (Linnie Blooms), Distress Inks (Ranger: Dusty Concord, Faded Jeans, Peeled Paint, Spiced Marmalade), spray mists (Starburst Stains: Belles of Ireland Green, Peony Scarlet Red, Bachelor Button Blue, Yellow Rose of Texas) sponge applicator, Time Holtz Nature's Elements clear stamp set CSS27836 (Stampers Anonymous), Meadow clear stamp set (Inkadinkado,) Tall Grasses rubber stamp set (Stampin' Up), daisy silhouette rubber stamp (Stampin' Up), black acrylic paint (Ceramcoat), paint brush,  word embellishment (Making Memories), Butterfly Mistables (Studio Calico), wooden butterfly, liquid adhesive (Aleene's Tacky Glue), gems, ribbon, dowel, cord
                   Stop by Karen's Blog, Art & Soul to see more of her projects.

Friday, August 28, 2015

Linnie Blooms Pallet Garden Flag


Greetings to all Linnie Blooms fans. This is my final sign off. I've had fun making and sharing creations and I wanted to say Thank You for checking out my creations.   

My final project is with the Linnie Blooms Garden flag. I turned it sideways to use and added some yellow sheer ribbon to hang the flag.  

I painted the entire canvas with gesso and then started painting with burnt umber paint, a light caramel color paint (it look like peanut butter) and a white paint. I was hoping these colors would assist in creating a pallet fence   

I used Linnie Blooms Bloom stencil to create my material flowers, I painted the burlap/canvas ribbon with a spring green paint. I use the Linnie Blooms canvas bird and attached felt and added an eye to bring him alive.

Of course my little guy is building ??? 


I added some fun texture under the paint, to build up my pallet fence


My sign off was a special Thank You

Art Anthology Paints & Mud, Ranger Texture Paste, Faber Castell  Whipped Spackle


Thanks for all the fun, keep creating and bye.


LOVE
TRISH 


Wednesday, August 26, 2015

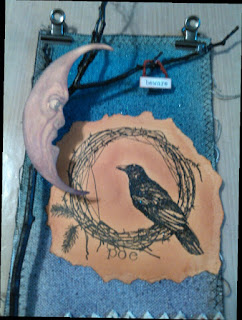
POE Mini banner

Hey Everyone, Dawn here again with another Fall project.  In my store we are working on Fall and Holiday projects so I'm all in.  This would make a nice hostess gift for a Halloween Party.
I love ravens...I even named my car Raven so when I got this stamp I had to use it...this is just the beginning for this stamp. :)

 I used the Linnie Blooms 11x5 canvas to make my mini banner. I also used the Linnie Blooms canvas fence.
 So I got out some inks to decide what exactly what I wanted to do. I knew I wanted a night sky and maybe some moonlight.
 Couldn't get exactly what I wanted with moonlight but I do like the color. And I inked the fence with Distressed ink Vintage Photo color
 Then I had the idea to stamp the image on the canvas and emboss it with a new black glittery embossing powder I just got but it didn't work...oops.  hmmm....I do like the glitter it left behind but the image is too light. So..........
 I used a piece of suede colored paper and stamped the image on it and then inked it and left a little glow around the raven for the moonlight I wanted. :)  Then stamped POE..just because.
 I added the "grass"...which is just a piece of fiber I had and the fence with the little spooky card and pumpkin to the bottom of the banner.
 I used the Tim Holtz chitchat words for Beware and hung it on the tree branch along with the moon.
 The moon and raven look like they are discussing who is spookier...:D
 My husband painted the tree branches with black Krylon paint for me.
 I used Twinklets on the tree to give it an icy look...I LOVE how it turned out!  I used little clips in the corner and some ribbon and trim to hang it.  *Tip* I also put a popsicle stick between the clips (and held by the clips) in back to keep it from buckling when I hang it. :)
 I used Diamond Stickles to bling a few things like the pumpkins eyes.
 I just love the Twinklets on the black branch. When the light hits it..it really sparkles.
 And there you go...:)

I hope you enjoyed my project and it's very easy to make.

Check out the other projects on the Linnie Blooms Blog for more great ideas. 

And please check out my store page on Facebook. Morning Star Crafts and Collectibles for even more ideas and fun. 

God Bless,
 ~Dawn Mattson

Monday, August 24, 2015

Maiden of the Lake Mixed Media Hanging

Come along with me and create your own fantasy beach at a lake in your dreams....


Summer is in full swing and I'm still rejoicing with every warm, sunny day!  Even though we may be inside working on projects using the awesome Linnie Blooms products, we can still take a little fantasy trip to the beach and mix it up a bit....

Painting "freeform style" on Linnie Blooms canvas products is a natural choice...and that is just what I did to create this mystical background for the hanging.  Of course, I always have to add inky techniques, too...and then a little paper tearing....embellishing....something to do with birds....

Okay, okay.  This turned into a Mixed Media project.

So....let's go play!

Materials used:

Linnie Blooms: 5" x 11" Long Blank Canvas, Angel Stencil/Mask

Impression Obsession Rubber Stamps: Butterfly Kisses (B8122), Butterfly 4 (D7783)

Clearsnap: Clear Embossing powder, heat tool
                  ColorBox® Classic Pigment Inkpad (Frost White, Sweet Melon, Antique Pewter, Black)
                  Archival® Dye Inkpad (Wicked Black)
                  Top Boss® Clear Embossing Inkpad
                  Art Daubers

Beacon Adhesives: Fabri-Tac® Permanent Adhesive

Acrylic Paint, Glazes and Mediums of your choice 
Note: I used a combination of Plaid Folk Art Acrylic Paint (white) and Decorator Glazes (Aqua, Bluebell) but these specific paint colors and types may not be current names.

Pages of printed text torn from old books
Decorative paper scraps
Cardboard scraps
Cardstock scraps (grey, black)
Black eyelash yarn scraps (or other yarn, doll hair, etc scraps of your choice)
Ephemera of your choice: ribbon lace, feathers, etc
Mini craft clothespins or other clips
Paint brush
Color pencil
Markers
Iron, 2 non-stick mats

Instructions:

Squeeze a dime-size dollop of white, blue and aqua paint directly onto the blank canvas. Distribute the paint over the entire canvas, lightly blending and thinning with water as needed; dry completely. Repeat on reverse side, if desired; dry. Place canvas on one non-stick mat; place second mat on top and iron on a low-medium setting until canvas lies flat and most wrinkles and ridges are gone.


Trace the angel shape on cardboard; cut out. Using the dauber, apply white ink over entire shape; heat with heat gun to dry. Dab Sweet Melon over head; dab pewter over entire dress area. Using DPT, apply black, using pad edges to create a geometric pattern of your choice. Sprinkle on clear embossing powder; heat. Draw eyes and mouth with marker; press clear embossing inkpad over entire shape, sprinkle on more powder and heat again.

Glue ephemera of your choice onto angel, as shown. Hand tear paper scraps; glue angel and remaining ephemera onto canvas.

Stamp butterfly in Wicked Black on black yardstick scrap, color with color pencils, cut out and attach. Stamp phrase in white on grey cardstock scrap, hand tear and attach. Add ribbon trim and clothespins to hang.
     
Closeup details below:


Friday, August 21, 2015

Blue Bird Holiday Card


Hello.  Ann here today with some early Holiday Season inspiration.  I know that the weather is so nice now it is hard to conceive that the Holidays are coming, yet they will be here sooner than we realize.  So while we are having a heat wave in my neck of the woods I am working inside my air conditioned house designing Christmas cards.  So here is my card:


To make this card I used a pre-made white base card (5 x 6 1/2), and some scrapbook and card stock papers as layers (5x6 1/2, 5x 6 1/4, and 4 5/8 x 6 1/4).


 The focus of this design is the Blue Bird (I was inspired by the Blue Jays that are usually flying around in the winter here).  The bird is a canvas die-cut by Linnie Blooms.


I used some Gelatos (creamy acrylic water soluble pastel) in a bright blue, a Teal, and a White.  With some water I smudged the colours with my fingers into the canvas.


I made the birds eye with some Puffy Fabric paint in black and a faux black rhine stone.  I made the branch by using the stencil (also from Linnie Blooms), a faint pencil tracing and filling in with some more of the black puffy fabric paint.


 Once the black paint was dry I distressed it with some white Gelato pastel. I added three light green leaves in more Gelato and glued on some red glass seed beads.


 I made the snowflakes from white paper and a punch, and glued the flakes to the card.  The sentiment (which is so shiny the camera did not make it out) reads Merry Christmas.  I made that with a good old Peel-Off sticker I had and a piece of white scarp of Card Stock die cut with a Little B die.

The supplies I used:
Linnie Blooms Bird
Linnie Blooms Stencil "Flutter"
White pre-folded card Recollections (Michaels)
Card stock in Dark Blue (scrap from my stash)
Metallic Scrapbook paper scraps in Light Blue, and White (From my stash)
Little B™ Die "Party"
Snowflake punch
Red Glass Beads (MultiCraft)
Puffy Fabric Paint in Black (Craft Medley--MultiCraft)
Black Rhinestone (Dollarama)
Gales by Faber Castell (White, Teal, Blue, Green)
Double sided Adhesive Tape (3m)
Aleene's Tacky Glue


To see more of my projects and how to's, please come over to my Blog at www.annmakes.blogspot.com.    Thanks for stopping by.


Wednesday, August 19, 2015

Sunflower Thank You Card by Rochelle

Hello Crafters!


Today I am sharing with you a card I created using Linnie Blooms Canvas Pieces.  
This super cute card is so simple and FUN to make!   This card is 4.5” x 5.5”, but you can make your card any size you want.  

First,  I used Maya Road & Tattered Angels mists and colors 2 Linnie Blooms Canvas Sunflowers.  I then colored and stamped a Linnie Blooms Canvas Circle.  


I layered them together and added a button and a piece of Linnie Blooms Mesh in the center.  


Second, I took a 4x5” of white cardstock and embossed it with a wood grain embossing folder.  I used a brown ink pad and lightly colored it.  

Then I added 3 pieces of green checkered wash tape  (for the steam and leaves)  onto the wood grain paper. 

Lastly, I  added the layered canvas flowers and a rub-on sentiment on the wood grain paper
and then adhered it to the white card.

here's a closer look at the card:


I hope this has inspired you to create your own card and to visit the
Linnie Blooms Store to see all the wonderful canvas pieces and projects! 

Thanks for stopping by the Linnie Blooms Blog! 


~ Rochelle, Design Team  

Monday, August 17, 2015

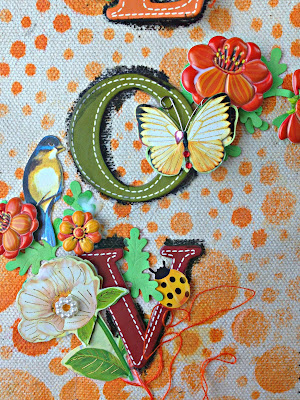
Love - 5*11 canvas

hi all
Today I am sharing this canvas made on linnieblooms.-5x11-long-blank-canvas. I love this size as it  gives me enough surface to work on and not too much as to think how to fill it.


First I stencilled the canvas, using mist.
Then arranged the letters and flowers.added butterflies, bird and lady birds.
all done. easy right.

Hope you will like it. Thanks for stopping by.

Friday, August 14, 2015

Let´s play Card!!

Hi everyone!!!

Noe here to give you some crafting inspiration with Linnie Blooms products!! 
To make this funny card I used "Flourish Pocket"... I love it... Make projects with this, it´s too easy!!


It´s too cute, isn´t it?

Well, here is the step by step to make it!!

- First of all, I painted "Flourish pocket" with a green Gelato and water.  Then I splattered it  with black liquid ink.


- Second step: using my Letterpress I marked "Smile" word and filled with Glossy Accents. After, I covered with glitter and I have left to dry.
TIP:. Don´t worry if you haven´t letterpress, use your favorite stamp as a template!!


- Third: Paint your stamps (mine are "Chubby Chums" Paper Smooches stamp set) and then play with your Distress ink on a piece of watercolor cardstock.

- Finally, paste the "Flourish pocket" on the cardstock... Ready!!!

More photos in detail:


 Hop on over to the Linnie Blooms website to check out all of these great products AND like Linnie Blooms on Facebook for more inspiration! 
Thanks for your visit!! Have a great day!!