Thursday, February 27, 2014

Recycled Box

Oops I did it again!  I can't stop.. I love cigar boxes and random boxes~  Here is an altered T-shirt box that my neighbor gave me.  It's actually bigger than the standard cigar boxes. 

I used a Linnie Blooms tag, star, and flourished pocket. 


I love using my boxes to hold other embellishments, trinkets, and do dads.  This box is actually going to a spring craft fair for sale.  Do you like to alter boxes?  How have you been using your Linnie Blooms shapes?   I use my shapes for scrapbooking, banners, tags, cards, and of course my altered home décor projects.. check out my site and this site for more inspirational projects.

Thanks for looking! 
Kimberly Scrap It Girl

Tuesday, February 25, 2014

Wedding Journal

Hey there! It's been a while I know and I'm so excited to share with you what I've created.  I have hoarded this canvas journal for a while now, trying to be certain of what I create in it. I toyed with the idea of creating an art journal on canvas, but that was a bit too usual in a sense (I plan on doing that another time). I finally decided to create a wedding journal being that I no longer have a wedding album.

Here, I will show you the process of how I began distressing/altering my journal


Above are the cover and the inside of the canvas journal.  I love that every other page has a decorative inclusion, which can be used in various ways to enhance the pages surrounding it.


For the front cover I used light molding paste and a damask stencil to add a bit of decorative dimension.  Continue to add as many layers of mediums or inks until you have reached complete altered happiness ^_^


After I added more ink by using a diamond shaped stencil and stamping some script in various areas, I adhered a crocheted doily.  The doily was adhered to cover a bit of the front and back of the journal.  NOTE: My adhesive of choice is Beacon's 3 in 1.  It has never let me down and I've never had an issue of items coming apart. Just in case you wonder about the type of glue I use for my projects.


And here is my final (cover) product after adding all of the embellishments. 


Pearls, diamonds and lace, just what every girl wants to see at her wedding. This was such a fun project to work on and I can't wait to get copies of our wedding pictures back so I can complete the inside of the journal and share the results.

Until next time...

Happy Creating                    Kisha

Saturday, February 22, 2014

Gift of Friendship

This is the year I want to create more "hand made" gifts.
So….I spot this burlap canvas and had to have it
I love how it's rugged, but pretty and not perfect on the edges.  
Now,  it was just a matter of what to put on it.
I found the perfect sentiment to use but it needed MORE….
That's when my Linnie Blooms canvas shapes started calling out to me.
I have said before, but will repeat…
how fun it is to use these blank canvas pieces!
You can seriously…..
use them blank, ink them, sew them on, paint them, draw on them…
endless possibilities.

Thanks for letting me be part of your day today.
And don't forget…

You can check out the Linnie Blooms catalog for more details on all of the wonderful Linnie Blooms products.
You can also find Linnie Blooms on Facebook and on Pinterest.
Thanks for stopping by today.
I hope your weekend is full of creativity!

Friday, February 21, 2014

Creative Bursts

I don't know about you, but sometimes I get some hardcore creative bursts!  You know what I mean -- when you just can't turn off all of the great ideas you have bubbling at the surface of your brain.  That's me today!  I tend to work up to these days, and I try to spill out as much creativity as possible.  The other evening it came out to this:

It's a protective sleeve for my new tablet.  I just love it!  I love using my creations as prototypes for new products to manufacture.  So, yes, I will be creating a bunch and adding them to my online shop within the next week.  And now I need to make one for my iPad :)  

Today, the creative burst continues...I'll be back tomorrow to show you the results of this one:)  TGIF!

Checkout what other wonderful, creative projects everyone is doing at:

Thursday, February 20, 2014

My Fun Camera Bag!

I bought this plain Donna Downey camera bag this winter with the plan to alter it!!  Every time I used it all plain looking, I would come up with grand plans of paint splashes and modeling paste shapes.  But when I pulled out my bucket of embellishments, of course, my Linnie Shapes JUMPED right out of at me.  They were perfect, I could color them up and match them to the colorful flowers that I had in the pile.  


It was play day at my local scrapbook store, so I packed up the bag and the embellishments and headed out.  The Linnie shapes are so versatile, they travel easily, the absorb spray so easily and the shapes are so pretty so I knew I could take them with me. In fact, these next few pictures were taken on my Ipod because I was working at the store - so excuse the quality!!

I sprayed up the butterflies with Dylusions and a stencil.


I glued them down with Helmar 450.

Before I glue them down, I always take a picture of what I have planned.  This is because I have the worst short term memory . . . and the minute I move them . . . I forget where they were placed!! So this is my tip for the day - take a picture when you think you have the plan ready to go!!  Then you can look at the picture for reference as you glue!! 

 And voila! I took the bag home, sat on the deck and took some pictures of my camera's much prettier home!!

Thank you so much for visiting Linnie Blooms today.  I hope I have inspired you to brighten up something that is just too plain!! Linnie Shapes make brightening up projects SO easy!!  Make sure to visit the Linnie Blooms Facebook page, the design team Pinterest page and come visit me at my blog too!!
-Karen


Tuesday, February 18, 2014

Small tags make it special

I'm hosting a couple of events in the next few weeks and I wanted to create something that my friends could take home with them. Something to entice them to give Linnie Blooms Mixed Stitch Media products a try... and fall in love with them like I did too.


I came up with 2 Make-it, Take-it projects that I think will do the trick. This one is for a home party I am hosting this Saturday afternoon. A few good, close friends are coming to nosh on snacks and sip mulled red wine, try out some pretty jewelry and make these little tags. I call them "No house is too small" tags. The quote and inspiration came from a country craft item I bought years ago and have hanging in my kitchen window. It reminds me that my house is small on size, but big on love.


I made these little gems with tags I cut using my Cricut machine. A simple small thing that was just right. The quote "Where love is, no house is too small" was printed out on my computer in 2 different font sizes. The little cottage is actually a Linnie Blooms arrow from the shapes collection. The little house is well, a little house shape from that same collection. A bit of thin paint, Sharpie ultra fine markers and some washi tape and glue was all it took to put these sweet little tags together.


 I am really enjoying using the Sharpie markers and the fine details I can get. I've learned to start using the lightest shade of colors first, then I can enhance and darken any details I need without over doing it. It feels a little bit like doodling, but with fun colors.

There are lots of ways you can play with Linnie Blooms canvas shapes. You might like to try using some of the many acrylic craft paints that are available now. These and a few small brushes, and you could create a lot of delicate details in no time at all. But for me, the good old sharpie is my tool of choice. It is fun, portable and so easy to do.

The next event I am planning is with a decorative painting group I belong to. I have recently become a business member and that allows me to have a table to show my work, products I want to sell and ideas I want to share. I am excited about this new development in my creative arts business journey. It helps me to reach out in a whole new way with my painting friends. I just know they will love trying out a new product and finding ways to incorporate it into their art work.


I will be sharing these little owl tags with my painting friends. They turned out very well and I couldn't be happier with them either. The tags came from the dollar gauntlet at my local Michael's store. Brown chip board tags and some twine cord seemed like the perfect little Make-it, Take-it to enchant my friend. And WHO couldn't resist the ever popular owl?


I started by stamping a small leaf background stamp in an assortment of greens on the chip board. As you can see, I used quarter sections to cover the tag completely. Next I rubbed some more inks on a tiny little branch that I cut out of cardstock with my Cricut machine. I hand printed the word "Whoooo loves you? I do, that's who!" around the upper edge, and finished it with some of the twine cording.


I wanted to try a couple of different looks in my owls. I am enchanted with the Zentagle doodling that is so popular now, but I don't have enough practice in doing it well, so I decided to try a cartoonish motif. I looked at a lot of photos of owls on line before I settled on these two.  I really wanted the eyes to pop and look right at you.


I hope my Make-it, Take-it designs have inspired you too. It doesn't take much in supplies, time or know how to make something really great. Using these on gifts will really brighten up someone's day and let them know just how special they are to you too. So, come on and play and see what you can do.


Best wishes!
Linda Kay
Be sure to visit Linnie Blooms for more Mixed Stitch Media products and ideas.
Linnie Blooms ~ www.linnieblooms.com
Linnie Blooms blog ~ www.linnieblooms.blogspot.com
My website ~ www.lindakaysart.com

Saturday, February 15, 2014

Simple bunting using linnie blooms canvas shapes... with Leeann Pearce

Hello Linnie Blooms fans... I hope you all had a wonderful valentines day yesterday. I'm sure there was lots of I LOVE YOU and chocolate and wine and kisses and and and....
This month also happens to be the month that I was married we will be celebrating 12 years!
-ain't that just sweet!
Anyway I decide to create a little off the page project for my home, I've had this pink paislee tray for a while and really wanted to semi embellish it.
My intention was to keep it simple with little color ... because I plan to display amazingly  awesome photos I have captured of my children.


"Simply Bunting using linnie blooms canvas shapes"

Step 1: Gather an assortment of shapes and line them up and machine stitch.


Step 2:  Add a tiny bit of detail to them. A stamped pattern and a couple of wooden buttons hand-stitched on.


That's it, told you it was simple!
Now just add it to your embellish tray, photo frame, scrapbook page or card. 
Totally up to you.


Thursday, February 13, 2014

Darlings - A little bit of Valtentine

Are you celebrating Valentines Day? Our family don´t that much. Maybe some heartshaped candy will be bought, but we don´t do any major celebrating. But at my work we celebrate with heart shaped candy, cake and hugs. Might have something to do with us working with hearts....

So here comes two of my Valentines on my February DT project. The page is about my two lovely kids!


 I have used the canvas stars and arrows on this. The stars have got a bit of black in on the edges and some sparkly paint on top. The paint comes from Ayeeda (13@arts).


I made the background by using leftover paper pieces that I glued on my background paper. Then I covered it randomly with heavy modeling paste that I dabbed my palette knife in to archive the structure. Then some ink and water, some stamps and the lovely decorations to finish it of.


Material used: Patterned papers; Chic Tags School House + leftovers. Embellishments; Acrylic arrow (Basic Grey). Flair (American Crafts). Tiny Word stickers (My Mind´s Eye). Clothes Pin (Pebbles). Alphas (Dear Lizzie). Cork Arrow (Studio Calico).

Marie

Tuesday, February 11, 2014

Create one from the heart and two for fun

I'm creating Valentines big and small with my Linnie Blooms canvas shapes today. I have not ventured my mixed media onto canvas before, so I started with an 8"x 8" size so I wouldn't feel too overwhelmed. I knew that I wanted my embellishments and textures (along with the quote) to be my focus, so I wanted a more subtle background.

 
I spritzed some Distress Stain (worn lipstick) with water and just splattered, brushed, and dripped it onto the canvas and then let it dry overnight so that the splotches and bubbles dried just as they were when wet. I wrapped the canvas with some metallic yarn and added the sentiment with a Sharpie marker.

I used Copic markers to color the house/arrow and heart.
I stamped (with gray ink) the background of the canvas with some Close to My Heart stitched hearts, wrote my sentiment (wherever you go-go with all your HEART), and then layered, layered, layered. You can spy some punches, button, stamps, burlap, tulle, twine, stickers, and a bingo card.
One Valentine present done.

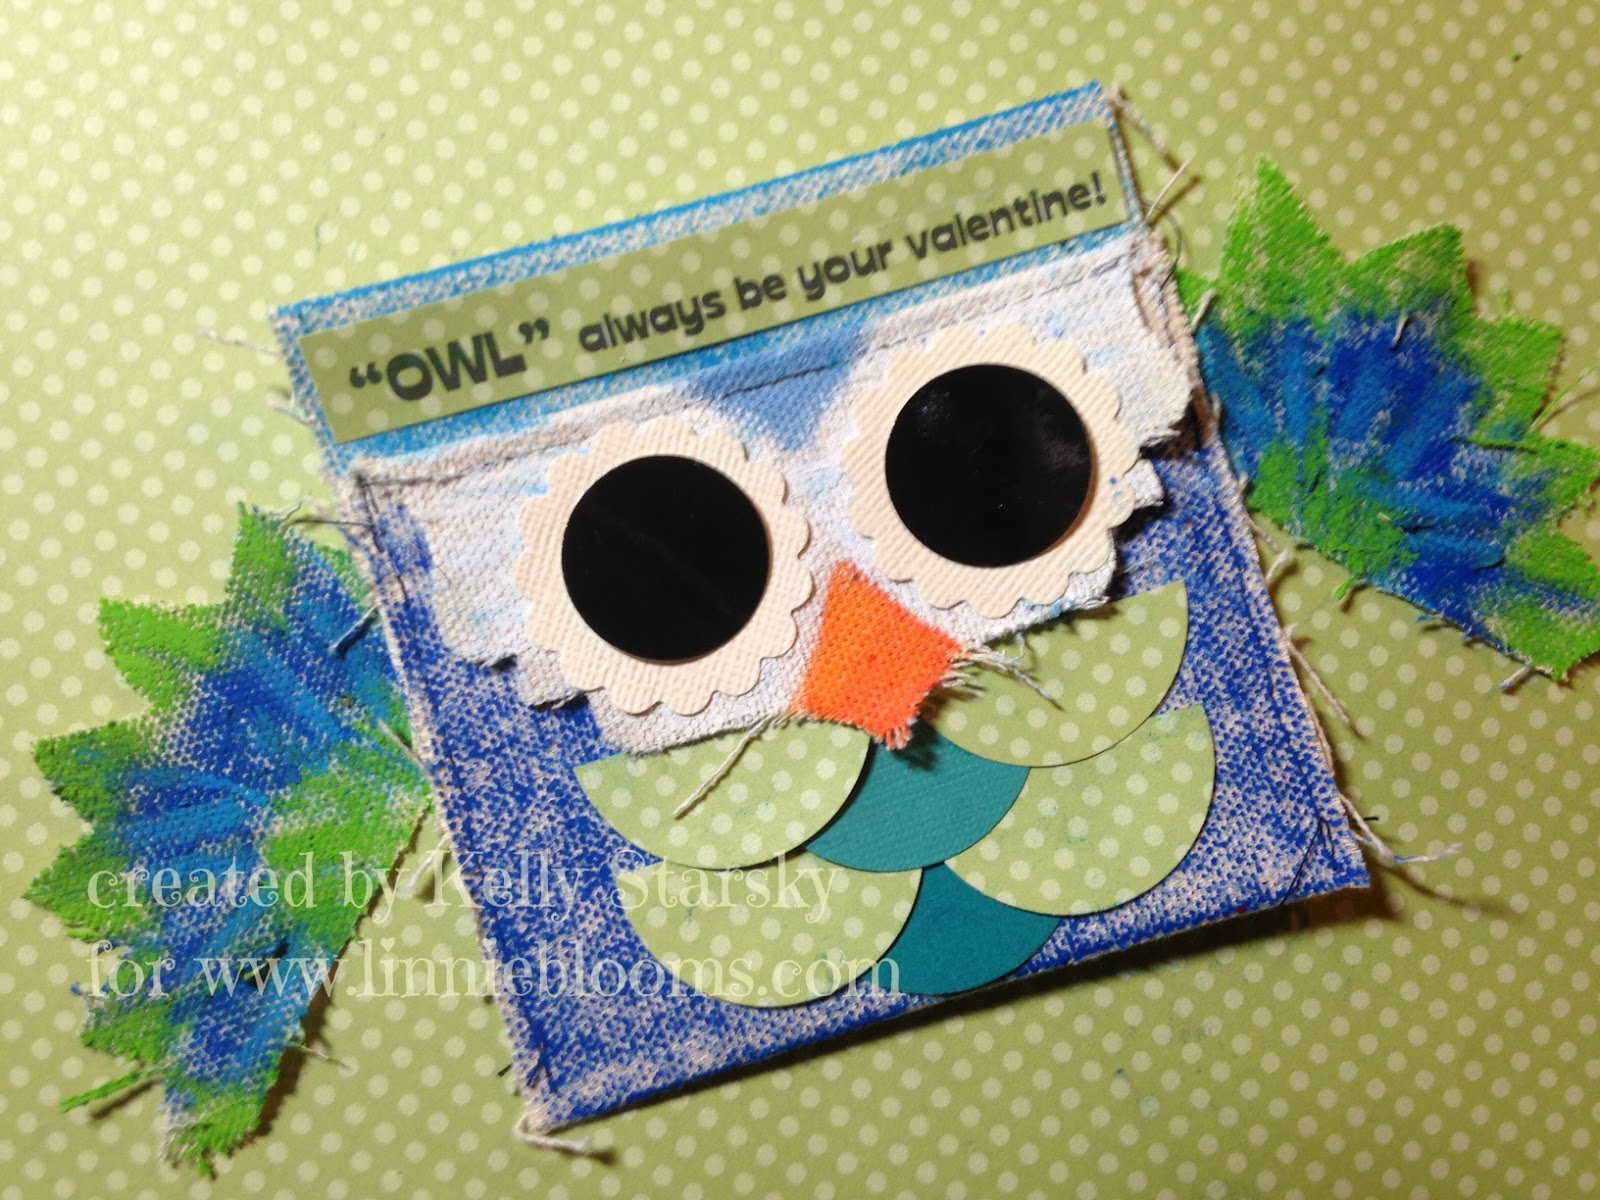
When I looked at my Linnie Blooms canvas pocket one day, for some reason I saw a beak. So this became...


THIS! (with the help of my daughter).


With oil pastels, she colored the pocket and I colored the wings (a Linnie Blooms canvas sunflower cut in half). We added some eyes and some punched half circles for layered feathers and she is going to stick a small treat in here for her teacher. WHOOOOOO wouldn't want to get this cute owl?

And one last Valentine--a silly one! Using up patterned scraps with these painted Linnie Blooms canvas hearts and LOTS of googly eyes--inside the card it says "EYE" love you lots!
Three Valentines done (more to do). Whether your Valentines are layered, from the heart, cute, or silly...they are OH so special when they are hand-made.
~Kelly


Monday, February 10, 2014

Get to Know Us

Did you know that Linnie Blooms is now a direct sales company? Yep! We have a beautiful new catalog that shows you all sorts of ways to use our products to beautify your life! Here's the link to the catalog:

 http://issuu.com/lindabarutha/docs/lbcatasof011814


If you are local to Mukwonago, WI, and would like to find out more about us and make a project using our products, why not come to our meeting this Saturday (2/15), 10 a.m. at our Linnie Blooms headquarters?  There is no cost -- simply RSVP by emailing me at linda_barutha@yahoo.com.

I hope to meet you soon!

Creatively yours,

Linda

Saturday, February 8, 2014

February Sketch Challenge

Time for a new sketch. Since it´s Valentines day month it has a little loving twist...


This is how some of the ladies in the Design Team used the sketch:

Marie

Leeann


Thursday, February 6, 2014

Hope is the thing with feathers.....

......HELLO!!!...this is my latest creation for the 
LOVELOVELOVE these awesome products!
Mixed stitch canvas...birdies and heart shapes...OH MY GOODNESS!
 I played with the canvas blank & shapes...coloring with paint...Dylusions sprays, Heidi Swap Color Shine, and my ULTIMATE new favorite color tools Faber Castell Gelatos!(OMG...YUMMY!)

 This is how my creative brain designs...with the bits 'n bobs all out in front of me...until I can get the perfect fit!
 up close of one of the birdies...heart shape wing.."hope" is one of my "I cannot ever let go of these Stampin'UP! sets!" from when I was a rep...

 ....and this is the back.....I printed out the first paragraph of Emily Dickinson's sweet poem, sewed it onto vintage music paper, and attached it to the canvas.
*************
I will be putting this in my Etsy shop this weekend....along with some other treasures from my heart!
Thanks for looking!...remember...if you are interested in coming over to The BeeHive studio to enjoy some creative playtime with Linnie Blooms, just convo me on FB!!

creative blessings,
debbie