Showing posts with label linnie shapes. Show all posts

Wednesday, August 5, 2015

Flower Jar Decor

Plain glass jars with lids have SO much potential for decorating!  Whether you fill them with spices, sweet treats or even baking mixes, you can create that warm home look to your kitchen.  Or, make several and give them as gifts or sell them for fundraisers!

Let Linnie Blooms Canvas shapes add just the right mix of texture, color and flamboyance to even the simplest of jars.  Let the decorating begin....


You will need:

Linnie Blooms: Canvas Shapes: Sunflower (1), Petal Shapes (1 large, 1 small), Leaves (2)
                          Shabby Trim (green)


Darice: Glass Jar with Lid

Kreinik Iron-On Ribbon (1/8" ribbon) 3M Green 6356

Impression Obsession Rubber Stamps: Lord's Prayer D7778

Clearsnap: Colorbox Archival Dye ink pad (Wicked Black)
                  Stephanie Barnard Sprays (Artichoke, Banana, Tangerine, Guava)

Beacon Adhesives: Gem-Tac Permanent Adhesive, Fabri-Tac Permanent Adhesive

Westcott: Titanium Scissors

Misc: Buttons, spray bottle with water, empty baby wipe container (or other plastic container with lid), paper towels, iron, Teflon coated ironing mat

Instructions:


Place paper towel inside container.  Place all three flowers on towel and spray with Banana. Blot and remove sunflower. Spray Tangerine on remaining flowers. Spray Guava on small flower. Blot and remove. Replace wet towel with clean towel. Place leaves on towel and spray very sparingly with Artichoke; spray with water; blot. Repeat,steps, if desired, on wrong side, replacing towels as needed.


Blot and place all pieces flat on clean paper towel. Place clean paper towel on top. Iron on low dry setting until dry.


Place stamp rubber side up; apply Wicked Black.


Stamp phrase on flowers and leaves; dry.


Cut petals, as shown. Attach canvas layers with Fabri-Tac. Glue button layers with Gem-Tac. Set aside to dry.


Iron the Iron-On ribbon across the center of the Shabby Trim, using the Teflon coated mat and an iron on a low, dry setting, as shown.


Wrap ribbon around the jar; trim and glue in place with Gem-Tac, as shown. Place jar on its side and glue on buttons in center of ribbon trim; dry completely.


Glue flower onto jar lid with Gem-Tac; dry completely


(Note: Pre-spray the canvas shapes with water for a lighter, less intense color. Let dry and then overspray to create a more speckled look. Experiment...try different looks...get messy and have fun!)


Tuesday, February 18, 2014

Small tags make it special

I'm hosting a couple of events in the next few weeks and I wanted to create something that my friends could take home with them. Something to entice them to give Linnie Blooms Mixed Stitch Media products a try... and fall in love with them like I did too.


I came up with 2 Make-it, Take-it projects that I think will do the trick. This one is for a home party I am hosting this Saturday afternoon. A few good, close friends are coming to nosh on snacks and sip mulled red wine, try out some pretty jewelry and make these little tags. I call them "No house is too small" tags. The quote and inspiration came from a country craft item I bought years ago and have hanging in my kitchen window. It reminds me that my house is small on size, but big on love.


I made these little gems with tags I cut using my Cricut machine. A simple small thing that was just right. The quote "Where love is, no house is too small" was printed out on my computer in 2 different font sizes. The little cottage is actually a Linnie Blooms arrow from the shapes collection. The little house is well, a little house shape from that same collection. A bit of thin paint, Sharpie ultra fine markers and some washi tape and glue was all it took to put these sweet little tags together.


 I am really enjoying using the Sharpie markers and the fine details I can get. I've learned to start using the lightest shade of colors first, then I can enhance and darken any details I need without over doing it. It feels a little bit like doodling, but with fun colors.

There are lots of ways you can play with Linnie Blooms canvas shapes. You might like to try using some of the many acrylic craft paints that are available now. These and a few small brushes, and you could create a lot of delicate details in no time at all. But for me, the good old sharpie is my tool of choice. It is fun, portable and so easy to do.

The next event I am planning is with a decorative painting group I belong to. I have recently become a business member and that allows me to have a table to show my work, products I want to sell and ideas I want to share. I am excited about this new development in my creative arts business journey. It helps me to reach out in a whole new way with my painting friends. I just know they will love trying out a new product and finding ways to incorporate it into their art work.


I will be sharing these little owl tags with my painting friends. They turned out very well and I couldn't be happier with them either. The tags came from the dollar gauntlet at my local Michael's store. Brown chip board tags and some twine cord seemed like the perfect little Make-it, Take-it to enchant my friend. And WHO couldn't resist the ever popular owl?


I started by stamping a small leaf background stamp in an assortment of greens on the chip board. As you can see, I used quarter sections to cover the tag completely. Next I rubbed some more inks on a tiny little branch that I cut out of cardstock with my Cricut machine. I hand printed the word "Whoooo loves you? I do, that's who!" around the upper edge, and finished it with some of the twine cording.


I wanted to try a couple of different looks in my owls. I am enchanted with the Zentagle doodling that is so popular now, but I don't have enough practice in doing it well, so I decided to try a cartoonish motif. I looked at a lot of photos of owls on line before I settled on these two.  I really wanted the eyes to pop and look right at you.


I hope my Make-it, Take-it designs have inspired you too. It doesn't take much in supplies, time or know how to make something really great. Using these on gifts will really brighten up someone's day and let them know just how special they are to you too. So, come on and play and see what you can do.


Best wishes!
Linda Kay
Be sure to visit Linnie Blooms for more Mixed Stitch Media products and ideas.
Linnie Blooms ~ www.linnieblooms.com
Linnie Blooms blog ~ www.linnieblooms.blogspot.com
My website ~ www.lindakaysart.com

Monday, December 2, 2013

Put on your mittens...


Baby, it IS cold outside.  Time to dig out those mittens...inside and out!  We are all playing with the Linnie Blooms canvas mitten shapes this week and they are just screaming for fun embellishments! 
 
As I mentioned in a previous post, I really do not like shopping.  Gift wrapping is where my heart lies.  The present inside may not be that great, or it may be a gift card, but a pretty topper makes it special. 
 
For these tags (that I cut into 3 1/2"x 6" from old file folders), I painted the canvas mittens with acrylics and added dashes of Picket Fence Distress Stain, outlined in Rock Candy Stickles.  I put a layer of Aleene's Tacky Glue at the top and pressed in tiny clear white seed beads to make the cuff.  Into my bin of doo-dads, I found and added some felt snowflakes, metal snowflake brads, wood snowflakes (painted and Stickled), and pearls.  I love that these canvas shapes can hold up to anything added to them (they are quite heavy when you start adding paint and beads and Stickles--regular paper couldn't hold up to this kind of "beading"...hee hee).
I often add sayings and phrases inspired by song lyrics to my projects, and here I am doing it again!  I liked this dotty paper, but found it just a bit too bold for what I needed.  By adding a few layers of Picket Fence Distress Stain (and drying it with a heat gun between layers), I was able to tame the background and make it ready for running through the printer. 

 
So, while I continue to "pro-craftinate"...that is avoid putting up Christmas decorations (or maybe it is because we are remodeling our bathroom and I have a bathtub, toilet, double vanity, linen cabinet, etc. in my living room and there is no room for the tree)...I am reminded that I am wrapping these gifts in LOVE. 
 
After all, shouldn't the whole season be wrapped in LOVE?
~Kelly
www.pinterest.com


Friday, October 4, 2013

a bit of mixed media for stampers


Hi! It's me again, Baerbel from Germany.

Mixed media is a trend in arts and grafics which has found lots and lots new fans during the last decade. Because all kind of crafts and hobbies are mixed together these days, stamping is involved in some of the mixed media ideas we can see all over the internet.

In my daily work with other stampers, I often meet those who are scared to colour in their images. These crafters will never try the mixed media, because a lot of free painting in involved. But even stampers can make unique pieces of art, and today I want to show you how.


For todays samples I used some of the canvas blank, Linda Barutha has kindly sent me all over to Germany!

My first step was to prepare your canvas, I have put a generous amount of gold acrylics (Marabu) all over the blanks for a festive effect. Let dry.

Then stamp you desired image with crafters in (Tsukineko). My prints have been very pale, but I do not need any crisp images for this technique. Let dry the print.

Fill in the image with the paints of you choice. The idea of this technique is, not to draw really exact. You can play with your paint, mix it as you go and try various painting technique. As my acrylics left a hint of where the stamped image was, I painted the black lines after the first layer of paint was dry.
Because you work with acrylics, you always can go back and paint another layer, if the first artwork doesn't please you.

Add highlights with some white. Mix the white paint with the colours you have used to fill the image, for a more subtle effect.Let your imagination go wild, and add some additional prints after the whole thing is dry. The last prints haven't to be exact either, because the beauty of mixed media is its imperfection! I hope you have fun!


And another wall hanger is ready for Christmas, I used the same technique....


materials used:
canvas blanks: Linda Barutha
stamp "Halloweenkürbis" , Stempelschmiede
stamp "Kringeltanne", fairysale
acrylics: Marabu
stamp pad: Tsukineko

Thursday, October 3, 2013

A colorful season


It is October! I seem to have a minor "freak out" with each month that passes. How can another month go by so quickly! October is a month to cherish though. It is nature at its best and brightest. So, why not replicate it? I'm playing with Linnie Blooms canvas shapes again, and this tree is a new one in the store. I was at the "real" Linnie Blooms store last weekend and got a chance to experiment a bit. Both Linda and I loved the look of stamping chevrons on the canvas shapes, so I decided to ink chevrons to the trunk while loading up the tree with colorful buttons.

Have you been keeping up with all of the new shapes that Linda has added to the Linnie Blooms online store? Owls, leaves, and trees are perfect for your fall projects while the circles, stars, and hearts are perfect for anytime! What is your WIP (work in progress)?


My WIP is trying to find some time to enjoy the natural colorful wonders right outside my window.
What a wonderful world indeed!


~Kelly

Wednesday, October 2, 2013

Welcome Home

Hi everyone!
Sandra here - ready to show you a new project made with the fabulous Linnie Blooms shapes...


and for the fist time I used Gelatos...and I realy love this colors... so easy to use!!!


the structure of this small home deco is the square canvas blanks, that you can find HERE,


and in the middle I added other two piece of canvas able HERE and HERE...

Enjoy with this shapes

Have a good day

Friday, September 27, 2013

Art Journal Cover

Happy Friday, crafty people!  Marfa (that's me ;-)) is back to show you another fun Mixed Media project using Linnie Bloom's canvas shapes.   This was sooooo much fun to do!  It is the reason why I consider myself a Mixed Media artist.  It encompasses every single craft that I can think of right now.  This project is a Design Team project forLinnie Blooms.  I used several canvas shapes that you can find at the Linnie Blooms store.  I used a birda heartpockets and pennants .  Canvas is so cool to decorate because you can do almost anything to it and it will take it!  I inked, I embroidered and I glued to my heart's content. This cover is so yummuylicious.  I can't wait to make more.   Scroll down to see a short video that's going to show you some cool details.

Here's the video:


Marfa Otano
               aka Crafting Marfa
Designer for Gina's Designs, video designer for Linnie Blooms

Sunday, September 22, 2013

Tim Holtz Fabric Fun

A little clutch made with Tim Holtz fabric and Linnie Blooms butterflies.  Here's a picture of the backside:


So much fun!


If you like the new Tim Holtz fabric, you might want to check out the limited supply of Linnie Blanks that I just added to the shop:)  


Saturday, September 21, 2013

Canvas with Linnie Blooms Shapes

Hi everyone!
- Sandra here - Today, playing with Linnie Blooms Shapes, I realized a little canvas, 20 x 20 cm:


there are many different layer in the background, made with my favourite products: Dylusions, gesso, stencils, acrilic colors and Distress Ink:


I used the small canvas butterfly, and I add in the middle a Key and many small buttons


Hope you enjoy

Thanks 

Saturday, September 14, 2013

Feeling Like Fall

I LOVE Fall!  Maybe because I'm a Wisconsinite and the fall weather is the most perfect for us!  So today as I sit down to make some fall cards, I thought I would also show you some of my other fall cards.
I

My Linnie Shapes are very well suited for cardmakers!  Here I used my house and some pendants.  The house was colored with a Faber-Castell Gelato and a little water.  The pendants with some Folk Arts Buttercup acrylic paint (love "buttercup")!

This card was super-duper simple!  I cut my designer paper and folded it like a matchbook.  Then I die-cut my Linnie Blank with Die-namics leaf die and simply adhered it to the cardstock with the pretty design peeking through.  The edges were highlighted with Ranger Distress Stain in Antique Linen.  Like I said, 'super-duper' simple!
This last card features one of the new Linnie Shapes coming out in my next release, later this month -- trees.  For these I colored them with Faber-Castell Gelatos and highlighted the edges with my favorite brown Faber-Castell Big Brush Stampers Marker.  The words peeking out from the curled top left corner is a piece of tissue paper from Brave Girls Club, which I simply glued down to my cardstock.  If you ever order anything from the Brave Girls online shop, you will receive your goods wrapped in this yummy tissue paper!  You can also order the tissue on their website!  Reuse-Repurpose-Recycle people!!

I hope you enjoyed my cards on this beautiful fall day!  Enjoy it!

Linda

Friday, September 13, 2013

Sunshine Found Mixed Media Canvas by GDT Laura C

Hey everyone!  I'm Laura Cox and so honored and excited to be a Guest
Designerat Linnie Blooms this month!!

Mixed Media is such a creative outlet....no rules, just go for it!  So that's what
 I did with this canvas project (my first!):


I started with a canvas base painted with gesso, added spray inks directly on
thecanvas and also through an UmWow Studio stencil.  I also added modeling
pastethrough one of these stencils. The sequins and chipboard were added
while  it was still wet, then allowed dry time overnight.

Playing with different textures and mediums is the best part of mixed media,
and in this piece, front and center for the texture I wanted, were the
 Linnie Blooms  canvas shapes.  The sunshine and the arrow shapes were
colored in with gelatos and water, and then frayed up at the edges. 

A paper circle with distressed edges and brushed with gelatos and then
 a button with twine completed my sunshine, here's a closer look:


I just love that these pieces are limited only by your imagination and creativity!

I also added the mesh from Linnie Blooms as well.....this is a great stencil, or
used for additional texture as I did here (it reminded me of the beach!).  Some of
 it was dyed with spray ink, some I left plain.  I coated it with Faber-Castell/
Design Memory Craft gel medium, then played with it until I liked the look
and left it to dry.

Here is a closer look:


A little more gesso, sticker letters and a pic, finish it off.  It's a special
memento  of our beach trip this year.  Love that I can have this memory
on display! 

Thanks for stopping by today and finding a little crafting sunshine with me!
Hope you are inspired to create some of your own...so many options
with Linnie Blooms goodies!

Tuesday, September 10, 2013

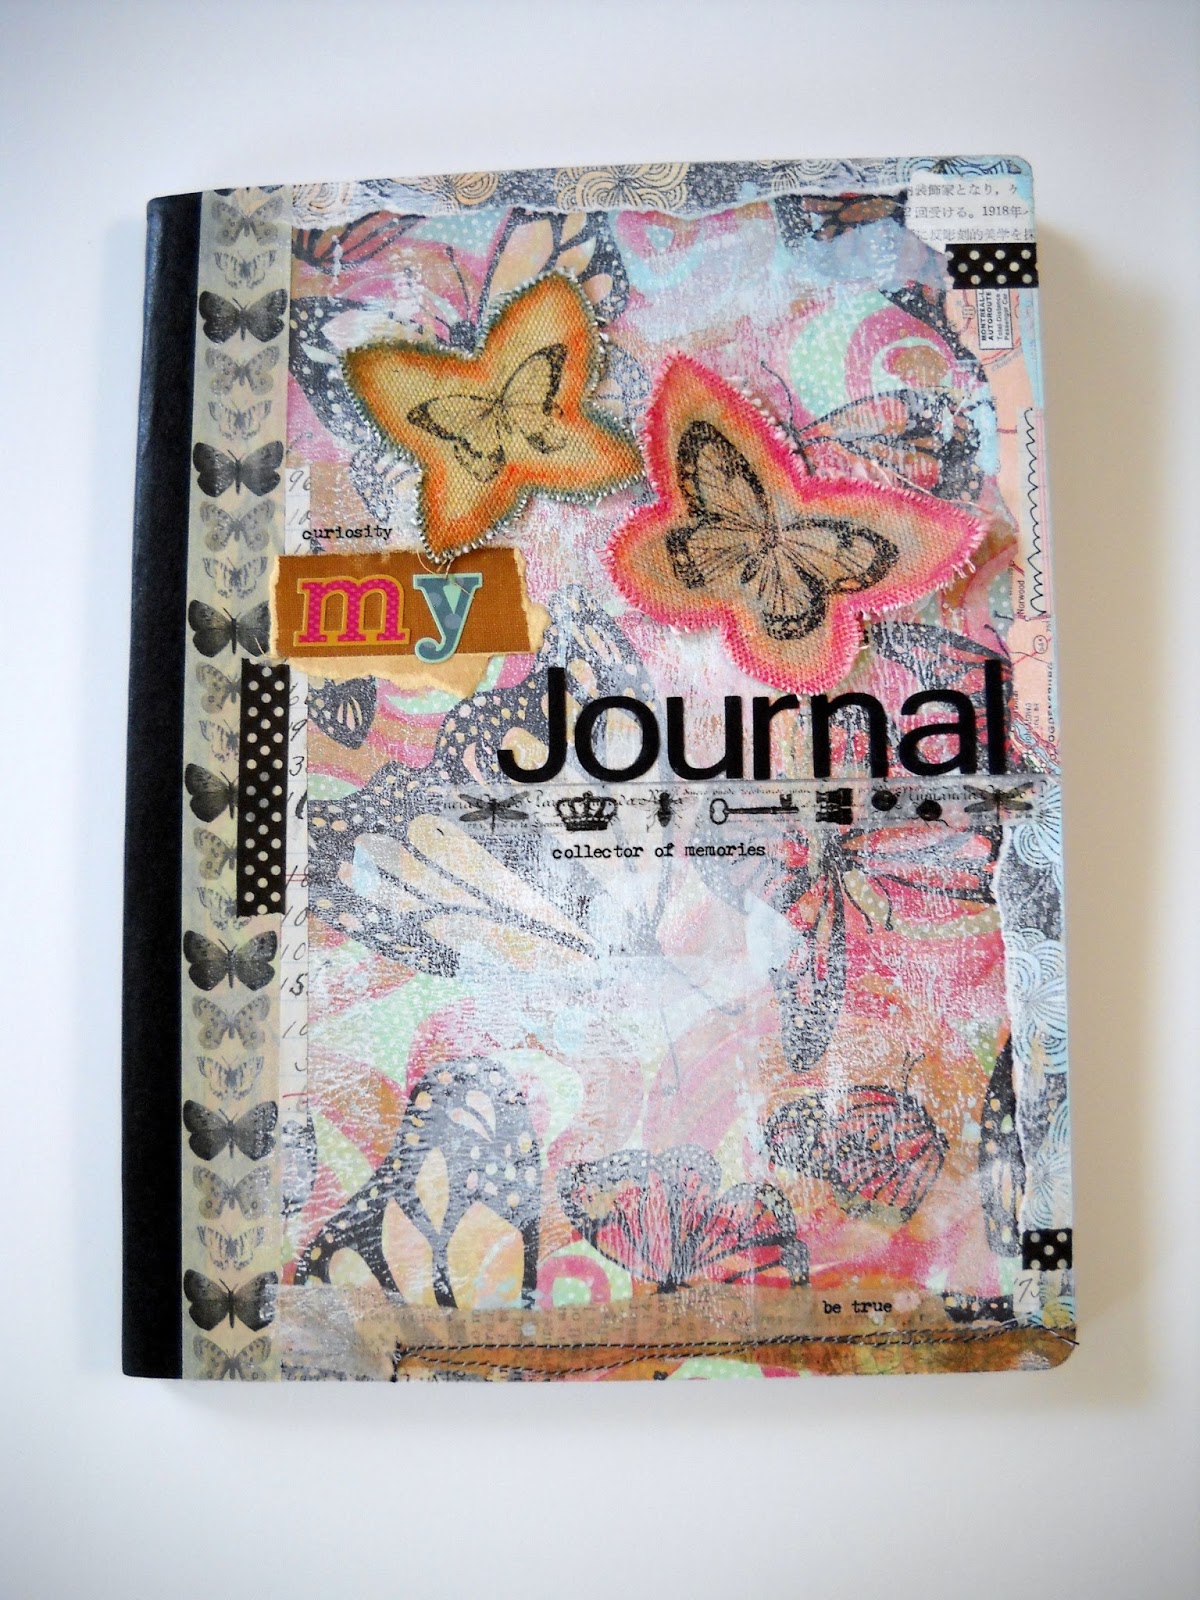
My Journal by Guest Designer Cheryl Dossey

My Journal – Created for Linnie Blooms
Here is my latest project featuring Linnie Blooms canvas shapes and a composition book.
I usually pick up several composition books each year during the back to schools sales. This one was the basic black and white. It’s now a bright, happy butterfly themed journal ready to be logged with all sorts of creative thoughts and ideas.  I love journals; I have art and written journals, as well as, one just for creative ideas or projects.


I really enjoy using Linnie Blooms canvas shapes in my projects.  The rough edges add great texture and dimension.  The butterflies were first painted using watercolor crayons. I then added a butterfly transfer to each one in black.
The background of the journal is a piece of patterned butterfly paper that was then painted with white paint using a brayer. I also added vintage ephemera scraps, and some washi tape. The words were done using rub-ons, stickers and cut with a silhouette cutter.
 It was a fun project and I’m looking forward to receiving new shapes soon.
Happy Creating!!
XO, Cheryl


Sunday, September 8, 2013

The Buckeye by Kelly Hoernig


And here is a link to watch the video:   https://vimeo.com/73993801

A little bit about the inspiration and piece…


I wanted to use the Linnie Blooms large butterfly and house shape for this project. So I looked around at what could be found at the local craft store and saw this charming little paint bucket. Well, I knew this would work for whatever I wanted to do so I bought it. When I got it home, I started looking through my ephemera and found a stack of library cards. I like to let the book names inspire the art and sure enough there was a card for “the Buckeye State of Ohio”. I remembered that there was a butterfly called the buckeye so looked it up and saw the beautiful markings you see on the painted sample. We are lucky enough to have the real ones in our area and they really do look this beautiful! I wanted a map of Ohio but when searching on our Indiana map saw the Ohio state line and the Ohio river, close enough, right. So that was how I started putting this fun piece together. I do hope you enjoy the video and also find some great uses for the many wonderful shapes in the Linnie Blooms product line. Happy Shopping!


Creatively yours, Kelly Hoernig :D


Wednesday, September 4, 2013

Altered Box with Linnie's shapes

Hi everyone! 
Today I show you an altered box...Originally contained the internet key for the PC, but the design was too cute not to be reused.


firstly I covered all the surface with gesso, the in the front I add texture with stencil and grunge paste... 


secondly I painted with acrilic colors made by Paper Artsy... and at the end I add Linnie Blooms Shapes:
I singed the edges of the butterfly, and I add colors: 


the two canvas pennant are simply stamped with Black Archivial Ink:


I hope you enjoy...

Came to visit Linnie Blooms SHOP is always full of new products..

Thanks