

Thursday, October 31, 2013
Wednesday, October 30, 2013
Fall Framed Home Decor
Hi there! Laura here today, and just a little sad, as today is my
last guest post for Linnie Blooms....so I did want to take just a
second and say a huge THANK YOU, to owner Linda and DT
coordinator Kimberly, for the opportunity to create with these
awesome shapes! I have had a blast!
And without further ado, here is my home decor project:

I used the Canvas Full Tree Shape and Distress Paint in Peeled
Paint and Walnut Stain to color the tree. To get the leafy look...
I used the dauber to pounce on the color. The Canvas Owl shape
was brushed with Distress Stain, and then I went around the edges
with Espresso paint dauber. His eyes are two black buttons with
Jellie Dot gems for centers.
The Fall Leaf Shapes were colored with orange and red gelatos,
directly onto the canvas shapes, and then blended with water,
because I wanted a deep fall color. I frayed the edges just a bit,
and then brushed them with the Espresso paint.
The fall banner is the Canvas Pennant pieces, and I left the tip
uncolored, then added a streak of orange and a streak of
yellow, and blended carefully to get the look of candy corn.
I brushed these with the paint as well, and then adhered the
letters, and used foam tape to adhere the banner to the frame,
and added twine bows.
I used stickers and paper from Reminisce, and buttons with
Trendy Twine Orange Licorice to finish it all off.
Thanks for stopping by today, and make sure to check out
all the fun shapes from Linnie Blooms....so many to choose from!
Tuesday, October 29, 2013
Make a Wish Layout with Canvas Shapes
Hello!! Rochelle here to share with you a layout I created using Linnie Blooms canvas shapes.


For this layout I used canvas stars and a canvas tag. I used two different types of mist; Maya mist and Tattered Angels mist. For the stars, I outlined them with Rangers Stickles and Liquid Pearls. I love how the canvas shapes add texture and dimension to layouts!
You can find these shapes and more HERE.
Happy Scrappin'!
~ Rochelle
~ Rochelle
Monday, October 28, 2013
Sewing Basket by Marfa
Hi everybody, it is Crafting Marfa again to show you my design team project for Linnie Blooms. It is a sewing basket! Yup, yup I made a cover for my sewing basket. It was totally intimidating at first, but by the time I was done I was having a lot of fun.
I used several blank canvas shapes from Linnie Blooms. I inked them, I sewed freehand designs on them and I even wrote on them! I also added pearls to the bird. I like it so much that I have it in my bedroom where I can see anytime I want. I made the flowers myself, following a video tutorial in YouTube. Unfortunately, I did not keep the link to the video, which is why I'm not able to share it with you. Do you like my little basket? Its so cheerful!

For a way better look check out my itty bitty little video ;-) http://www.youtube.com/watch?v=VB_9xZd8zhE
Sunday, October 27, 2013
Kindergarten Mini Scrapbook Album
Although we are fully enjoying the many hues and events of this Fall season, which I absolutely LOVE. Lets also remember to get those back to school memories down on paper. It's always good to get a start on creating those memories on paper before the new year rolls around.

Below you can take a peek at my video showing each page and detail of the mini.
I hope this has inspired you to print those back to school pictures we have stuck on our cameras and phones. Yes, the school season has only just begun, but so has the many many memories our kids will create for this school season. So let's get started!
Kisha
Kisha
Saturday, October 26, 2013
Twinkle Twinkle
Good day everyone. How was everyones weekend going?Is everyone getting their final Halloween touches?
Well today I must say it is my last post with Linnie Blooms.
I am excited to have been one of the first designers for the team. It
is time to see some new talents and I cannot wait to see who gets to
inspire us all next.
So I thought since I started with an art journal page why not finish
with one. My daughter inspired this little page as she loves to sing
Twinkle Twinkle, along with Justin Bieber. Well Twinkle Twinkle was
easier to pull off for me.
So here is my artistic take of Twinkle Twinkle I hope you are inspired. Also make sure to watch the video on how I created it HERE.

I love how big the stars are in the Primitive Star Set.


I couldn't resist using some texture paste for some background sky and stars using a Crafters Workshop Stencil.
I
whipped out a new Prima Stencil to create a stone looking wall using
texture paster and some embossing powder from Sparkle N Sprinkle called
Silver Lightening.

There are so may ways to create using Linnie Blooms shapes and I know
you will be inspired after checking out more projects on the blog so
look around and check out the store too!
Shanna
Friday, October 25, 2013
When a simple thank you won't do...
Sometimes, a simple "thank you" isn't enough.
Sometimes, a paper "thank you" isn't enough.
Sometimes, any kind of "thank you" isn't enough, but something will have to do.
This is one of those times.

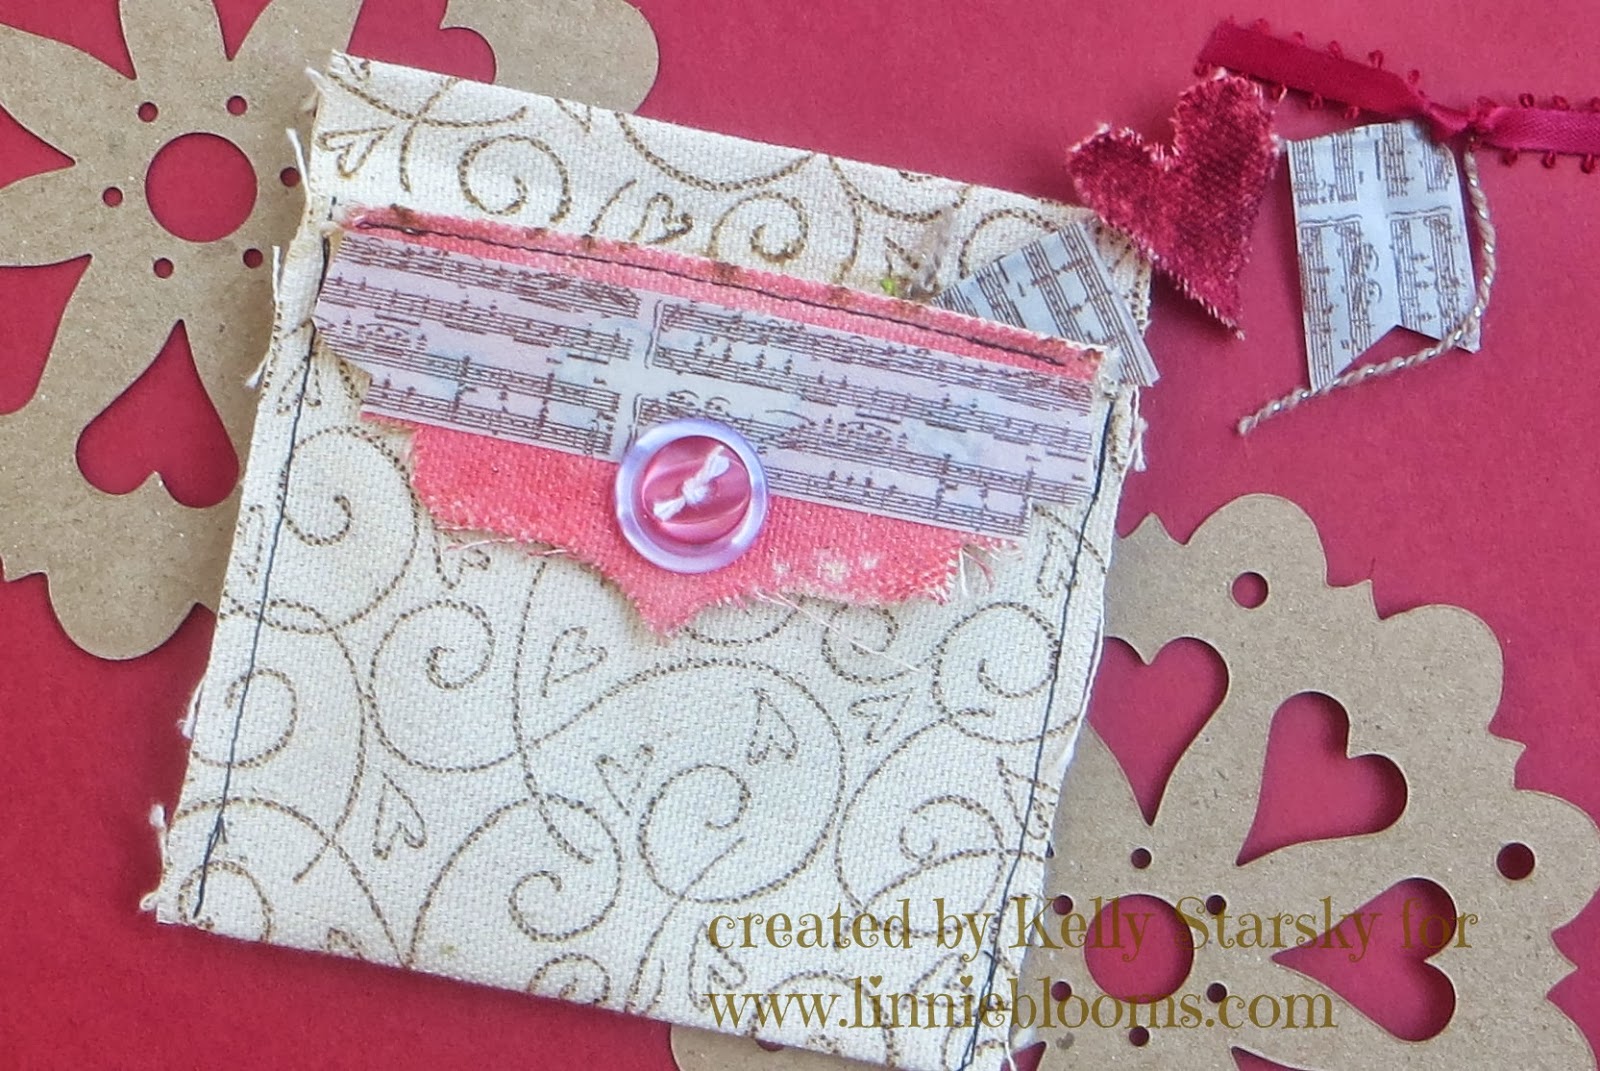
I'm playing with Linnie Blooms shapes again, and this time it is the new canvas pocket (available soon). It's the perfect size for a gift card or...

a pull-out message.
I stamped the pocket with Distress Inks (I love that they don't bleed on the canvas) and then added some Distress Stain color on the flap along with some washi tape and some buttons. Inside, I used more Linnie Blooms shapes (pockets, pennants, and hearts) to make a mini banner. I used acrylic paint, Copic markers, and more Distress Stains along with more washi tape to complete the banner.
Wondering how I got those letters on there? I laid down some alpha stickers and painted right over them. When the paint was dry, I lifted the stickers off and a perfect stencil remained (no seepage).

And, it's the gift that keeps on giving because it can be passed on and on and on to new recipients.
Spread the love.
~Kelly

Thursday, October 24, 2013
Altered Cigar Box
Hello Crafty Peeps, As we start to roll into the weekend I have decided to share one of my cigar boxes. I love to alter them and sell them. This one I made for my craft room, so I will be keeping this one. However it did look really cute in the Linnie Blooms shop so I may have to make one for Linda Barutha's store too.
If you have been checking out our blog daily you will see all of the awesome projects the design team have been doing. I wanted to use 3 of my banners from Linnie Blooms on an altered art piece. I love keeping them used as banners however you will see how creative the team is and they have found clever ways to use them.


If you have been checking out our blog daily you will see all of the awesome projects the design team have been doing. I wanted to use 3 of my banners from Linnie Blooms on an altered art piece. I love keeping them used as banners however you will see how creative the team is and they have found clever ways to use them.


 |
| Here is the cigar box sitting on top of my shelf full of supplies. |
 |
| 2 banners on the right painted w/ pink acrylic paints & I added 2 puffy stickers |
 |
| Displayed in my studio w/ the banner I made using Linnie Blooms Shapes. |
 |
| Close up of my Cigar Box using 3 banners from Linnie Blooms. |
 |
| The other banner I used as a Pennant and added a stick and some twine. |
Have you decided what Mixed Media shapes are you favorite? You may need to get a few in your stash then decide. I change my mind every time I use them. But so far these are my favorite shapes, until next time.
Thanks for reading today's blog, I hope you have a cigar box you can alter. Check out Linnie Blooms shop to purchase a few shapes.. you will love the variety.
Linnie Blooms Designer, Kimberly (Scrap It Girl)
Wednesday, October 23, 2013
Little Blue Bird of Happiness
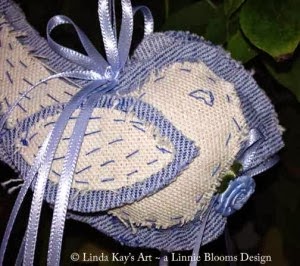
I have a new project that I designed for Linnie Blooms ~ a sweet Little Blue Bird of Happiness.

I used 2 of the Canvas Birds and 2 of the small Canvas Leaves for the wings and an old worn out pair of blue jeans for this little birdie. I love to recycle old jeans into projects. They lend a soft touch and color to so many things I make. I thought it perfect for this little creature.

I used 2 of the Canvas Birds and 2 of the small Canvas Leaves for the wings and an old worn out pair of blue jeans for this little birdie. I love to recycle old jeans into projects. They lend a soft touch and color to so many things I make. I thought it perfect for this little creature.
With some stiching for details and to putting it together, it was completed in an evening in front of the TV and a movie I was watching. I had a bit of ribbon salvaged from another project and a sweet little ribbon rose that matched perfectly. It was pretty easy to do and I bet you too could make one.
I placed the Linnie Blooms canvas shapes over the denim and cut around them leaving a 1/4″ seam allowance. I did the detail stitches first, then stiched them together just by holding them between my fingers. No glue, no pins. I like the little bit of raw edges here too. I stuffed him gently with a bit of pellon and made a ribbon hanger long enough to go over a branch if I want.
I can see him done in white velvet for a Christmas dove, or crushed red velvet for a Cardinal. Even tiny pastel prints would do nicely. A touch of potpuri used in the stuffing would make an nice closet sachet too. Oh the possiblities!!
What are you going to create with Linnie Blooms canvas shapes? Sure would love to hear from you!
Happy creating!
Linda Kay
Play a Little
It's "Sassy" time here at Linnie Blooms which only means that I (Sassy) bring you today's post.
As I was sorting through Linnie Blooms canvas pieces I had on hand and what was to be put aside for future projects, I was left with a canvas circle, arrow, burlap strings, a piece of mesh, and a few snippets.


Using the pieces above, I created this 5 x 7 boxed canvas:
 The circle was used for the girl's head, the house/arrow for the body, burlap threads for hair, and mesh for additional texture in the lower, right-hand corner.
Be sure to check out Linnie Blooms blog for more inspiring ideas.
Thank for stopping!
As I was sorting through Linnie Blooms canvas pieces I had on hand and what was to be put aside for future projects, I was left with a canvas circle, arrow, burlap strings, a piece of mesh, and a few snippets.
Using the pieces above, I created this 5 x 7 boxed canvas:
Be sure to check out Linnie Blooms blog for more inspiring ideas.
Thank for stopping!
Tuesday, October 22, 2013
Canvas longs blanks with Sandra
Hi everyone,
It's Sandra today...
This time for my project for Linnie Blooms I used the Canvas Long Blanks, the ideal base to experiment with gelatos and stamps:


I used my favourite colors (tropical gelatos) and I love how its looks... I hope you too..
Don't forget to visit the SHOP
Thanks
Monday, October 21, 2013
Leafy Fun With Pinky **Tutorial**
Good morning Linnie Bloom friends,
Pinky here today with this Linnie Bloom Canvas card
perfect for fall or even Thanksgiving.
These new Linnie Bloom shapes are amazing and easy to work with.


- Using small leaf stamps (I used Nuts About You from Avocado Arts) and several fall colored inks (Clearsnap Chalk Inks), stamps leaves all over upper part of Linnie Blooms Canvas Full Tree.

- Spritz entire tree using Smooch Spritz in Gold Glow (adds shimmer).
- Rub tree trunk with brown ink.
- Ink edges of tree by hand.

- Adhere tree (Beacon 3N1 Adhesive) to kraft paper and trim out.
- Trim out card (4.5X5) from card stock (CutCardStock) and layer papers.
- Adhere tree to front of card as shown.

- Using foam pop dots- adhere die cut sentiment (Teresa Collins) to center of tree).
- Adhere card front to card base.

That's it! A beautiful fall card with a handmade touch.


I hope you enjoyed today's post and like this card!
Until next time- Keep on creating.

Sunday, October 20, 2013
Happy Halloween Canvas
It's creeping up on us...HALLOWEEN! Are you ready? I am very excited this year for Halloween. After living 8 years way out in the country, never seeing one, not one trick or treater, I will be ready this year! We have totally decked out our house for our first party this Saturday. That is a first too. So fun things right around the corner! Today I have a canvas to show you.

I used the LEAVES to make the flower shape and as the leaves. I used green gelatos over gesso to get the pretty green.

I used gesso first to give a nice primer to the canvas. I used orange gelatos and a little paint to color the leaves. The shapes take so many different mediums!


I love the canvas CIRCLES! They are perfectly cut and we all know how hard it is to cut a circle out of canvas!

So I hope you all have a Spooktacular Halloween! Go shop at the STORE to get some fun things to play with! The canvas shapes are AWESOME!
~Kimberly S.
Saturday, October 19, 2013
Time to start your Christmas Cards!
Hi Everyone! Julie here!!
I know it's not even Halloween yet-
but when I saw one of the newest Linnie Shapes-
I knew exactly what I wanted to make!

I colored the canvas tree with some Copic Markers and blinged it up with Stickles!
Very festive!

It works perfectly with some DCWV Burlap paper and some

Christmas will be here before you know it,
so time to get started on those cards to mail out!

Thanks for stopping by!
Subscribe to:
Comments (Atom)