Saturday, March 29, 2014

Calling Mother Nature with a spring wreath


My wish...SPRING!
Oh spring, spring...where for art thou spring?

My little spring thing last week really didn't seem to have any effect on Mother Nature, so I'm trying again. This time, I'm making a wreath to grace the door and scare away the winter spirits.


First, I took a straw wreath and wrapped and wrapped it with this pastel variegated yarn.

Next, I took a Linnie Blooms canvas bloom and made a cut in it to the center.  I colored it with gelatos and spritzed with water so I could spread the color with my fingers.  These new spring blooms come in 2 sizes and I colored 5 of each size for this project using all shades of pinks and orange.  Some blooms have lots of color, some are more natural in the center and just colored on the edges.  Some are more pink, some are more orange.  A flower hodge-podge!


Once dry, I dripped some  hot glue onto one section next to the slice...


and overlapped the adjacent petal to give the bloom some curved dimension.


Next, it's painting time!  I painted these ADORABLE Easter shapes and letters from Unique Laser Designs.

I "marble-ized" the solid egg and bunny by blending gelatos over the dried acrylic paint and then splattered the letters with pink paint after covering them with a few thin coats of Distress Stain Picket Fence.


I added some seed beads to the center of the blooms and then tucked the blooms in with the wood shapes, a burlap ribbon, and some twisted paper leaves (attaching all of them to the wreath with hot glue).


This is my ode to spring.  Mother Nature are you listening this time?
~Kelly

Pin It

Thursday, March 27, 2014

Stamped Mini Blank Pocket! Makes a Great GIft!

Today I am showing you a simple way to add some details to your mini blanks without having to paint the whole thing or feel like you have to change the color of the canvas.

 I actually like the natural color of canvas! 

I used my mini blank as a pocket for a gift card for a friend.  I used my adhesive tape and a few mini staples to secure it to a tag. 

I only needed a few items to add details to my mini canvas blank.
A stamp set from Close to My Heart, my new bling, a prima tag as my base, Heidi Swapp's Pink Color Shine & Stencil.  I covered the tag with some of my favorite paper. Both sides of the tag are covered so it hides my staples and brads.  I used the color shine as a paint to add the details of the stencil and to color my ribbon. 


Order a few mini blanks and you can create a few of these for your friends.  You can also put a few of the mini blanks together to make a mini album.
 

Tuesday, March 25, 2014


Celebrate Spring!

I have a new design I made for Linnie Blooms and I am offering it as a class in my home studio classroom.

Celebrate Spring Banner
Where I live, we have had a Very Long Winter! I am so anxious for spring and some green grass with some spring flowers. I decided to make a Linnie Blooms piece to celebrate the coming spring and all the wonderful things it has to offer. Wouldn't this banner look nice hanging in your home too?!?

A little love detail
Who doesn't love spring and the bounty that springs from the earth? I was inspired by love of warmer weather, the return of song birds and colors that seem to pop and are so vibrant.
I choose some of my favorite colors ~ creamy white, pinks and turquoise blues
A few of the Linnie Blooms canvas shapes ~ a heart, a couple of birds, and some small petals to use as wings & some Shabby Trim ribbon.
little blue bird of happiness
A pair of little Blue Birds of Happiness who were making a honeymoon nest of their own and plenty of spring time love in the air...
These are the thoughts I had while creating this little banner on a Linnie Blooms Long Blank. Trimming the canvas edge with pinking scissors revealed the bright pink backing just perfectly. I love it when things fall together like this!
Cute as a button

All this little nest needs is a few baby blue birds to snuggle into their nest. As spring warms the soil and brings new life into the world, maybe those little babies won't be too far behind...

nest detail

The class for this "Celebrate Spring" banner will be held on Sunday, March 30th,  2:00 - 5:00 pm in my home studio classroom. You can sign up for it here on my website.
Best wishes!
Linda Kay
If you would like to order any of their products, please let me know and I can get you started.
My website ~ www.lindakaysart.com
& Be sure to visit Linnie Blooms for more Mixed Stitch Media products and ideas.
Linnie Blooms ~ www.linnieblooms.com
Linnie Blooms blog ~ www.linnieblooms.blogspot.com


Saturday, March 22, 2014

Imagine Dream Fly Linnie Blooms Wall Art

Hello and Happy Saturday!
Donna K here to share a little piece of Linnie Blooms Wall Art with you.
I used a Linnie Blooms "long blank" canvas and actually cut it in half.
Isn't it cool that you can change up these pieces and use them in just about any way imaginable to create anyTHING!
I tend to work better on smaller spaces…maybe that's why I enjoy cards 
so much more than a larger scrapbook page?
I just had myself a little canvas, paper and lace party on this 
ready to decorate blank canvas piece.
across the center for a bit of drama in that area. 
LOVE the sweet canvas butterfly on this…
I've used these butterflies on cards but I think this wall decor is my favorite.
AND…
I just HAD to show you this awesome display piece…
do you love this decorative hanger as much as I do?! 
I hope you enjoyed stopping by today. 
Just so you know...
 Linnie Blooms supplies along with the entire online catalog is available HERE
Have a great day today!!
~Donna K / Created by Donna K

products involved in this design:
Inks: Memento Black, Studio G, Colored Pencils (StampinUP)
Papers & Embellishments : DCWV Mat Stack Vintage Collector
Lace Ribbon : 3 Girl JAM
Chevron Ribbon, Jute String : Sparkly Sweet Craft Notions
Stamps : Unity Stamp Company October 2011 KOTM

Thursday, March 20, 2014

Gold and Glitter

You know those days you feel like you are like a grey mouse wandering around in the city? We all have them, and I took a photo of myself one of those days. I mean, scrapbooking is about documenting life, and life ain´t bright and sunny everyday...

To spruce up the "sad" picture I have used a lot of golds and sparkly bits.


I have used a mini file folder as my backdrop for the picture. I used different stamps to achieve some and dept to it.


I built up my page on top of the file folder with different cards, tags, tread and a piece of a brown bag. Then I added a lot of flowers and the gorgeous Linnie Blooms Canvas leaves.


The leaves where covered in varnish and two different Mesospheres from Ayeeda (13@arts). The papers, cards and tags are from 7 Dots Studio. I have also used Heidi Swapp color shine (gold).

Hope you enjoyed my romantic page!

Marie

Tuesday, March 18, 2014

Retro Mini Album

The definition of Retro:

adjective
adjective: retro
  1. 1.
    imitative of a style, fashion, or design from the recent past.
    "retro 60s fashions"
noun
noun: retro
  1. 1.
    clothes or music whose style or design is imitative of those of the recent past.
    "a look that mixes Italian casual wear and American retro"
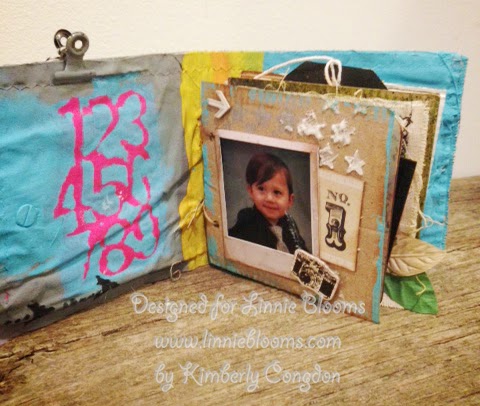
Most of us already  knew the definition of Retro, but that is not the Retro I am talking about for my post.  I am actually talking about a Mini Album for my 2 year old nephew named Retro. 
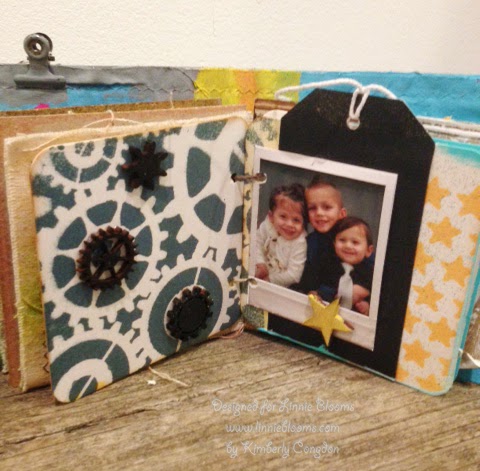
I am using a long blank, 2 small blanks, a star, and a bunch of misc. cardboard pieces, coasters, and pictures to assemble my mini album.  I wanted to make it a little grungy and messy... kind of like my nephew.  He struts himself around showing off his long messy curls and grungy 2 year old attitude. 
Here is a photo of the Linnie Blooms products I used.


Here are a few photos of the cover, inside pages, and what the side view of this chunky book looks like.


I totally love this mini album.. I still have tons of pages inside to play with.  All you need is a long blank and a few of the smaller blanks.. easy to do.  I actually have a Linnie Blooms tag and a few of the new feathers to still add to this.  I love that we can paint, distress, use stencils, and really mess up the canvas with any products.  No matter what we use we always create something new and unique.   Have you made a mini album yet?  Just think of all the possibilities.
Thank you for stopping by!
Linnie Blooms Design Team Member

Saturday, March 15, 2014

New Wall Art

My 12x12 canvas pages are just as awesome to use for wall art!  I had so much fun making this one the other day.  It features Linnie Bloom's brand new medium Pennants, our flowers, bird and shabby trim.  So much fun!  This one will be for sale at the event I'm vending at this weekend, March 15th and 16th at the Waukesha Expo.  I have tons of new items so if you are local I hope to see you!

Thursday, March 13, 2014

Angel with a pocket of wishes


I often find inspiration for my creations from music and today is one of those times.  My daughter introduced me to this inspirational song from Chantal Kreviazuk called "Weight of the World".  As soon as I heard it, I began to have images of this design developing in my head.  

It is a mix of patterned paper, paint, chalk, stencils, ink, watercolor pencils, lace, ribbon, metal wings, vellum, flower and swirly punches, a paper doily, sticky pearls, and washi tape.   

But my favorite element is this pocket.  Using the Linnie Blooms Canvas Flourish Pocket, I created polka dots with a watercolor pencil.  I covered the dots with Glossy Accents and let them dry.  The Glossy Accents moistened the dots, but also, once dry, acted as a resist for when I inked the whole pocket with Distress Stains.  I glued on some trim scraps (rik-rak, pom poms, and lace) and added a few blooms and a button. 

Inside this pocket, secret wishes...wishes for dumping the weight of the world and wishes for taking off flying.


Wishing for more crafty time today?  I hope your wish comes true!

~Kelly

Tuesday, March 11, 2014

March Sketch Challenge

Do you feel the spring in the air? WE do so this moth we have a spring green sketch for you.


Play with us and enter your version of the March sketch on our Challenge tab!

Saturday, March 8, 2014

What's in the Tea Leaves?

Well....as much as I enjoy my cup of coffee in the morning...I do so also enjoy my YOGI tea...
and so attached to each  tea bag is a tag with positive sayings/quotes/wordage.
Not to let ANYTHING go to waste ...I have been collecting these little pieces...for my art:

Soooooooooooo...I made a tag...with the tea tag "leaves"...and a Linnie Blooms butterfly, turned into a sweet yellow buttercup for spring!....a little piece of art!
Now, I am on a roll....I have had some mini frames( 4"x5") in my stash for MANY years..that I took and shabbed up, and with an ATC size piece of chipboard, I painted, layered & collaged up 2 more TEA ARTs!
*****I adhered these to the topside of the frame for a different look*****
I used the Linnie Blooms house and the owl ...super cute product!!
Beeeeeeeeeeeeee sure to check out The Linnie Blooms shop...she is adding more fun & yummys all the time!....


creative blessings, 
debbie

Thursday, March 6, 2014

New Picket Fence

Hi! It's Candy Spiegel returning with a brand new piece from Linnie Blooms ... the picket fence!

I was so excited to see this brand-new piece. It is lined and sewn like the bookmarks and blanks.

In my mind, picket fences are white, so I painted the piece with white acrylic paint. (The front fence in this photo is untouched) However, that also covered the stitching, so I spritzed the wet paint with a bit of water and re-painted with the brush and then used a paper towel to absorb some of the moisture until I achieved the color I wanted.
While my fence dried, I airbrushed the tree with the Copic Airbrush System and Copic markers. I wanted to give the appearance of leaves, so I randomly held the airbrush in place, close to the tree, to get the darker areas. I used a similar technique on the trunk, but I kept the airbrush going in a nice, smooth strip.

I attached both pieces to a 5x7 card with Art Glitter Designer Dries Clear adhesive.
I then used dies to add grass, flowers (Elizabeth Craft Designs), birds (Memory Box) and sentiment (Elizabeth Craft Designs) to the card. The center of the flowers is a Dew Drop from Robin's Nest.
Thanks for stopping by! Visit my blog to see more ideas.

Tuesday, March 4, 2014

Creating with Linnie Blooms Textures

Hey there! Kisha here again with two projects to share with you today.  I decided to step out of the box a bit with Linnie Blooms products.  Instead of giving you my normal canvas shaped creative designs, I decided to show you how to get creative with her Textures.  There's more in store (Linnie Blooms store that is) than canvas shapes to add texture and decor to your pages, cards, etc.  Linnie Blooms also offer Textures and I love them, such a great way to add that unexpected pop to your multi media items.

So let's get the show started.  First, here's a show of the Linnie Blooms Textures (and canvas shapes) I used on my projects.


For this LO, you will see that I used both LB Textures.  One has more of a chicken wire look to it, and it's very easy to work with and manipulate when adding additional mediums and layering.  The khaki/black texture is a burlap material and I don't have to tell you how much I love working with burlap.


As you see I altered the burlap texture a bit more by cutting it into sections instead of using it whole.  I love the chevron pattern within the burlap, which made it so hard not to cut and use as more dimension on the page.


I also used some Linnie Blooms canvas squares...what can I say I just couldn't stay away from the canvas.  I added three different inks to distress the canvas, instead of using it in it's natural state.  That allowed the canvas to blend with the background of the patterned paper used for this LO.

The next item I created is a mini canvas that measures 7X5, and is great to use with those loose wallet size pictures.


Here again you will see I used more LB Textures and two circle shaped canvas pieces.  One of the circle canvas pieces was cut in half, tinted and used as tabs, the second shape was used in it's natural state but both were ruffled up a bit for added texture.


See how well the Textures piece takes on the color mist, gesso is not needed to make the color adhere which is wonderful.


Thanks for stopping by and taking a peek at my projects.  I Hope you have enjoyed these projects and have been inspired to take get creative using LB Textures.

Kisha