Showing posts with label Canvas Trees. Show all posts

Wednesday, August 20, 2014


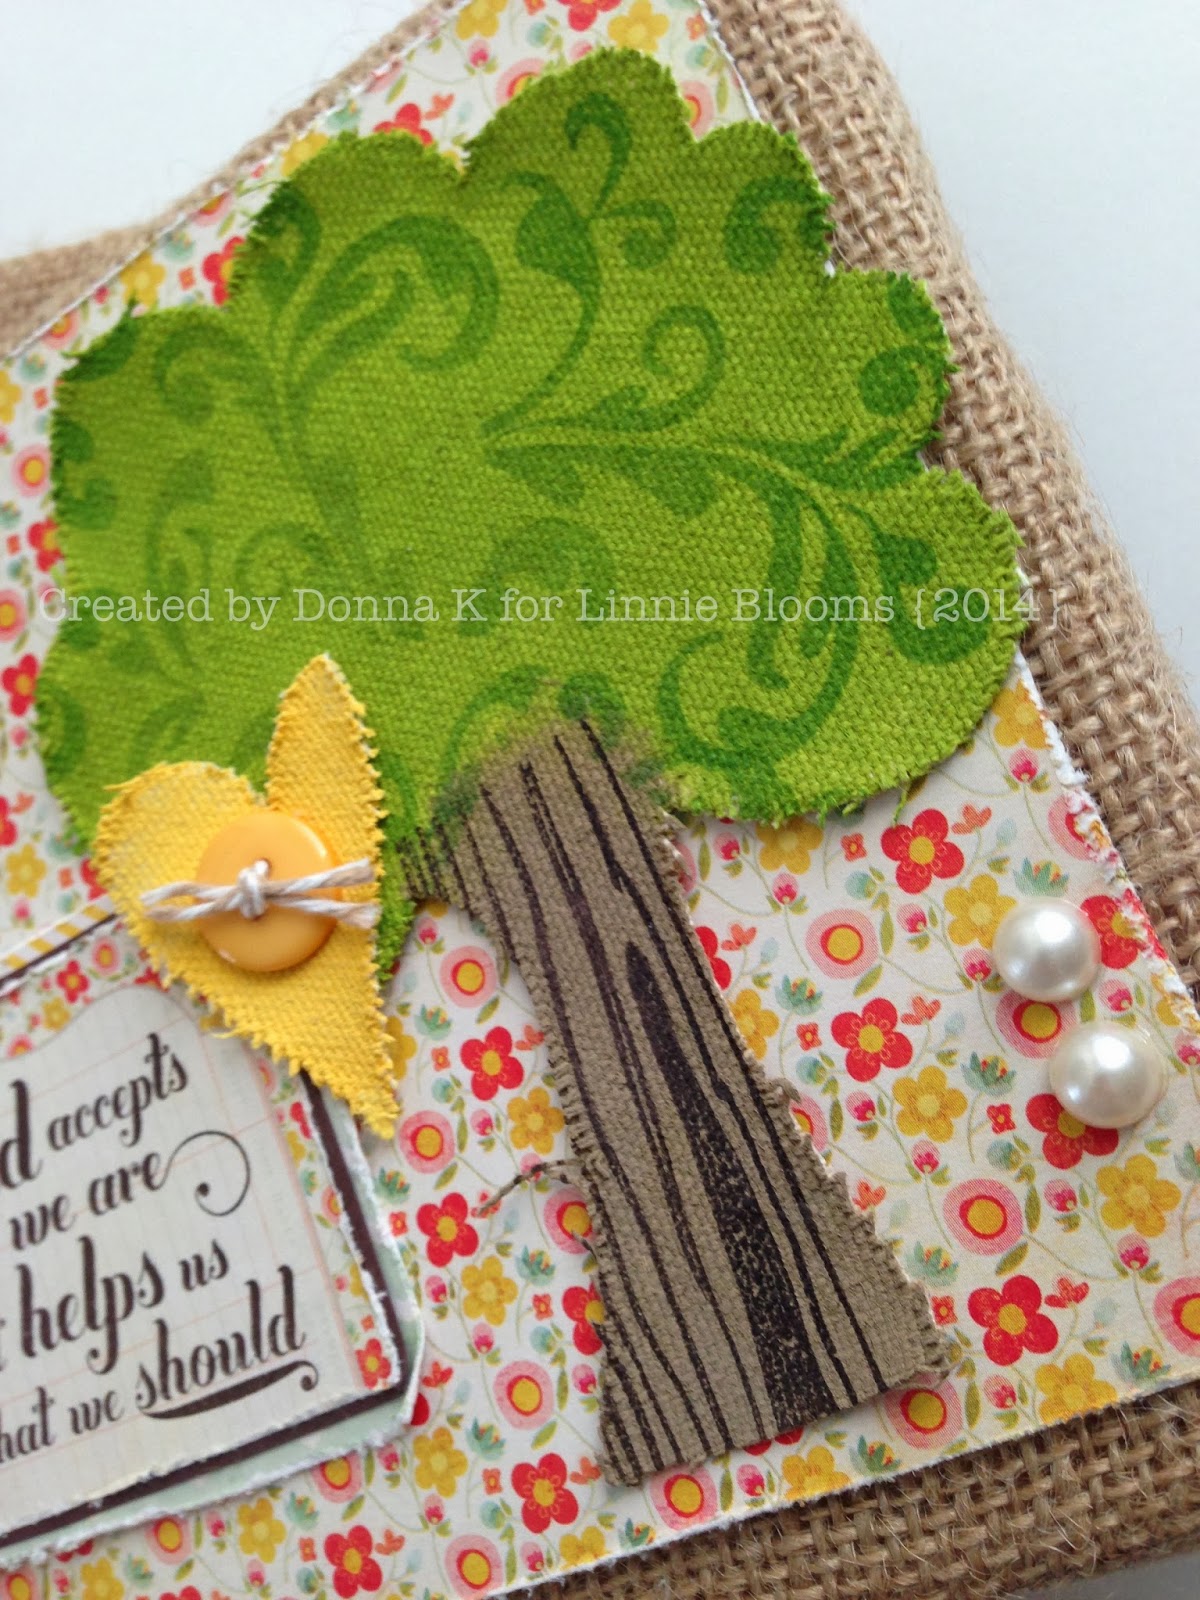
Hi Bev here today. This month at Linnie Blooms I had a chance to 
create using this fabulous canvas pillow case... 
one of the many new product lines to come out in late August.
I haven't dont any stitching for years now.. but it was coming back to me .. just like riding a bike.
No even sure of the names of the stitches... but I am thrilled with my finished pillow case.
I still need to buy the proper inner cushion but substituted for now to get a finished photo.


I started this project with my tree first. I inked the trunk and stamped the leaves 
with textured stamp and green ink. I then added the twine tied buttons.
Next  up was the inked leaves and the stamped look for more depth and texture.
Stamping of the sunburst and the background was next before adding the tree, leaves and  piece of burlap.

Next I stamped the words which I hand stitched using embroidery floss from my stash.
The design was still a bit off so I sew easy inked rolled the lower and side edge with the
stitch pattern which I then hand stitched over top with a varigated coloured embroidery floss.
I didn't worry about the ink splatter.. it added depth and rustic look to my projcet.

Supply List:
Linnie Bloom Supplies:Canvas Pillow Cover, Canvas Tree, Canvas Leaves, Word Stamps
Ink Roller: We R Memory Keepers stamp ink roller
Mask: cut file
Paint: misc
Ink: Tim Holtz ranger, StazOn, ColorBox
Other: burlap, embroidery floss, twine, Stitching, buttons

Special NOTE: the word stamps and canvas pillow case will be in the store around
August 25th.. so be sure to mark your calendar for the newest product lines to become available.

Saturday, July 26, 2014

Simple Joys

Hi Friends! Abby here with ScrappinAbby and today I'll be showing you how I freshened up one of my older projects using the canvas pieces from Linnie Blooms .
This is how it looked before...
This is a mini canvas I made around 7 years ago...I liked it then but I wanted to freshen it up a bit and give it a new look. I have a short video that shows you the project up close along with the Linnie Blooms products I used...

I used one of the tree canvas pieces as one of my background elements. I gave it some texture by using a script background stamp and used the Green Tea Gelato....


We were at a local amusement park called The Enchanted Forest, so I thought adding the canvas tree would be fun & fitting.

To have the photo "pop" off the canvas I used one of the Mixed Stitch Canvas pieces as my background for the photo. To add some color, I used more of my Gelatos in Lemon and Bubble Gum.


I think it turned out pretty cute : )


Using the Linnie Bloom Mixed Stitch and canvas pieces is a great way to update one of your older projects or to just simply mix it up a bit. 

Thanks for stopping by the Linnie Blooms blog today and for checking out another ScrappinAbby project. 

Happy Crafting : )


Friday, July 18, 2014

Amazing Linnie Bloom canvas shapes


Hi .. Bev here today and OMG ..my first ever real canvas attempt... sure hope you like it.
It all started with canvas shapes from Linnie Blooms... and 
I knew exactly what I wanted to do with these really cool canvas trees and leaves.

I started with a 8 1/2"x 12" canvas from the dollar store.
I used paint strips on the background to start. 
Then I mask with gesso for more texture and then added more paint splatter.
Next I used Paper House papers.. plywood and  pine forest... rustic and ripped 
it and edges with ranger ink.
More layers with some burlap, strip of cork and a section of Creative Embellishments accent.
Phot was placed under the accent a bit and the 
painted trees cover the base of the photo also.


I put a cute rubon on a piece of paper, ribbed and inked and applied
 to top right corner of all the layered textures.
I added and metal accent and a twine tied metal keys accent.
In the top upper left corner I inked the leaves, doodled spines and added buttons.


Using Cricut I cut the title "best memories".

Be sure to visit Linnie Blooms blog and store.. amazing craeative 
projects to inspire you.. and give you fab hints on how to use all 
the fabulous canvas shapes and many other unique accents.

Supply List:
                                           Paper: Paper House Plywood P-0578Pine Forest P-0576
                                                       Background Canvas: paint, gesso stamping
                                                                          Ink: Tim Holtz ranger
                                                                                Pen: Staedtler
                                                                 Accents: Creative Embellishments
                                                                  Canvas Shapes: Linnie Blooms
                                                                       Masking Stencil: Prima
                                                                             Cricut: cut files
                                               Other: cork, burlap, buttons, metal pieces, rubon, twine

Monday, July 14, 2014

Back to school teacher treat!

Hello everyone! Jessica LiBasci here from Scatter Joy with Jessann! Hope everyone is enjoying their summer. As we journey through summer, we journey toward the start of a new school year. It is important to start the year off right! Teachers often have special ways of welcoming our children, it is time for us make them feel appreciated too! This design is intended to inspire you and your child in creating something special for their new teacher. Linnie Blooms has a ton of wonderful supplies for you to create your teacher treat!

For this one you only need a few supplies!
Linnie Blooms Nature Canvas Dies (tree)
Chocolate gelato
Green Tea gelato
Linnie blooms shabby trim (I used ribbon from my staff but I love the shabby trim much more!)
Any style green paper, blue paper and tan paper
Small red buttons
Black sharpie
Card board
Hole punch
Adhesive

I began my project by cutting, what would soon be the green top of of the tree away from the trunk.


Once cut, I used the green tea gelato to color the top of my tree and the chocolate gelato for the trunk.

While the canvas was drying I cut and adhered my paper to the cardboard. I used a blue patterned paper for the sky and a green patterned paper for the grass. Once the canvas was dry I glued it on. Then I glued on my buttons and tied on my ribbon!

To finish my project I used a black sharpie to create a dashed line/stitching effect. 
You can create any banner and wording you choose.


Saturday, February 22, 2014

Gift of Friendship

This is the year I want to create more "hand made" gifts.
So….I spot this burlap canvas and had to have it
I love how it's rugged, but pretty and not perfect on the edges.  
Now,  it was just a matter of what to put on it.
I found the perfect sentiment to use but it needed MORE….
That's when my Linnie Blooms canvas shapes started calling out to me.
I have said before, but will repeat…
how fun it is to use these blank canvas pieces!
You can seriously…..
use them blank, ink them, sew them on, paint them, draw on them…
endless possibilities.

Thanks for letting me be part of your day today.
And don't forget…

You can check out the Linnie Blooms catalog for more details on all of the wonderful Linnie Blooms products.
You can also find Linnie Blooms on Facebook and on Pinterest.
Thanks for stopping by today.
I hope your weekend is full of creativity!

Saturday, January 25, 2014

Picnic Anyone?

Good morning and happy Saturday!  Linda here with a Linnie Blooms Mini Mixed Stitch Journal.  With all of the snow and cold outside, I couldn't resist to think of warmer times.

Nothing screams picnic more than red gingham, so I used some Bella Blvd paper to create my fence.  The tree was colored with a variety of Faber-Castell Gelatos mixed around with a watered brush.  Once dried, I stamped the tree with an old Stamp'n Up! roller stamp in brown archival ink.  The base of the tree was colored with Faber-Castell Stamper's Big Brush Pitt Marker.

My favorite part of this was how I made the "tulips".  I took Linnie Blooms Small Butterfly Canvas Shapes and colored them with Heidi Swapp Color Shine Spritz.  I always color both sides because when my canvas gets its shabby curl I want to see color on both sides.  Once dry, I fold the butterfly shape and use Aleene's Fabric Fusion to hold it in place.  Aren't they cute?!!

The final touch was the cute little birdies which were cut out of some more Bella Blvd. paper.  If you would like to give this project a try, check out our catalog or contact one of our Creative Reps.  You can find both at www.LinnieBlooms.com.

Thursday, January 23, 2014

Winter Night and Summer Day!

Hi Linnie Bloom Fans!!  Today I have two different canvases.  I  made the summer day canvas last week and when I saw Debbie's wonderful long blank, I thought, great minds think alike!! Then, I took out my Linnie Shapes and amazingly, 8 shapes later, I saw the Winter night come to life too. I hope you enjoy my Winter night and Summer Day!


The first thing I do is lay out my shapes and the papers I want to use for the background.  This time I used a map of Georgia, some book paper and a couple of children's poems.  (I also added a gelli printed paper for the snow, but it is not pictured here!)


I got out my supplies - I love art supplies!!


I painted up my little house on a canvas arrow with acrylic paint, a brown paint and mixed it with Golden's titan buff to create dimension.


  I used three different gelato colors and a Faber Castell Pitt pen to create the color on the trees! The stars, were sprayed with Dylusions spray through a star shaped stencil.  I just LOVE how the spay keeps its shape on Linnie shapes through stencils.

And here are some close-ups of the the finished canvas!! I think I might like to be on vacation at this winter cabin right now!!  Even though it has been cold here (for Atlanta) I would love some snow and true winter weather!


And then, in contrast here is my summer day canvas!! This is a little 5x7 canvas that I had in my stash.  I thought it fit my Linnie Tree perfectly!


For the tree, I used acyrlics.  I painted on a thin layer of a lighter green.  I used stencils and a 'spouncer' to keep the paint from bleeding under the stencil.  I layered on a couple of different stencils for a more textured look.


I used a brown gelato and a brown Faber Castell Pitt Pen for the trunk.  I put the gelato directly onto the canvas piece and then smeared it around with my finger.  I used the pen to outline the shape and add a little detail!


Thank you all so much for stopping by the Linnie Blooms blog today!!  There are some exciting things going on around here so make sure to keep checking in here at the Linnie Blooms Blog, the Linnie Blooms facebook page and the Linnie Blooms Pintrest page!!  You can also keep up with me at my blog!! So be sure to stop by and say HI!!

Tuesday, January 14, 2014

Creative Tote Bag

A cute little tote for my Linnie Blooms projects


Several days ago, I received my Creative Reps kit from Linnie Blooms. It was FULL of wonderful canvas product pieces, some fabric glue and a couple of bottles of spray ink. I can't tell you how excited I was to receive this package! I couldn't wait to get started, except a cold stopped me in my tracks. Oh the post holiday blues!!!


One of my Fly Tribe friends told me about a great canvas tote that she was using to paint designs on and I jumped at the chance to get a few of these for myself. I have a similar one from one of my paint suppliers, so I knew this would be a perfect place to keep all my Linnie Blooms supplies and its a great Grab-N-Go bag.
I started out picking lots of pieces of Linnie Blooms canvas cut outs to place on my tote. So many to choose from! I came up with a couple of design layouts that I liked and I got started on it a few nights ago. I had good luck with drawing on these pieces before with my fine tip Sharpie markers, so I went with that.


I like the fine tip markers best for this product. I am able to get great colors, fine lines and tiny details ~ or I can go big and bold. Very versitile! I started out with my little banner on these triangle pieces to declare my bag a creative place.

Next, I started with the tree and leaf designs and created lots of leaves, textured bark and just played around. I wanted both large and small tress to depict a design with distant and foreground items. Linnie Blooms has good pieces to choose from that offer versatility, making creative ideas easy.
I like how the large tree came out and I had room to add a hollow hole and plenty of leaves in several shades of green. I also played around with the 2 sizes of butterflies and created 2 with playful folk art styling.
A flower became my sun with contour following lines in an ombre color pattern.
My favorite is the arrow piece which I like to turn into a sweet little cottage. I have used this twice so far and each one looks cuter than the last. I like a gingerbread style of house. Maybe I will have one like this some day.
After a dry fitting to be sure the pieces were placed just right, I used Fabric Fusion to glue them into place. It took a bit more glue to make them stick than I first thought, but I like how this glue didn't seep through, discolor the tote itself or become hard and stiff. A little gentle coaxing was all it took to get them to hold in place. Pretty easy and very little mess!
This is the first side I like to call my Creative Home. I want to go back and add more details onto the tote itself and create a little still life. I think some rolling hills, a path to the house and maybe some flowers along the path.
This is the Creative Side of my tote. Again some more details are needed, like antenna for the butterflies, some more Linnie Blooms hand dyed ribbon and maybe even a bit of glitter. A work in progress, and oh so much fun!  I will be proud to carry this around with me!
Check back again soon for updates on this Creative Tote on my blog.
Best wishes,
Linda Kay
Be sure to visit Linnie Blooms for more Mixed Stitch Media products and ideas.
Linnie Blooms ~ www.linnieblooms.com
Linnie Blooms blog ~ www.linnieblooms.blogspot.com
My website ~ www.lindakaysart.com

Friday, December 20, 2013

O Christmas tree...


Sometimes tags are just too pretty to put on a gift and then throw away.  Sometimes tags are just too pretty to put on a gift at all.  That is when they end up on the tree as ornaments! 
 
I had every intention of using these Linnie Blooms canvas tags as gift tags, but once I started playing, I just couldn't give them up on a gift, so onto my tree they went!
 
I added strips of washi tape to the tags, and then painted them with a layer of Modge Podge to seal the edges of the tape from lifting.  I painted the tree and stars with acrylic paint and "decorated" with Stickles for extra sparkle.  There can never be too much sparkle at Christmas time!
 
I added some musicality with these alphabet letter stickers from Cosmo Cricket and then strung some seed beads on wire to make them easy to hang. 
 
These are so quick and easy that I will make some more.  Maybe, the next ones I make I'll be willing to part with.  Maybe.


Wishing you the happiest of times this Christmas season!
Kelly

Monday, November 4, 2013

Thankful

The changing of the season, the cool breezes and the falling of such beautiful leaves, also brings the planning of the holiday season. Time to plan for holiday gatherings with family, menus and long awaited visits from dear friends and family. This always brings me to think of all of my blessings and, all that I'm grateful for. Which brings me to the Thanksgiving tag book I created.


I also created a quick Christmas card using the canvas evergreen tree.


Here's a video describing what I created. **I apologize for the video being split I can't begin to explain what happened the reason I had to split it** I hope you enjoy.


Canvas leaves and tree used:
IMG_0559.JPGIMG_0552.JPG


I hope this has inspired you to create your own Thanksgiving mini. It's always great to get your kids and even other family members involved in expressing what they are thankful for. Plus you are creating memories that can be passed on from generation to generations.

Have a wonderful week!