Showing posts with label canvas heart. Show all posts

Tuesday, May 5, 2015

“Flower in Pot” Gift Decor and Tag

“Flower in Pot” Gift Decor and Tag
By Gail Green


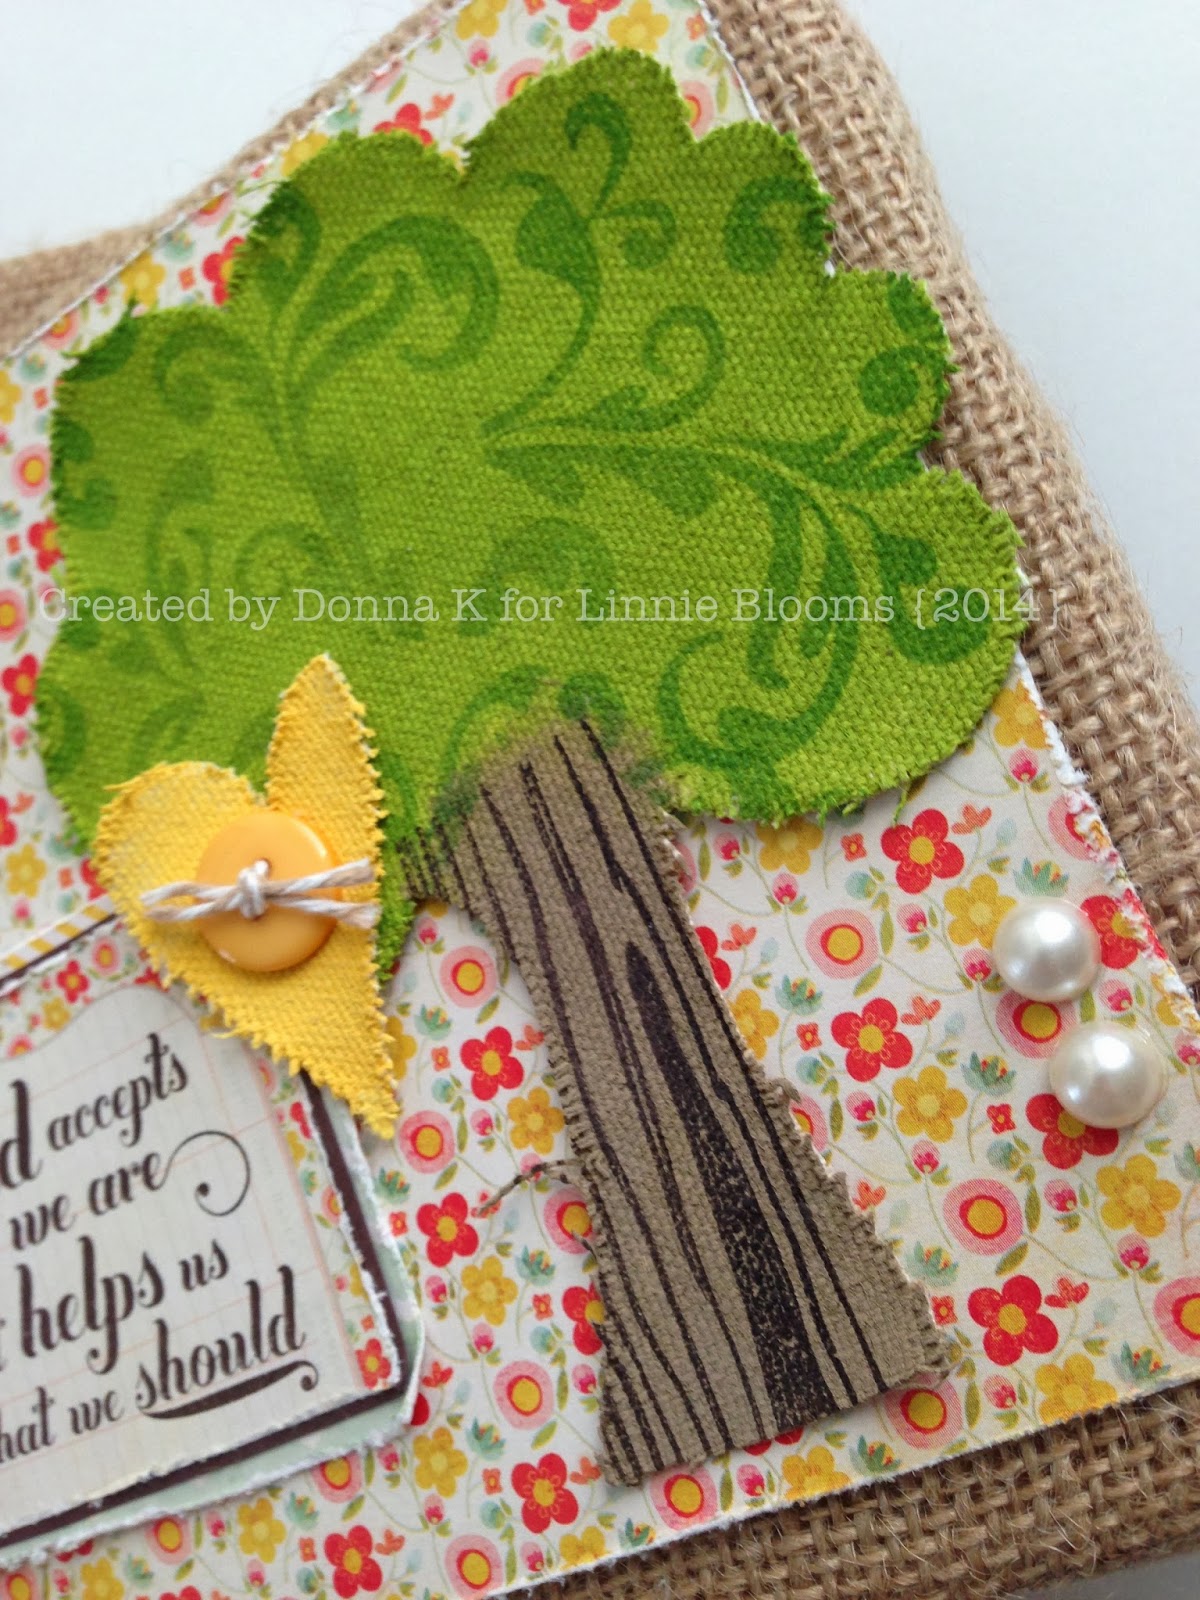
I LOVE decorating packages and other everyday items in unexpected, simple ways!  Sometimes just a splash of color can brighten up everything or make someone smile. How cute are these canvas shapes when assembled and placed inside a vase  or used to decorate a gift?! 

Materials:

Linnie Blooms
Canvas Shapes:
Large Flower
Small Flower
Small Heart
Small Pocket
Canvas Tag
Shabby Chic Trim (green)

You will also need:

Clearsnap Colorbox Premium Sprays by Stephanie Barnard (Yellow, Chocolate, Orange, Bubblegum Pink, Guava, Strawberry

Dimensional Fabric Paint of your choice in colors of your choice

Beacon Adhesives Gem-tac Permanent Adhesive 

Miscellaneous
:  Printed card stock scrap
8-12" wood skewer
Heart button
Small pearls


Instructions:

1. Spray the flowers, heart and tag in color combos of your choice; dry flat by placing a non-stick Teflon mat over wet pieces. 
2. Paint dots on the flowers and heart; dry completely several hours or overnight 
3. On the wrong side of the pocket, apply glue along the side and bottom edges. Attach the pocket to the center of the tag; dry. Paint stitches along the edges, as shown; dry completely (several hours or overnight).
4. Poke a small hole in the center of the large flower. Insert the pointed end of the skewer/stem 1/4" into the large flower from the backside and glue in place.  Attach the small flower over the large flower, centering over the skewer/stem point. (Note: Paint or spray the skewer/stem first, if desired. Dry thoroughly before attaching to the flower)
5. Glue pearls onto the button; dry. Tie three Shabby Chic Trim bows onto the skewer/stem. 

 6. Write or stamp a phrase or sentiment on the note card scrap; slip into pocket.  Insert the skewer/stem into the tag hole. (Note: Glue skewer/stem onto on back of tag if desired. 
7. Place finished project into a vase, gift bag or tie onto a wrapped package. This project can also be used to decorate indoor artificial plants, placed into a weighted base for Bridal Shower place cards or hung on the wall!


Friday, August 15, 2014

I'll give you my heart

Karen N here from Craftily Yours.  Today, I'm sharing a card that I made using a pennant and a heart inked up through a couple stencils with TH distress ink.  These shapes are from the Linnie Blooms - Set of Canvas Dies - Shapes.


I had finished with the card and was stamping the sentiment when I bobbled and rocked my block.  Oh NO!  I ended up swiping on some black ink around the image to hide it, and I actually like the look.  It sorta gives it movement!  The paper is from PB&J from Basic Grey, and the stamp is Unity Stamp Company {Sense of Wonder}.  I finished it off with some 3 Girl JAM lace and ribbon.  The inside of the card says, "I'll give you my heart."  I gave this card to my husband for our 6th anniversary earlier this month.

Thanks so much for stopping by today.  Before you go, be sure to check out:

Linnie Blooms Catalog/Shop  

Craftily yours,

Karen

Thursday, August 14, 2014

Boo.... Did I scare you???

Hey, Hey everybody it's me Scrappin Madge!! Today I am super excited to share with you a fun Halloween Tag that I created using the amazing Linnie Blooms Canvas Shapes and Canvas Fence!! I absolutely love how it turned out!!! I used a Prima Tag (which is great to use spritz, Gellatos and watercolor on) I allowed it to dry. Then I used the Heidi Swapp color shine and spritzed the Owl and the Fence Black.  I then set them to the side and Used yellow Gellato on the Canvas Circle to make a moon.  I then took a canvas heart and used the Heidi Swapp Color Shine purple and mixed it with some yummy purple gellatos.  After everything was dry I started to piece my tag together.


Here are a couple other pictures of this tag.  Be sure to check out my blog for more info on how I created this super fun tag, along with all of the items used. 


And a close up of the moon and the stars...


Be sure to get your Linnie Blooms products HERE-
Canvas Shapes, Color Shine and Gellatos....

Tuesday, April 1, 2014

a sweet little canvas bag... by leeann pearce

Hello Linnie Blooms fans. Today I wanted to share another sweet but simply project I made using one of the 9x11 inch canavs blanks.

I made this little canvas bag for my youngest daughter as she has a love for bags of any kind. She loves to just stuff what ever she can in them.
One of her favorite animals is elephants because she remembers them from our Thailand trip.

 anyway so this is it...


- I simply cut a piece of fabric measuring the same size as the canvas.
- I also made a elephant template and cut this out using scraps of fabrics.
- I used a canvas heart and cut in two and used them as leaves for the red fabric flower.


- Once the shapes were cut out i pinned everything in place and used a zig zag machine stitch.
- I went around twice.
NOTE: At this stage it was time to machine stitch the large piece of fabric I had cut out. 


- I used some scraps of ribbon to create the carry handles and machine stitch them in place.


So you can see how easy it really was. 
There are so many great ways to used this canvas blank. 
I certainly loved making this little bag for jorja!

Thanks for popping by Leeann Pearce

Saturday, March 1, 2014

a sweet canvas for the home - using linnie blooms canvas shapes...with leeann pearce

Hello Linnie Blooms fans, I hope you are all well and have been creating up a storm with Linnie Blooms canvas products!

So today I am sharing a sweet canvas I made for the home.
Lets check it out! 


When I am creating  I don't feel that I have to paint it and ink it every time. Sometimes it looks perfect in it natural state. It already has shape and texture. It might just need a touch of detail. And that's how I have used the canvas shapes today! I simply glued the canvas shapes into a window and added some hand stitching detail. I also layer and hand stitched a  small canvas heart onto the bird for it's wing. I added some flair to the larger heart and buttons to the owl shape.

So there you have it... I hoped you enjoyed my simply but sweet canvas.

Thanks
>>>Leeann Pearce<<<
http://thepaintbrushgoesspottie.blogspot.com.au/


Saturday, February 22, 2014

Gift of Friendship

This is the year I want to create more "hand made" gifts.
So….I spot this burlap canvas and had to have it
I love how it's rugged, but pretty and not perfect on the edges.  
Now,  it was just a matter of what to put on it.
I found the perfect sentiment to use but it needed MORE….
That's when my Linnie Blooms canvas shapes started calling out to me.
I have said before, but will repeat…
how fun it is to use these blank canvas pieces!
You can seriously…..
use them blank, ink them, sew them on, paint them, draw on them…
endless possibilities.

Thanks for letting me be part of your day today.
And don't forget…

You can check out the Linnie Blooms catalog for more details on all of the wonderful Linnie Blooms products.
You can also find Linnie Blooms on Facebook and on Pinterest.
Thanks for stopping by today.
I hope your weekend is full of creativity!

Saturday, February 15, 2014

Simple bunting using linnie blooms canvas shapes... with Leeann Pearce

Hello Linnie Blooms fans... I hope you all had a wonderful valentines day yesterday. I'm sure there was lots of I LOVE YOU and chocolate and wine and kisses and and and....
This month also happens to be the month that I was married we will be celebrating 12 years!
-ain't that just sweet!
Anyway I decide to create a little off the page project for my home, I've had this pink paislee tray for a while and really wanted to semi embellish it.
My intention was to keep it simple with little color ... because I plan to display amazingly  awesome photos I have captured of my children.


"Simply Bunting using linnie blooms canvas shapes"

Step 1: Gather an assortment of shapes and line them up and machine stitch.


Step 2:  Add a tiny bit of detail to them. A stamped pattern and a couple of wooden buttons hand-stitched on.


That's it, told you it was simple!
Now just add it to your embellish tray, photo frame, scrapbook page or card. 
Totally up to you.


Tuesday, February 11, 2014

Create one from the heart and two for fun

I'm creating Valentines big and small with my Linnie Blooms canvas shapes today. I have not ventured my mixed media onto canvas before, so I started with an 8"x 8" size so I wouldn't feel too overwhelmed. I knew that I wanted my embellishments and textures (along with the quote) to be my focus, so I wanted a more subtle background.

 
I spritzed some Distress Stain (worn lipstick) with water and just splattered, brushed, and dripped it onto the canvas and then let it dry overnight so that the splotches and bubbles dried just as they were when wet. I wrapped the canvas with some metallic yarn and added the sentiment with a Sharpie marker.

I used Copic markers to color the house/arrow and heart.
I stamped (with gray ink) the background of the canvas with some Close to My Heart stitched hearts, wrote my sentiment (wherever you go-go with all your HEART), and then layered, layered, layered. You can spy some punches, button, stamps, burlap, tulle, twine, stickers, and a bingo card.
One Valentine present done.

When I looked at my Linnie Blooms canvas pocket one day, for some reason I saw a beak. So this became...


THIS! (with the help of my daughter).


With oil pastels, she colored the pocket and I colored the wings (a Linnie Blooms canvas sunflower cut in half). We added some eyes and some punched half circles for layered feathers and she is going to stick a small treat in here for her teacher. WHOOOOOO wouldn't want to get this cute owl?

And one last Valentine--a silly one! Using up patterned scraps with these painted Linnie Blooms canvas hearts and LOTS of googly eyes--inside the card it says "EYE" love you lots!
Three Valentines done (more to do). Whether your Valentines are layered, from the heart, cute, or silly...they are OH so special when they are hand-made.
~Kelly


Thursday, February 6, 2014

Hope is the thing with feathers.....

......HELLO!!!...this is my latest creation for the 
LOVELOVELOVE these awesome products!
Mixed stitch canvas...birdies and heart shapes...OH MY GOODNESS!
 I played with the canvas blank & shapes...coloring with paint...Dylusions sprays, Heidi Swap Color Shine, and my ULTIMATE new favorite color tools Faber Castell Gelatos!(OMG...YUMMY!)

 This is how my creative brain designs...with the bits 'n bobs all out in front of me...until I can get the perfect fit!
 up close of one of the birdies...heart shape wing.."hope" is one of my "I cannot ever let go of these Stampin'UP! sets!" from when I was a rep...

 ....and this is the back.....I printed out the first paragraph of Emily Dickinson's sweet poem, sewed it onto vintage music paper, and attached it to the canvas.
*************
I will be putting this in my Etsy shop this weekend....along with some other treasures from my heart!
Thanks for looking!...remember...if you are interested in coming over to The BeeHive studio to enjoy some creative playtime with Linnie Blooms, just convo me on FB!!

creative blessings,
debbie

Saturday, January 18, 2014

LOVE is in the Air.....

.....My first blog post as a Design Team member for Linnie Blooms!!
soooooooooooooo...over-the-top excited!!

I just do not know where to start!...OK...let me JUMP in!!....This started out with a plain old metal candle  tray that was rescued from the Goodwill {hunting } bag....
...to which I added some PP from my huge stash...yes...I am a hoarder...but, that is for another posting!
I started with a Linnie Blooms long canvas blank
..and started adding some paints from my (hoarding) stash..
yes....yes....as you can see...I have some OLDOLDOLD MM scrapbook paints I cannot throw away...along with an OOPS paint from Lowes(my "day" job)....Look closely at the paper pad ledger...it will "morph" into a background on another project...
******


I took the Linnie Blooms canvas tree and, being inspired by another DT member , Candy Spiegel
and her idea of using an embossing folder..I slightly dampened the tree shape and ran it thru my Cuttlebug w/embossing folder....WOWeeeeeeeeeeeeee...just a slightly raised image...but, once I put the color on....OH MY GOODNESS!!!!


So, adding bits 'n bobs from my stash(yes...THAT one!)....along with the Linnie Blooms flags...uber cute...I took my  alpha stamps and with Stazon ink stamped the letters and wordage....Glued everything down with MOD PODGE matte.....OH the TEXTURE....oh the colors!!
The entire canvas collage was attached to the tray for a OOAK piece of art !

BTW...I am totally IN LOVEEEEEEEEEEE with the Faber-Castell Gellatos & Pitt pens!!
These are my new...FAVE...go to coloring go-to's!
The Gellatos are just absolutely YUMMY!!...and vibrant...and creamy....any EASY to use!

*************
And..................because I cannot throw anything away...(craft hoarder)...I used the ledger paper and cut into a tag as  a background for the SUPERDUPER sweet as can be Linnie Blooms canvas owl.

...and yet ANOTHER tag...with a LB canvas heart..background made from the babywipe I cleaned up paint & sprays with...

Sooooooooooooooooo...there you have it!....I hope my posty inspired you to get your crafty on with your Linnie Blooms!
I will have a give-a-way  for this sweetheart tag on my blog SUNDAY, January 19th at 
Beeeeeeeeeeeeee sure to stop on by!

creative blessings,
debbie


Thursday, January 16, 2014

All you need


I'm thrilled to be sharing my next long canvas blank with you in my vellum mason jar series.  If you missed my other canvases (fall and spring) you can see a peek at the bottom of this post. This week I'm playing with hearts! 
 
I decided to go with a different background this time, even though I did love painting the chevrons with Scotch blue painters tape before.  I randomly stamped small hearts in different shades of red and pink (it was a good way to test which of my ink pads were drying out).  I used acrylic paint to create a black/pink border which really seems to help it look complete--like a frame.


I cut out my vellum jar, inked the edges, and added some Stickles (rock candy) for some bling.  After I painted my Linnie Blooms canvas hearts metallic red, I used a Papertrey Ink gingham background stamp with white ink to add even more texture.  I used some decorative paper straws as my "stems" and added a few felt hearts in with the canvas ones.  I also twisted some knots in some Linnie Blooms textures and I love the way they add one more unexpected element to the bouquet. 
 
One of my new favorite finds is this "burlap paper" from DCWV.  It's still able to fray like traditional burlap, but it provides a stable background for my LOVE stamp.  When it comes to a sentiment, you can't go wrong with the Beatles!  I love to use song titles and lyrics in my designs. 
 
Valentine's Day will be here soon! Time to add some hearts all around the house!
 
~Kelly
www.pinterest.com


Sunday, December 29, 2013

Cherish Today

Hi Everyone- Julie, from A Little Bit of Bling, here today.

Today is my last post as a designer for Linnie Blooms. (sad face)
I've had a great time on this team!  Linda- thank you so much for having me!!

Mixed media has always been something that I saw (and loved) but thought, "I'll never be able to do something like that".
Working with the Linnie Blooms shapes and canvas blanks definitely brought me out of my crafting comfort zone- and I am so thankful for it!
I have learned a ton of new techniques- and made some new friends while I was at it!


One of the new techniques I learned is working with alcohol inks.
I made the flower out of aluminum foil and colored it and the canvas blank and shapes with my new alcohol inks.
I finished my project off with some 3 Girl JAM ribbon.  (There may even be a little sneak peek of something new coming to 3GJ soon!)

Make sure to check out the other posts on the Linnie Blooms blog and the shop.  Linda has some exciting things happening on the horizon!

Thanks for stopping by!