Saturday, November 30, 2013

Santa's Boots

Santa's Boot Ornament for Linnie Blooms by Linda Kinnaman:
I am enjoying my time working with these Linnie Blooms canvas shapes. They are so easy to work with! It took no time at all until I had a set of  cute ornaments. Plus, at the end of my post is a special discount code to use for a 10% discount and info on a Black Friday – Cyber Monday sale!
Linnie Blooms Stocking
Linnie Blooms Leaf Set
This time I experimented with the Stocking Shape, which is currently on sale for $1.49 ea.  on Linnie Blooms’ website. I also used 2 of the Fall Leaf Set leaves that looked a bit like holly leaves to me, and some of Linnie BloomsTextures.
Linnie Blooms Texture
I gathered my supplies: some craft paint in black, white and green, a small brush, a scrap of ribbon, some floral berries on wire, thread, needle and scissors.
Linnie Blooms Stocking and Leaf
First, I painted the canvas shapes with a quick coat of paint. I made a messy scallop for the cuff of the boot with the white paint. After they dried, I put them under a couple of books to flatten out as they started to curl after I painted them. Overnight was enough to take care of that.
I hand stiched some of the Textures along the cuff creating puckers and puffs as I went. I wasn’t too careful about it and let the textures find their own place. A few snips of ragged edges was all it took to clean them up.
Santa's Boots Ornaments
Next I poked a hole into the top of each leaf and the boot and placed the wired berries through to the back. A quick twist of the wire on the back secured these little berries. I stiched the ribbons onto the back for a hanger and that was all it took.
Pretty cute, aren’t they?!? Think how nice they would look on your tree, as a gift to someone special or as a package tag. You could write “To:” and “From:” on the back easily and maybe even include a nice note.

To purchase the canvas shapes, please go to the Linnie Blooms website link below and be sure to use the codeLB2013LK at check out and you will receive a 10% discount off your order!

Plus ~ Now through Cyber Monday, many items are 1/2 off!

Linnie Blooms Website ~ www.linnieblooms.com
Hope you enjoyed my little project. Come back soon to see what else is on my workbench.
Until next time!
Linda Kinnaman
My Facebook Page ~ www.facebook.com/LindaKaysArt

Friday, November 29, 2013

PreSeNTs

by Kelly Hoernig for Linnie Blooms


I have been collecting Bingo cards for a couple of years now and thought it would make a nice background for a holiday piece. It is not expected but nice and sturdy, both of which I really like. I just purchased some old viewmaster disks and on a closer inspection found one for the “the Night Before Christmas” so knew it would be a perfect addition to the design. I worked with a nice variety of Linnie Blooms canvas shapes and tried to give each one its own personality just to be fun and different.


I used DecoArt Americana acrylics in Light French Blue, Light Avocado, Foliage Green, Terra Coral an
d Spicy Mustard to create this exact look. I pulled out my favorite stencils to add some flair to the background, the stocking and the heart. Some are subtle and some make a statement, you decide on what goes better with the look you want to achieve.


Because I wanted to add depth, I used fabri-tac and paper glued to the backside of the stocking. It makes it stand up just enough giving you the look of things being filled in it. I then used fabri-tac to hold all the elements to the background. For the disk I attached it to the bingo card with a brad.


Can’t wait to see what creative twist you put on this inspiration – hope you will share it when you are finished! Enjoy and Happy Holidays from me to you!!

Tuesday, November 26, 2013

wrapped in hand-made love...

 
I do not like to shop.
There, I said it.
I'll say it again.
I do not like to shop.
 
However, I do like finding the perfect gift for someone.  And because I do not shop often, I browse for good gifts all year long.  Sometimes, that perfect gift is a gift card (like to their favorite scrapbook store...hint, hint).   And, while a gift card may sometimes seem impersonal, when it's wrapped with something hand-made, it seems to be wrapped with love. 


The Linnie Blooms shop is full of some new fun holiday shapes, and this stocking is perfect for a stocking stuffer (it doubles as an ornament too). 
 
First, I took out a white crayon and freehand drew some zig-zag shapes on 2 of the Linnie Blooms Canvas Stockings.


With a little bit of Distress Ink and some water, I painted over those zig-zags (one side is Festive Berries and the other side is Evergreen Bough).  The white crayon acts as a resist.


Then, I used Tacky Glue to line the edge of one of the stockings and glued them together.


Next came the fun, embellishing part.  I glued a thick, furry felt as the top of the stockings and rubbed in some Rock Candy Stickles.  I added silver glitter glue as stitches on the toes and heels.  I went outside and clipped my spirea shrubs to get some natural sticks that I added to some silver berries and wrapped them in a bundle with some twine.  Some Copic-colored Linnie Blooms leaves top it off.


And look...it's the PERFECT size for a gift card!
So don't despair if you don't find that perfect gift...
wrap it in LOVE...then it is perfect!
~Kelly

 
 www.pinterest.com


Sunday, November 24, 2013


"A Shabby Christmas" 
One of the new trends this year has been Shabby Chic..

With that in mind, I decided to make this cute 3 in 1 embellishment..

It can be used as a adorable decoration for my burlap bag, ready to be filled with goodies.. I attached it with a small clothespin..

It also serves as a To: and From: tag , so my gift gets into the right hands..

Lastly, after all the great gift giving, It can be used as an ornament on the tree :)

I used the cute Linnie Blooms Canvas Stocking.. It's such a good size!! I left it natural and only darkened the edges with Tim Holtz Tea Dye Distress Stain..


Next, I used some little scraps of lace, beads, and pom-pom trim from  my stash.. (everybody has those little snippets around :) I added a few flowers and a small piece of a snowflake Christmas ornament.. Topped it off with just a dab of Snow-Tek for a "snowy" look.. 


Thank You for stopping by and checking out Linnie Blooms DT Blog!!
These canvas pieces are soooo much fun to play with.. If your new here, take a look around and see what other FUN projects the Design Team have came up with :)

 Linnie Blooms - by Linda Barutha
Twitter:  LLLCreate

Direct link to the online shop:  http://linda-barutha.squarespace.com/shop/

Home Decor Holiday Pillows

Although Thanksgiving is in a few days, Christmas is totally on my mind.  So being that Christmas is right around the corner, now is the perfect time to start creating a few special items to add to your holiday decor.

I've said year after year that I need to make or purchase holiday themed pillows.  This year I've gone full speed ahead with creating simple, quick, yet cute pillows to enhance my holiday decor.  Today, I will share with you a pictorial on how I created pillows using Linnie Blooms canvas Stocking shape.


Let's start with necessary supplies.  You will need either unused pillows or pillow fill (if you use pillow fill you will also need cotton fabric to use as a liner), Burlap or your choice of fabric, ruler or measuring tape, tailors chalk, thread, pins and your sewing machine.

First you will need to measure your pre-existing pillow or decide the dimension of what you would like the end result of your pillow to be. Cut your fabric to size (remember to include ample seam allowance to your original measurement)


Place your fabric with right sides together, pin and sew each seam leaving one side open to insert the pillow. If you are using pillow fill, leave only about a 1" opening.  Just enough to stuff your pillow casing.


Once you have sewn each edge, you want to cut the corners of the case.  Be sure to NOT cut into the stitching.  This will allow the corners of your pillow to have a smooth look.


Press the seams of the pillow case  Then flip the case right side out and fold over the opening edge and press.  This allows for even and smoother edges.


Then proceed to stuff your pillow or pillow fill into your casing.  


Now to the decorating part.  Gather a needle, thread, button and of course your Linnie Bloom canvas stocking shape.  I also cut a small piece of canvas to create a loop to hang the stocking.


Fold over the canvas into a loop, attach to the stocking along with the button and sew into place.  Now this will be a little thick so be sure you are using a good sturdy needle and thread.


I threaded twine through the loop of the stocking and adhered it all to the pillow using fabri-tac adhesive. I'm not concerned with having to wash the pillow, as it's only used seasonally.  Also, if need be, I will spot clean the pillow instead of washing it.

And there you have it, my simple to create yet rustic chic looking holiday pillow.  I hope this has inspired your creative juices to get starting on your holiday decor by implementing Linnie Blooms holiday canvas shapes.  

Happy Holidays!

Friday, November 22, 2013


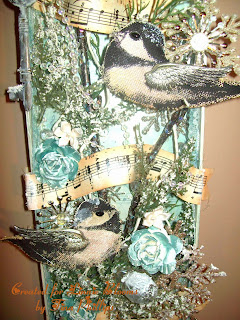
"WinterLand"
  
Wintertime in Indiana is like any other season in Indiana, You never know what you'll wake up to.. As a child, I remember I would wake up for school.. see snow and then listen to the local radio stations for news of school closings :D ..  SNOW DAY!! Back to my cozy bed!! Later, I would stare out the windows, and muster up the nerve to go explore this "WinterLand" After 30 minutes of  adding layers of clothes, scarfs, gloves, hats, boots.. I was ready.. Stepping out on the porch, a blast of frigid air instantly freezes my nose hairs.. BRRRR! Should I go back in? 
 Then I see it! The BEAUTY! This beautiful snow, so pure and white!! The trees are iced over creating a sparkling white and blue oasis..  I stand in AWE.. Thinking, just yesterday, there wasn't a flake on the ground.. The only sound to be heard, is the slight crackling of the ice on the trees, and a few sparrows singing..  After exploring the 7 acre farm.. I venture back into the house.. Strip off layer after layer of clothes, grab a cup of hot chocolate, and get cozy on the couch with my mama <3 .. These childhood memories inspired me to make this beautiful winter scene.. 
The Base of my project is a chipboard box lid.. It was long and narrow, perfect for a scene such as this.. I painted it white, and added vintage music paper for a background.. Then I mixed up an icy blue color using my Folkart Metallic Paints (it's opaque and shiny).. I glued snowflake ornaments, iridescent beads and some lace onto my base..  After that I added pieces of different sprays (some snow covered, some glitter covered, some with crystals) to make my "tree branches" .. I placed painted roses (with the same icy blue paint mixture) a few white flowers, and then a broken small snowflake ornament I had.. I used the same vintage music paper and cut into 3 stripes to make banners, then wove them into the background.. I finished my background with a key on the right side.. <3 Perfect!

For the sparrows, I used the Linnie Blooms Bird Shapes.. and small Tim Holtz metal wings.. I painted both with Folkart Metallic paint in Champaign.. Then I added distress inks in Tea Dye and Wild Honey on the tail and underbelly of the birds.. Next I used a black sharpie to add details to the birds, then darkened them up with black paint and a liner brush... I also added black paint to the tips of their wings... Let them dry, then hot glued the wings to the bird canvas shapes.. 
 Then I hot glued (i use hot glue for everything :D) the birds perched upon my branches..

 PERFECT!!! I had this project invisioned in my mind for a few weeks.. It turned out just like i imagined.. I was sooo happy to be able to create this for Linnie Blooms..  Every time I look at it, Im reminded of those beautiful cold mornings in my "Winterland" on the farm :) Thanks for reading my little story.. Hope you enjoyed!!
For a more detailed explanation on my project process, and more photos, you can view my facebook album.. <-- click here

You can find these adorable canvas birds as well as many other mixed media products here:

 Linnie Blooms - by Linda Barutha
Twitter:  LLLCreate

Direct link to the online shop:  http://linda-barutha.squarespace.com/shop/


The Gift of Bird

Happy Friday!

Sassy here from Sassy Moments bringing you today's Linnie Blooms Design Team post and a cute gift idea easy enough for kids to make this holiday season.

Stitch together two Linnie Blooms Canvas Birds leaving a small opening to stuff.  I stuffed the bird with small pieces from a plastic envelope and then sealed the opening.  Both sides of the stuffed bird were painted with Tim Holtz Distress Paint, Aged Mahogany.  Gold ink was used for embellishing.  After drying, the bird was given three coats of a waterproof sealer.

The key chain assembly was done and VOILA.... a cute bird key chain.


Thursday, November 21, 2013

Tick Tock, Time to Fly~

Have you been following along with our posts this week?  If so or if not.. everyday one of the Linnie Blooms designers is showing you what  they did with one of the Linnie Blooms mixed media bird shapes. 

Today is my day to share my project.   I took the easy route and just painted my bird and wing with soft fabric paints from Tulip.  I used a lighter pink for the wing and a bright pink for the bird's body.  This is the inside of the clock.


I named my project Tick Tock, Time to Fly...  I will be sharing more photos and the items I used once I teach the class a few more time!
Linnie Blooms Designer,
Scrap It Girl, Kimberly Congdon

Design Team Call in Progress


Design Team Call:
*Do you love creating with paper, scraps, fabrics, ink, paint and more?
*Do you create every week?
*Do you love being on the cutting edge of crafting projects?
*Do you love sharing what you create?
If you answered a resounding “YES” to all of the above questions, then you might just be who I’m
looking for! Linnie Blooms is a manufacturer of mixed media products. We are currently looking for
new Design Team members that would be given free Linnie Blooms products to play with and then
display their creations on our blog. If you are interested, please see the requirements below.
Term: 4 months
Requirements:
Post a minimum of 2 projects per month using Linnie Blooms products that will be sent to you.
Post on our blog according to schedule, in addition to your blog, facebook page, pinterest, and
instagram.
Display our Design Team member badge on your blog/website with a link to our online store.
Participate in our blog hops and monthly challenges
What you get in return:
More exposure to your sites
Design team experience for your resume
Opportunity to work with new products
Free product
DT members receive 20% discount on their LB purchases
$50 received for each Magazine Published project using our product and using the Linnie
Blooms name.

Interested?  Then email Linda at LLLCreate@yahoo.com.  The deadline is Dec. 1st.

Wednesday, November 20, 2013

Let Your Heart Be Light!

Hi Linnie Bloom Fans!! This week I was lucky to get to work with Linnie Bloom Bird Shapes! I LOVE them!! 

This piece was inspired by an old vintage Christmas card I found on Pinterest.  I loved the old fashioned street lamp and wonderful Christmas robins.  When I thought about my Linnie Shapes, I knew the birds could make the piece really pop! 


Using spray on the canvas pieces makes wonderful color! Sprays really stand out on linnie shapes! First,  I cut a piece of paper to match the shape of the bird wing.  I put it onto the canvas and held it in place with spray bottles, (I just needed another hand!!)


You can really see how crisp the line stays with spray!! No bleeding at all! 


I did the same on the other side with blue spray!!
 

And this is a final bird with some pen work and rub-ons for details! 
 

The paper branches really curl up off the canvas. I just nestled the birds right in!


Thank you all for joining me today!! I hope you really enjoy playing with your Linnie Bloom Mixed Stitch Shapes and Canvas!

Make sure to hop on over to the Linnie Blooms shop to get your mixed stitch canvas pieces!  Check out my blog and don't forget to check out the design team's Pinterest page for even more wonderful design ideas!

Tuesday, November 19, 2013

PeaCe oN EaRTh

by Kelly Hoernig for Linnie Blooms


I love boxes, any and all kinds. I also like to do my part for the environment and recycle or repurpose whenever possible. So, this piece combines both. It is a brie cheese box that I have repurposed into a home décor item but I used an old atlas to decoupage over the front and back labels to help bring my message of peace on earth to the forefront. You will want to tape the box together then gesso the entire piece. Adhere the map pieces to both lids with decoupage then gesso lightly over them to tone back the map info.
For this piece I have used DecoArt Americana acrylics in Blue Mist, Camel, Honey Brown, Bleached Sand, Sea Glass and Heritage Brick. For the adorable canvas pieces, I spray with water first then apply the base colors. I try not to make them even in application so they become mottled when dry. The bird has the most detail. I floated the belly and added some lines for the feather detail. The eye area is filled with BS first then paint the eye details. I added a twirled piece of string and stapled the string and wing to the bird shape. Decoupage all the elements to the box, making sure to leave room on the bottom for the text. Stamp on using your favorite ink and font. Add some nice lines and you are finished.


So, how many of these are you making for the holiday season? After all, you will be serving baked brie right, it is a special little appetizer and the box is so worth it! Easy to make and adds a little pizzazz to any meal. Search for “Pillsbury baked brie” and look at all the wonderful options you have. Let me know how it turns out, can’t wait to hear all about it!

Monday, November 18, 2013

Christmas Bird

Hi Everyone!

Julie from A Little Bit of Bling here today!  I am starting to get into the Holiday Spirit and although I know it's still a bit early for Christmas, I just couldn't resist when I looked at the Linnie Blooms Canvas Bird!


I colored the bird with a white gelato then outlined it with a black ink pen.
I put the bird on a simple white embossed background with some silver snowflake cut outs.
Some Pink by Design sentiments and some 
new Ribbon Candy Red 3 Girl JAM Crinkle Ribbon put the final touches on my first Christmas card of the season.