Hey, Hey friends!!!! Happy Friday It's me Scrappin Madge!!! Whoop Whoop! Is there any better way to start off the weekend than by playing with some yummy Linnie Bloom products???
A few weeks ago I shared with you the cover and the first two pages of my journal. To check out that blog post click {HERE}. In that blog post I said that I would continue to share my art journal as I went. Today I have 1 more pages, a pocket and a tag to share with you!
I used gellatos like watercolors. Then I used some molding paste and paint. I then used Heidi Swapp mist sprays. (Allowing each layer to dry before adding another) I then took the canvas shapes and sprayed them with several different colors of spritz. After they were dry I attached them to my canvas journal using fabric fusion {HERE}. When they were good and dry I took my Faber Castle black marker and drew doors and windows and chimneys on the houses. Then I took some Gold Leaf Rub n Buff to the journal. Next I stamped the sentiment Good Times Together. I just love how this page turned out!
Butterfly pocket:
I started off by spraying the canvas with some Lindy's Stamp Gang flat spritz sprays. I allowed it to dry. I then took the butterfly stencil from Linnie Blooms {HERE} and used some embossing paste {HERE} I then took some silver embossing powder and made this great butterfly. I also stamped the word believe on the same pocket as the butterfly. I misted some fun glitter mist to make it sparkle!!!
Dream Tag:
I stamped the image of the girl first, then stamped the dream sentiment, next I stamped the heart. I used my heat gun to make sure that the black ink was set before I started to use my spritz ink on the canvas. I used the Heidi Swapp Gold shimmer mist {HERE}to give it some sparkle. The Stamp set is a CTMH stamp set.
Be sure to stay tuned, for two more pages of this journal. My next post day is next Friday!
Also be sure to get all of your Linnie Bloom Products Today!!!
Showing posts with label Butterfly Stencil & Mask. Show all posts
Friday, June 13, 2014
Wednesday, June 11, 2014
Canvas pin
Hello Everyone, Kim here today with another fun and simple project using the canvas butterfly. I made it into a pin. You can wear it on a jacket, scarf, or attach it to a pillow, or even a curtain.
Let me tell you a little bit about how, I made this. First, I took the canvas butterfly and gessoed the front and then the back. This makes it stiff. Once it was dry, I used spray inks, stencil and some glitter glue. The center piece is a collaged mini-domino piece. Attached that to the canvas butterfly with some E6000. Made some antennas out of wire and used E6000 to attach them to the back of the canvas butterfly. Then I took some felt (I only had blue) and used my butterflies stencil/mask and trace a butterfly on the felt. Cut it out. Since, I can't sew to I used fabric glue attach the felt to the backside of the canvas butterfly. Leaving open one wing so you can add poly stuffing to it. Once you have it all filled with the poly stuffing then put the fabric glue on open area to close it. Then with E6000 I add a pin closure. Let dry and you have a super duper cute pin.
Hope you have enjoyed my project today!
Hugs,
Kim H
Thursday, June 5, 2014
Linnie Blooms stencils and beautiful Butterflies
Hi everyone, Bev here today. I am sharing some fun ways
to use the Linnie Blooms Stencil/Masks to create with.
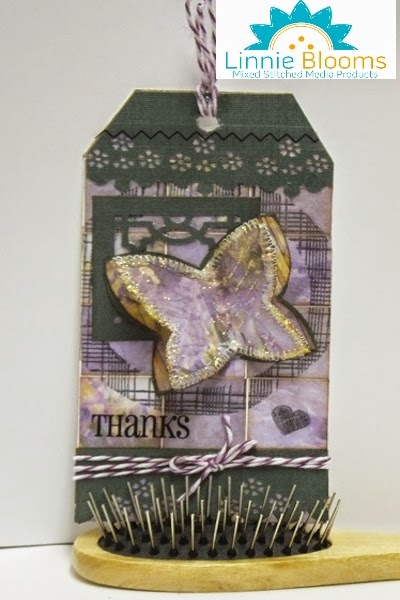
I thought I'd share a variety of ways to alter the butterfly stencil and use it on your projects.
I choose to make tags but they would be great on many different projects too.
1. I punched the wings of the butterfly with Kreaxions #903
2. applied gesso through a mask and then ink stamped it
3. I embossed it and inked the raised parts to pop it.
4. NO PHOTO.. but I zigzag stitched all around the outside edge.
Using #1 and #2 together I topped the gesso stamped with the punched butterfly.
The base one is glued flat but the top one is attached only through the centre and is also offset.
The card base is Paper House Impressions, the stitching and sentiment is SRM stickers and I added some Creative Embellishments squares that fell out of a punched accent and the twine flight path for the butterfly is perfect. Then the last added twine through the punched hole.
Supply List:
Paper: Paper House impressions mini paper pad
Cardstock: misc
Punch: Kreaxions #903
Ink: Memento
Accent: Creative Embellishment
Stencil/Mask: Linnie Blooms butterfly
Stamp: misc
Mask: Prima using Gesso
Sentiment and Stitches: SRM Stickers
Other: twine, tag base
Using #3 and #4 I topped the stitched one on top of the embossed inked butterfly... only these are directly on top of each other. I added the outer edges with stickles and through the centre.
On this tag I Kreaxions #903 punched the bottom and top border. I ink stamped the circle behind the butterfly and the stitching and sentiment is SRM stickers. Twine is also applied to this tag.
Supply List:
Paper: Paper House impressions mini paper pad
Cardstock: misc
Punch: Kreaxions #903, Martha Stewart
Ink: Memento
Accent: Creative Embellishment
Stencil/Mask: Linnie Blooms butterfly
Stamp: Martha Stewart
Ink: Memento
Sentiment and Stitches: SRM Stickers
Other: twine, tag base
Thanks for stopping by today.. be sure to check daily as the rest of the DT shares more creative projects using Linnie Blooms products.
Friday, May 23, 2014
Feel Better Soon Friend
Hi Friends! Abby here with ScrappinAbby and I'm happy to be back with another DT project to share with all of you : )
This time I wanted to play with the Stencils & Masks from Linnie Blooms and I created a card for a good friend of mine who is recovering from surgery....
For this card I used the following stencils & masks....
I also have a video that shows you the card up close along with a tutorial on how I used the stencils & masks for my card....
To start I selected the papers & sprays I wanted to use with the stencils & masks....
The next few photos show you how I used the stencil & mask for the different elements I added to the card....
For the larger flower, I spritzed it with some water, crumpled it up and used my heat tool...
I wanted to add a distressed feel to the butterflies and leaves I made from the card stock and a scrap piece of fabric...
Once all of my pieces were dry and distressed, I just started layering them on the card....
I layered the butterfly stencils that I made on two different types of paper so it would have a layered look. Love how that turned out : )
I love all the layers and textures on this card. Using the stencils & masks with your paper really creates some great dimension I think. It's fun to create your own embellishments for your projects and using the Linnie Bloom stencils makes it easy to do that.
Thanks for stopping by the Linnie Blooms blog today and for checking out another ScrappinAbby project.
Be sure to stop by my BLOG for additional photos and a full product list.
Happy Crafting!!
This time I wanted to play with the Stencils & Masks from Linnie Blooms and I created a card for a good friend of mine who is recovering from surgery....
For this card I used the following stencils & masks....
I also have a video that shows you the card up close along with a tutorial on how I used the stencils & masks for my card....
The next few photos show you how I used the stencil & mask for the different elements I added to the card....
For the larger flower, I spritzed it with some water, crumpled it up and used my heat tool...
I wanted to add a distressed feel to the butterflies and leaves I made from the card stock and a scrap piece of fabric...
Once all of my pieces were dry and distressed, I just started layering them on the card....
I layered the butterfly stencils that I made on two different types of paper so it would have a layered look. Love how that turned out : )
I love all the layers and textures on this card. Using the stencils & masks with your paper really creates some great dimension I think. It's fun to create your own embellishments for your projects and using the Linnie Bloom stencils makes it easy to do that.
Thanks for stopping by the Linnie Blooms blog today and for checking out another ScrappinAbby project.
Be sure to stop by my BLOG for additional photos and a full product list.
Happy Crafting!!
Subscribe to:
Posts (Atom)