Wednesday, August 12, 2015

Sympathy Cards

For the most difficult times, a handmade card sends much needed comfort.

Directions:
1. Begin to make the background by holding the feather mask firmly in place while gently sponging ink around the edge. Carefully remove the mask, reposition it, and continue sponging. Continue to add more feathers making sure to vary the direction & size of the feather. Also, be sure to place some feathers going off the edge of the paper.

2. Next, make the focal point feather by using the stencil and a darker color ink. Place the stencil down and while holding firmly, sponge the center. To add a bit of shading, use a darker shade of ink around the edge of the stencil and blend it by drawing the sponge towards the center of the feather.

3. Next, add a border strip of embossed feathers. Use a glitter gel pen to add a subtle sparkle to highlight parts of the embossed image. Then add a sentiment of condolence.

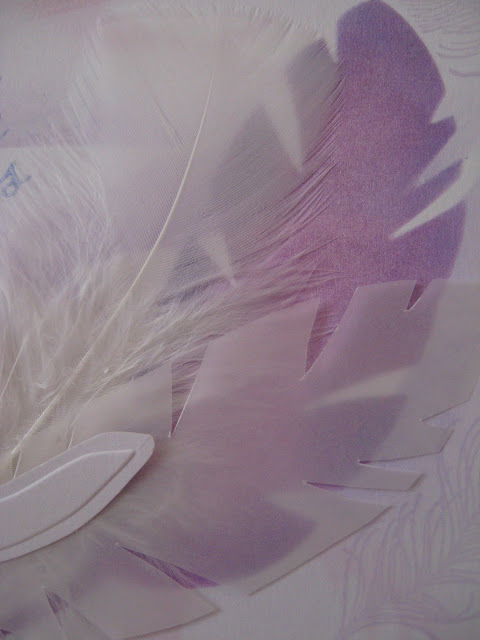
4. Finally, stamp a delicate flourish pattern over the canvas feather and add a hint of color by sponging ink along the edge. Lastly, use the stencil to cut a paper feather and embellish the card by forming a cluster using a combination of a real feather, vellum feather, or paper feather.

A Closer Look:


Linnie Blooms Supplies: feather stencil and mask, canvas feather
Other Supplies: pigment ink (Brilliance -Pearlescent Lavender, Purple, Sky Blue, Platinum Planet) (VersaColor - Polar Blue) (Studio G -lilac, rose, acua), condolences sentiment rubber stamp (PSX F-2562), Flourish Background cling stamp (Hero Arts), feather stamp, feather embossing folder (Darice), vellum, sponge applicator, feather, Stardust Glitter Gel Pen (Sakura)
Linnie Blooms
Visit Karen at Art & Soul

Tuesday, August 11, 2015

Christmas in July Contest Winners Announced

Thank you to all that joined in on the fun of our Christmas in July contest!  There were many great ideas!  Unfortunately, we could only pick a few for this year.  Those that participated will be given a gift card for $10 to spend in our shop AND a free package of their suggested winners.

So, the Christmas canvas die cuts that will be coming out are:

Holly Leaves

Poinsettas

Sleigh

Candy Cane

Ornament Set


These die cuts will become available mid-October.  Just in time for you to get those holiday cards made!

Monday, August 10, 2015

Another Sunny Day

Hi All! Greeting from California. It's another Sunny Day.

I started this project with a 6 x 6 stretched canvas I gesso the canvas and started painting green at the bottom and turquoise at the top  (the green paint is from Prima and the turquoise is from Art Anthology). I used the Canvas Fence and the Canvas Tree.  I gesso the fence and the tree,I painted the tree green with magenta blooms, I gesso over it again and painted it a second green with baby pink blooms. The fence was gesso and painted in baby pink with a hint of green (grass goes through fences).    


I added flowers to the fence(prima) and even some initials inside a heart. I added some croscill flowers(paper from DCWV) and mod podge them on to the canvas (middle and bottom low left)


I added a little blank scrabble piece and some rope twine to make a tree swing. (Memories)...


Thank You for letting me play. 

TRISH


Friday, August 7, 2015

FALL Garden Flag

Hi everyone...Dawn here. I have to admit...here in AZ I think a lot of us look forward to Fall to escape the blazing heat...especially those in Phoenix I'm sure. I live in Northern AZ and we are about 10 degrees cooler.  I was just driving near Williams AZ and there are literally thousands of wild daisies blooming everywhere not to mention all the crows.  I took a hint from nature and created this Fall garden flag with sunflowers. 


I started off with a Linnie Blooms Garden flag. I used ink and a blending tool to make the pumpkins. You can use paint too but I wanted the canvas to remain flat without having to stop and iron it. 
                    I used a Sharpie marker to draw the lines and dot the pumpkins.
 I used the Linnie Blooms sunflowers...inked them orange and the sprayed them...along with the pumpkins...with Tattered Angels coral reef color. I LOVE how it added so much to them. The added some lines and dots with the Sharpie and a black button.
 I Stickled EVERYTHING...I love Stickles to add sparkle. I used the Diamond Stickles.  I used some floral wire to make the little squiggle things pumpkins have. And Linnie Blooms green ribbon added a little greenery along with Linnie Blooms leaves.
Oh I love my little sweet black crow...he turned out cute and sparkly. I used Linnie Blooms bird and a small leaf for his wing. 
 Close up of my blingy sunflowers.  For the FALL letters I stamped on some extra canvas I had and then cut out the letters...glued them on and added more bling. 

I also used some Lindy's spray in Tibetan Poppy Teal to the background blue...It activated the distress ink and gave it a watercolor look. 

My husband added the stick into the "pocket" and the wire to hang it.  I added an extra stick and the peach color Linnie Blooms ribbon.

Have a great day...and think FALL! 

God Bless,

~Dawn

Wednesday, August 5, 2015

Flower Jar Decor

Plain glass jars with lids have SO much potential for decorating!  Whether you fill them with spices, sweet treats or even baking mixes, you can create that warm home look to your kitchen.  Or, make several and give them as gifts or sell them for fundraisers!

Let Linnie Blooms Canvas shapes add just the right mix of texture, color and flamboyance to even the simplest of jars.  Let the decorating begin....


You will need:

Linnie Blooms: Canvas Shapes: Sunflower (1), Petal Shapes (1 large, 1 small), Leaves (2)
                          Shabby Trim (green)


Darice: Glass Jar with Lid

Kreinik Iron-On Ribbon (1/8" ribbon) 3M Green 6356

Impression Obsession Rubber Stamps: Lord's Prayer D7778

Clearsnap: Colorbox Archival Dye ink pad (Wicked Black)
                  Stephanie Barnard Sprays (Artichoke, Banana, Tangerine, Guava)

Beacon Adhesives: Gem-Tac Permanent Adhesive, Fabri-Tac Permanent Adhesive

Westcott: Titanium Scissors

Misc: Buttons, spray bottle with water, empty baby wipe container (or other plastic container with lid), paper towels, iron, Teflon coated ironing mat

Instructions:


Place paper towel inside container.  Place all three flowers on towel and spray with Banana. Blot and remove sunflower. Spray Tangerine on remaining flowers. Spray Guava on small flower. Blot and remove. Replace wet towel with clean towel. Place leaves on towel and spray very sparingly with Artichoke; spray with water; blot. Repeat,steps, if desired, on wrong side, replacing towels as needed.


Blot and place all pieces flat on clean paper towel. Place clean paper towel on top. Iron on low dry setting until dry.


Place stamp rubber side up; apply Wicked Black.


Stamp phrase on flowers and leaves; dry.


Cut petals, as shown. Attach canvas layers with Fabri-Tac. Glue button layers with Gem-Tac. Set aside to dry.


Iron the Iron-On ribbon across the center of the Shabby Trim, using the Teflon coated mat and an iron on a low, dry setting, as shown.


Wrap ribbon around the jar; trim and glue in place with Gem-Tac, as shown. Place jar on its side and glue on buttons in center of ribbon trim; dry completely.


Glue flower onto jar lid with Gem-Tac; dry completely


(Note: Pre-spray the canvas shapes with water for a lighter, less intense color. Let dry and then overspray to create a more speckled look. Experiment...try different looks...get messy and have fun!)


Monday, August 3, 2015

Art Journaling

Hello, it's Ann from the Design Team here at Linnie Blooms and from the blog at http://annmakes.blogspot.com.  Today I am showing you a couple of pages I have played with in my Linnie Blooms Journal.


I used some bright colours that make me happy and feel like summer:


I covered the first page with a coat of white Gesso, let that dry and then had fun with some spritzes of colour.  I sprayed on some colour ,added a few sprays of water and let it drip!   I just played with that technique until i was happy with the result.  I let the paints dry and then used a stencil with some black craft paint for the silhouette.   I stamped the quote onto a scrap of vellum and adhered it to the page with some sealer.


The second page was actually done first and I left the canvas unprimed.  I dabbed some fluid acrylics through a stencil for the background.  Then I played with a damp brush through the remaining paint on the stencil.  When the paint was dry I used a rubber stamp with some black ink and stamped the cat.  I went over the cat image with a black pen to cover any spots that were too light.  The eyes were coloured with a metallic green marker.  The quote is a clear sticker that I had in my stash for the longest time.  I used some extra sealer to make sure it would stay stuck to the page.


I hope that you are inspired to play along in a journal too.

Thanks for stopping by.
Please come over to my Blog at: http://annmakes.blogspot.com and my YouTube channel to see the other projects I am working on.

Supplies:
Linnie Blooms Mini Mixed-Stitched Book
Page 1:
DecoArt® Media™Misters in: Primary Magenta, Primary Cyan, and Primary Yellow
DecoArt® Crafter's Acrylic ™Paint  in Black
DecoArt® Stencil Andy Skinnner 6"x6" "Vogue"
Stamper's Anonymous Tim Holtz stamp "City-Central"
Page2:
DecoArt® Media Fluid Acrylics™in:  Cobalt Teal Hue, Quinacridone Magenta, Hansa Yellow Light
Stamp (my stash)
Ranger's Archival Black Ink(used ion both pages)
Faber Castell Black Pitt Pen
DecoArt®Americana stencil 6"x8" "Daisy Chain
Quote Sticker (my stash)
Respect Green Metallic pen
Decoupage by DecoArt® glue-Sealer-finish (used on both pages)

Friday, July 31, 2015

Garden Flag with Cloud Imagination

Hi Trish here and The Linnie Blooms Garden Flag too!

Today, I wanted to play and create something I did from my childhood and that was lay in the grass and watch the clouds roll bye creating beautiful different shapes. I always wanted a ladder to take me to the clouds so, I could play. My friends and I would scream out when we saw a shape we knew it was fun to use our imagination. Do kids still do that?  Any Hoo!  I still go out in the backyard and look up into those clouds to see what I can find (every once in a while I let out a scream-when I know what it is).

 
I had so much fun playing with the Linnie Bloom Canvas Garden Flag, So
 much space to cover, I just want to keep going and going. Today, I used Paint from Art Anthology, Texture from Ranger, Whipped Spackle from Faber Castell, Stencils from Stencil Girl and the Linnie Blooms Canvas Butterflies(I think the hanger is from 7Gypsies)


I LOVE the Linnie Blooms Canvas Butterflies, you receive 4 in a pack. They are very durable especial when you are pulling and bending and painting and they are not falling apart.
 
It was fun to let loose today, I feel extra happy, I have 22 hidden items in my clouds can you find them? 


Keep letting your imagination play
 
Happy Day
 
Trish    


http://linnieblooms.blogspot.com/2015/07/Garden-Flag-with-Cloud-imagination