Wednesday, September 16, 2015

"You are My Happy" by Rochelle

Hello Crafters!

It’s Rochelle here today and it’s my turn to share with you my project that I created using Linnie Blooms product! :) 

Today I am sharing a burlap panel I altered and decorated with Linnie Blooms Canvas Petal Flowers.

Here it is: 

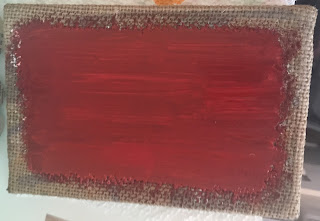
I started with this 5x7 burlap panel that already had a vintage image on it (sorry, I forgot to take a “before” photo).  I added a layer of Gesso and the color red to cover the image:


Here’s the Linnie Blooms product I used for the flower: 

I colored each canvas piece (and stamped the circle) and set aside to dry. I cut a small piece of the mesh (my fav!!!) for layering.  While I waited, I cut the vinyl quote from my Cameo and transfered it to the panel. 

 When the flowers dried I layered them and added a button, twine and a couple of stick pins
And there you go!  

A very fun, quick and gorgeous burlap panel with Linnie Blooms Canvas pieces!

Thanks for stopping by!

~ Rochelle

Monday, September 14, 2015

Linnie's Laundry

Hello,   it's Ann from the Design Team blog here at Linnie Blooms with a fun and easy painting project.  Here is my small cloth bag that is just the right size for someone to use to carry the essentials (such as coins, some detergent, and maybe a few dryer sheets) on their trip to the laundromat.  I was thinking of the college students away from home who must still have clean clothes!


I used one of the "NEW" Linnie Blooms Patterns called "Laundry Day" (Available here) by downloading , scaling the image down by 60%, printing onto paper and tracing it with some carbon paper onto the cloth bag.  The bag is actually from Linnie Blooms and once held Canvas Shapes (Like these).


First I printed the image onto plain copy paper.  I inserted a piece of cardboard into the cloth bag.  I placed a sheet of carbon paper over the cloth bag, and laid the print over that.  I then traced the image with a pen.


Tho colour the image I used a piece of plastic packaging left over from some products as a palette. I used the Gelatos as a pigment which I coloured onto the palette and turned them into water colour paints by adding some water.  I then used a small paint brush and painted the images.

The supplies used:
Faber Castell Gelatos (Banana, Blueberry, Red Cherry, and Brown)
Linnie Blooms Cloth Bag
Linnie Blooms Pattern "Laundry Day"

Please come check out the other projects I make over at my blog here: http://annmakes.blogspot.com.
Thank you for stopping by.

Friday, September 11, 2015

Sunset in the Woods ATC by Gail Green


Use Linnie Blooms pre-sewn canvas ATC blanks to make individual ATCs or several for group challenges!


ATC cards are miniature masterpieces...but they don't have to take a ton of tine and talent!  You just need the right materials and techniques to create ATC projects that will impress even the most experienced crafter.   The secret weapon...Linnie Blooms pre-sewn canvas ATC blanks!

Let's begin....


Materials:


Linnie Blooms Sewed Canvas ATC Blank

Clearsnap: Colorbox® Archival® Dye Inkpad (Wicked Black)

Impression Obsession Rubber Stamps: F7787 Pine Trees

Beacon Adhesives: Gem-Tac® Permanent Adhesive

Acrylic Paint Glaze or Acrylic Paint with medium added
(Note: I used Plaid Decorator Glazes: Paprika, Sunflower, Aqua, New Leaf, Linen White)

Miscellaneous:  Printed text scrap (from old book, newspaper or other uncoated paper source)
                          Paint brush
                          Heat tool or hair dryer


Instructions:


1.  Prime the canvas with 2 coats of Linen White. Dry completely.


2. Squeeze a pea size each of Paprika and Sunflower.


    Spread each color with a wet paintbrush.


    Blend colors where they meet. Dry completely.


3.  Hand tear strips from the printed text scraps. Dab Aqua and New Leaf on the strips. Dry.  Attach to the ATC with Gem-Tac® Permanent Adhesive.


4.  Stamp Pine Trees onto ATC.  Dab ink around the edges.  Dry completely.


Try making a whole series of ATC cards using  a variety of stamp images and color combinations.  And...check out the entire range of Linnie Blooms products!


Wednesday, September 9, 2015

Stitched Country AND an Announcement

Happy Hump Day!  Linda here, excited to show you what I've been working on!

This is a mixed stitch project I created on the Linnie Blooms Canvas Garden Flag.  Such a great way to do something a little different.  

I started with a Linnie Blooms Pattern -- YES, we now have patterns!  More about that shortly.  
So, I traced the pattern onto the canvas and started with hand stitching.  I stitched the barn, flowers and fence.  
Next, I used Faber-Castell Gelatos mixed with water to color the canvas.  So Much Fun!

The sentiment was stamped on with brown archival ink.  Then I stitched through the center of the lettering to help it stand out.  I ended by sewing some burlap/lace to the top and bottom.  

What do you think?  

Okay.  Now let me quickly tell you about the "announcement".  

I have designed some downloadable patterns for Stitching, Painting and Coloring.  They are for sale on the Linnie Blooms site starting today.  I hope you will check them out!

Creatively yours,

Linda


Tuesday, September 8, 2015

Forever & Always

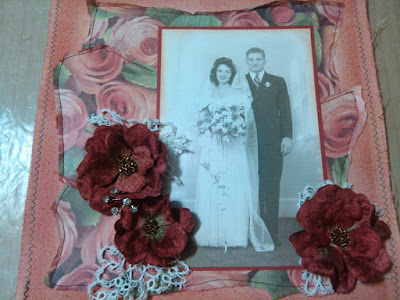
Hi everyone....this is a special post from me to my Mom and Dad.  I found this picture of them on their wedding day August 30, 1946 and decided to make this for my mom. My dad passed away in 1988...they would have been married 69 years now. He is waiting for her in Heaven. :)

I had to find a large canvas for the picture so I used the Linnie Blooms 12x12 canvas...love these...such a nice quality.


 I started out with the Linnie Blooms 12x12 canvas and used 3 different inks to get the color I wanted for my paper. I love how the ink works on canvas. 
 I used a piece of paper with roses on it to go with my mom's bouquet. I tore it up and sewed it to the canvas. I LOVE that I can sew on it! 
         I added the photo, some flowers with beads in the center, some vintage tatting,
                            leaves and 5 little crystals on wire to represent the 5 us kids. :)
I added the lace to the top of the canvas and diamond Stickles to my moms bouquet and around the project.  The photo is a copy that I found...it is much better in person...just couldn't capture well.
 And there you go...:)  I love it! I'm going to add a ribbon to hang it.  I think my mom will love it too. 

Thank you and please visit the Linnie Blooms website for lots of nice products including the 12x12 canvas used in this project.

And please check out my Facebook page Morning Star Crafts and Collectibles and join us for more projects and fun.
 https://www.facebook.com/pages/Morning-Star-Crafts-and-Collectibles-LLC/248624745207213?ref=hl

~Dawn

Friday, September 4, 2015

Gift LB Card

Hi everyone!!

I hope your week is going very well! Noe here to give you a little inspiration using LB products!

Today I come to show you a card in which, in addition to write a nice message, we can hide a small gift for that special person.


Step by Step:


1.- Paint a mini file folder with red mini gelato. 
2.- Sprayed with water and a brush unifies color.  
3.- Use paste emboss or medium sparkle with your stencils to add texture and shine.


 4. Add fine glitter to embossing paste and covered with this paste the other side of your mini file  folder.
 5. Create a rectangular structure with hard cardboard and paste it at  mini file folder with hot glue.


6.- Paste Shabby trim on the side of the mini file folder that will be attached to the cardboard to do after the loop.
7.- On a piece of white watercolor cardstock sprayed Silver  Distress Spray Stain and create your background using your favourite stamps.


8.- Finally, create a tag using canvas flower petal, painted with green Gelato, and stamped on it your sentiment or message!

Now you just have to paste this structure at the base of your card !! You got it!!!

Any idea to give your gifts:
 Products used:

Hop on over to the Linnie Blooms website to check out all of these great products AND like Linnie Blooms on Facebook for more inspiration! 
Thanks for your visit!! 
Have a great day!!

Wednesday, September 2, 2015

Linnie bloom 5x5 canvas

Hi
Schools reopened today. Finally I will be back on my regular schedule of crafting and scrapping.
Today I am sharing my work on linnieiblooms - 5x5canvas.I really love this size, can be used in various ways.
I mounted mine on corrugated board and framed it.
process

I started by applying Faber Castel texture paste and then combing the paste with the Faber castel texture comb.
Next by using faber Castel stencil,and paste added more texture.
applied Faber castel gelatos on the texture and then sprayed some water to spread the colors on the canvas.
Tied blue and yellow thread for added texture and then cut a piece of wire mesh and added on the canvas.
I stamped a cardstock with Stampendous butterfly , embossed the butterfly with golden powder.
Next I colored the creative embellishment Key to black, added some beads and pasted it on the butterfly
Finally Splashed some black and brown paint on the corrugated board around the canvas.

Hope you will like it. Thanks for visiting.