Showing posts with label linnie blooms 5x5 blank. Show all posts

Monday, July 20, 2015

Sponged Nature Hanging


I LOVE inky techniques!  And...I especially love to try inky techniques with Linnie Blooms' awesome pre-sewn canvas products!

I was inspired by all the GREEN and SKY and foliage around my neighborhood and decided to create this cheerful little wall hanging, using the items below:


I just LOVE Linnie Blooms picket fence, tree, 5" x 5" blank square, heart, miniature clothespins and Shabby Trim!

...and that little yellow button added just the special touch of sunshine to the project!

In addition to these items, I also used these additional supplies:

Clearsnap, Inc: Archival Dye inkpads (Wicked Black, Mudslide, Glacier Lake, Moody Blue, Tree Frog, Grasshopper, Pinetree, Squash, Pumpkin Pie, Fireberry)
Clearsnap, Inc:  Color Blenders
Beacon Adhesives: Fabri-tac Permenent Adhesive
Needle and thread
Scrap paper
Scissors

INSTRUCTIONS:

Begin with the background.  Draw a scalloped edge on the scrap paper and cut out. to create a cloud stencil.  Place the stencil just below the top edge and gently sponge both blue inks along the edge.


Move the stencil down and angle slightly.  Sponge ink again along the edge.


Continue until the entire square is covered in clouds.  Aren't they adorable?! This one of my favorite inky techniques...and now you know how easy it is to do!


Next we will do the pieces. Using a technique called "direct-to-paper" (DTP), add  Squash and Pumpkin Pie to the fence.


Cut out  a small section in a paper scrap as shown below. This creates a "mask", which only exposes the area in which we want to add ink.  The remaining areas remain covered.


Place over the fence and dab Mudslide along the edge. Move the paper as needed and continue for each fence post.


It should look like this when you are done. Pretty cool, eh?!


Tree and heart are next.  Now that you are so skilled using a simple paper mask, sponge the tree trunk in Mudslide and then move the paper around and sponge the three greens on the leafy parts.


Simply add Fireberry to the heart using the DTP technique.  (Look how many cool inky techniques you are learning!!)

When dry, sew  the cute yellow button onto the heart.


And now to the cool assembly.  I wanted to add a 3-D vibe to the hanging so I folded and pinched the tree and fence before gluing....just like this!


One more step... Use DTP along the edge of the Shabby Trim to add a little Pinetree grunge.


Now glue all the pieces onto the cloud background....clip the trim onto the hanging when dry!  


Tuesday, March 17, 2015

5x5 Canvas Blank Mini Album


Hi everyone!!

 I´m Noe and I so excited to share with you my first project from Linnie Blooms Blog.

(Hola a todos!! Soy Noe y estoy entusiasmada por compartir mi primer proyecto para el blog de Linnie Blooms).

When I saw Linnie Blooms products first thing that caught my attention  was  5x5 Canvas Blank… perfect for the front and back of a mini album!!! I love mini albums!

(Cuando ví los distintos productos de Linnie Blooms el primero que llamó mi atención fue el Canvas de 5x5, perfectos para la portada y contraportada de un Mini Album! Me encantan los Minis!! Inmediatamente me puse manos a la obra y este es el resultado).

Immediately, I got down to work!! And this is the result:


To make it I used next Linnie Blooms products:
Other products used:
  •   Lora Bailora stamps (also in english).
  • Acetate sheet. 
  •  Cork sheet.
  • Acrilic paint
  • Dylussion Inks
  • Imagination Crafts Sparkle Medium
To make the cover of mini álbum, play with your acrilics paints and dylussions inks… So simple!! Enjoy!! Also used dimensional paste to give relief (in my case, I used Sparkle Medium). If you like the result, let it dry.

(Para hacer la portada del mini juega con tus pinturas acrílicas y tus tintas Dylussions, es así de simple, solo jugar y divertirnos con ellas!! Usaremos además algún tipo de pasta dimensional para darle algo de relieve a la portada, en mi caso, sparkle medium. Cuando nos guste el resultado lo dejamos secar. Mientras haremos la flor de la portada).

Now, let´s make the flower!!

Using Linnie Blooms Bloom Stencil draw contour  on a piece of cloth… Also, draws a spiral in the center and trim it. Now, starting from the center, began to roll the fabric, for this, use a piece of cardboard to paste it. Finally, stick in the center of the flower  a button , bead or gem.

(Usando el stencil de Flor de Linnie Blooms dibujamos el contorno sobre un trozo de tela y dentro de éste una espiral y recortamos. Ahora, empezando desde el centro, comenzamos a enrollar, ayudándonos para ello de una trozo de cartulina sobre el que la pegaremos. Finalmente pegaremos en el centro un botón, una perla o un brillantito).

Fill the different sheets with your favorite photos and decorate with stamps, washi tape, wooden figures and everything you can think of !!

(Rellenamos el resto de las hojas con nuestras hojas favoritas y decoramos con sellos, washi tape, figuras de madera y todo lo que se nos ocurra).


For the back to the mini album used Stitched Greentings Clear Stamps Set and sew the word you prefer  with the color you want.

(Para la contraportada usé el Set de Sello de Plantilla de Cosido... cosemos la palabra que prefiramos en lo color que más nos guste).

Finally, used Shabby Trim to decorate  rings. Ready… you got it!!

(Finalmente usaremos la cinta Shabby para decorar las anillas... Listo, lo tenemos!!).

I hope you all enjoy it. Thanks so much!
Hop on over to the Linnie Blooms website to check out all of these great products AND like Linnie Blooms on Facebook for more inspiration! 

(Visita la página de Linnie Blooms para ver todos los productos que hay y dale a Me gusta en la página de Facebook para ver más post).


Friday, March 6, 2015

SUNFLOWER GIFT BAG TAG

Hello Everyone!  I'm Beth Watson and I am so excited to be here on the Linnie Blooms blog sharing my first Design Team project. 

I met Linda this past January at the Craft and Hobby Association trade show where she was showcasing her line of pre-cut canvas shapes, stamps, masks and stencils and WOW was I blown away!  Such a great idea for mixed media and all of the work is done for you - GENIUS!  And what a great name for her company - Linnie Blooms!

I LOVE sunflowers, so I was immediately drawn to the sunflower mask and stencil.  When working in mixed media the concept of masks AND stencils is so very important, but a lot of companies don't get that!

Now, on to my project!


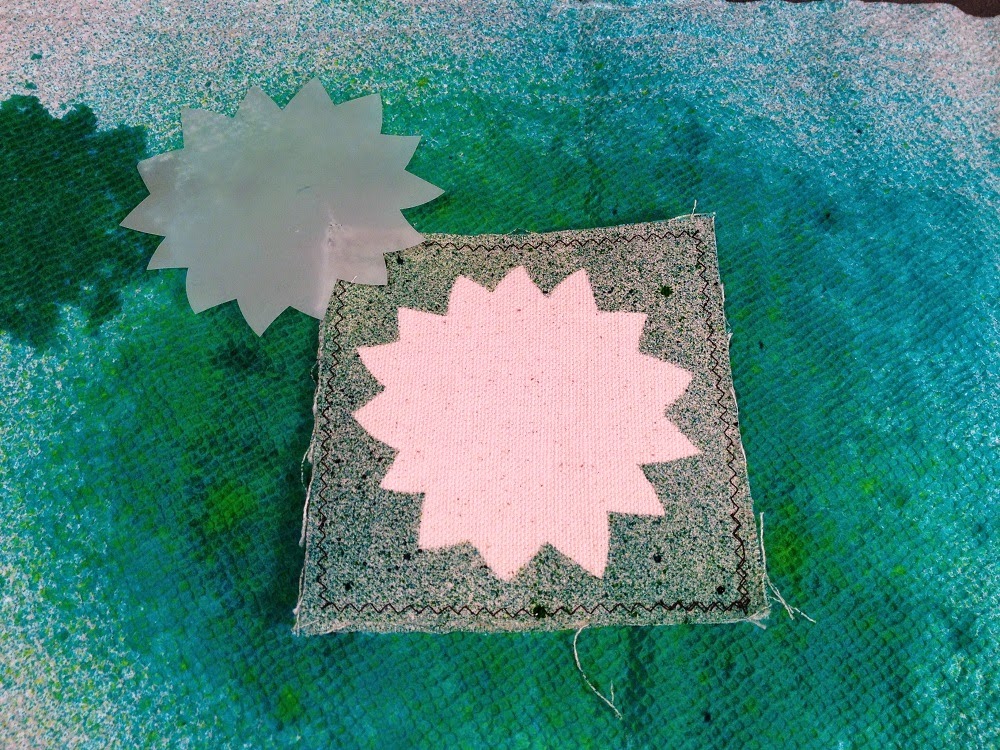
Start with the 5" by 5" Canvas Blank, the Bloom Stencil & Mask and some turquoise spray mist.  Place the mask down, spray then set aside to dry.


 Next, use the stencil and spray with yellow mist, set aside to dry.
TIP:  Use an old copy paper box lid lined with paper towels to spray with mists.  The box lid contains the spray and the paper towels absorb the extra mist which can be used for other mixed media projects, so nothing goes to waste!


Cut leaves from the Canvas Butterflies, then spray with lime green and grass green spray mists.  Make a few lighter and a few darker for contrast, then set aside to dry.

TIP:  The smaller canvas pieces will tend to curl when wet with mists, so once dry, iron them to straighten out.

Once dry and ironed, accent leaves by outlining with Tombow Dual Brush Pen in black (N15). 


Attach assorted black buttons to center of sunflower with Tombow MONO Aqua Multi Glue, let dry.  Accent flower petals and zig zag around edge with Tombow Dual Brush Pen in black (N15).


Decorate bag with Stitched Greetings Clear Stamp Set and black archival ink in a random pattern.  Accent with leaves created by coloring in the Bloom Stencil & Mask with Tombow Dual Brush Pens bright green (173), then outline in black (N15).


Mix leaves with loops of Shabby Trim in green and attach to sides of Canvas Blank with Tombow MONO Aqua Multi Glue, let dry.  Attach gift tag to top of bag with Mini Clothes Pins. 


Fill with a wonderful gift and give, give give!

Hop on over to the Linnie Blooms website to check out all of these great products AND like Linnie Blooms on Facebook for more inspiration!

Thanks for stopping by!  -Beth


Friday, February 27, 2015

Greet Visitors with a Cheerful Canvas Hanging!

By Gail Green


Instructions:

BASE: Using black ink, stamp “HOME” on the lower right-hand corner of Canvas Blank. Using Art Dauber, stencil 3 leaves in Pinetree, as shown.  Put stamped Canvas Blank into Color Catcher (or other box). Place Butterfly Stencil in upper right-hand corner and spray with Artichoke; dry completely and iron flat, if desired.

           SHABBY TRIM: Cut a 10” length of Shabby Trim. Using Bloom Stencil, dab leaves onto trim with both green inks; dry.

      WOOD CLOTHESPINS: Spray Artichoke onto 2 clothespins. Wipe off excess; dry completely.
      
      CANVAS BLOOMS: Lightly press one large and one small canvas Bloom into Squash and Pumpkin Pie ink pads. Place into the spray box; lightly spray Bubblegum, Strawberry, Tangerine and Guava on both canvas pieces; dry completely. Dab Mudslide around edges.

     
TO FINISH: Glue Blooms onto Blank with Fabri-Tac, pressing until glue grabs. Using Gem-Tac, add button and pearl embellishments, as shown; dry. Position stamped Shabby Trim and secure in corners with sprayed clothespins.

Your wall hanging is now ready to display!

Materials:

Linnie  Blooms
      Canvas Blank
      Canvas Petal Flower
      Stencils/Masks (Flutter, Bloom, Butterfly)
      Shabby Trim (Peach)
      Stitched Greetings Stamp Set
      Mixed Media Products (Wood Clothespins)
  
Clearsnap
      Stephanie Barnard® Sprays (Banana, Tangerine, Bubblegum, Strawberry, Guava, Artichoke)
      Colorbox® Archival Ink (Mudslide, Wicked Black, Pinetree, Tree Frog, Squash, Pumpkin Pie)
      Art Daubers
      Color Catcher™ (or other empty box for spraying)

Beacon Adhesives
      Gem-Tac® Permanent Embellishing Glue
      Fabri-Tac® Permanent Adhesive

Miscellaneous: Button, pearls or other embellishments of your choice

Visit the Linnie Blooms Page on Facebook and our Board on Pinterest!